![]()
![]()
![]()
The success of any bivalve hatchery operation starts with the availability of a good and healthy parent stock. A number of research activities have clearly pointed out that the performance of the juvenile spat, from egg fertilization through to larval development to early spat, is related to the quality of the eggs produced by the parent stock.
Figure 2. Home made hatchery sieves and plunger.
The size and external appearance of the broodstock should be taken into account when they are selected from the natural fisheries grounds prior to their transportation to the hatchery. It is usually a good procedure to select the stock from moderate size individuals that have shown an active growth throughout. Larger specimens produce more eggs, but are often move reluctant to spawn. It is important to select adult specimens with a history of active growth because fast growing parents usually produce fast growing offspring. Deformed or damaged individuals should be avoided because they may be diseased or slow growers. Individuals with holes in the shell indicating the presence of worms or other boring organisms should be avoided to prevent contamination of larval cultures.
The collection site is usually important if the spawning activity in the hatchery is based on the natural gonadal cycle of the bivalves. Mature specimens collected far from the hatchery site will provide organisms that may spawn at different times. This is the case in temperate countries where gametogenesis is closely related to the cyclical weather conditions. However, in sub-tropical and tropical countries bivalve specimens tend to spawn all year round although distinct natural spawning seasons do occur. It is usually preferable to collect specimens from local population provided that they are in good health conditions as described above. It is common practice now to collect broodstock from various sites and transplant them in suitable areas near the site of the hatchery. With regard to the gonad development this can be controlled by conditioning the broodstock, so that mature specimens can be made available throughout the year.
Like other organisms, bivalves have certain requirements for survival. They must take in oxygen and food and discard carbon dioxide and other waste products. During transportation bivalves need not to be kept submerged in water as they can survive relatively long periods out of the water as long as they are kept moist, cool, out of the sun and not disturbed. They are usually best transported in portable coolers with ice provided they are not immersed in the fresh water from the melting ice.
Careful handling and transportation are essential to avoid stressing the specimens.
Selected broodstock can either be maintain in suitable sites located near the hatchery, in suitable size earth ponds filled with seawater, or directly in the hatchery. It is common practice to keep the adult specimens in their natural environment and transfer them into the hatchery for the conditioning period which may vary from site to site, time of the year and species (Fig 3; Plate 3 and 4). If the specimens are held in standing seawater, large water volume and surface area for each specimen should be allowed.
A sufficient number of broodstock are required for a commercial hatchery. Mortality from natural causes and unsuccessful spawning must be taken into account. Usually are adult specimen can release several million eggs for any given spawn, however, it is often the case that not all individuals being treated undergo spawning.
Particularly in temperate countries it may be desirable to begin spawning before the bivalves in nature are mature in order to take advantage of a longer growing season, fewer bacteria or undesirable phytoplankton species in the seawater or for economic reasons. Bivalves may be conditioned to ripeness or retarded from spawning to prolong spawning seasons, however these manipulations work within certain limits, and add to the operation cost of the hatchery. In tropical countries conditioning is recommended as it has been shown that the quality of eggs produced are usually of better quality.
Conditioning of broodstock in both temperate and tropical countries aims mainly at producing good quality gametes. Broodstock conditioning in temperate countries is accomplished by raising the water temperature to 20–24 °C and providing additional food, usually in the form of cultured phytoplankton, and if seawater temperature has a low fluctuation range throughout the year (as in tropical countries), conditioning is activated exclusively by providing additional food. Conditioning can be carried out either by using a flow-through system or a partial-recirculating system.
Figure 3. Oyster broodstock holding facilities. (A) Net cage seed and (B) pearl net. Both structures are used to hold oyster broodstock in their natural environment, either suspended from a floating structure or (A & B) or raised above the sea bottom on a rack system (A).
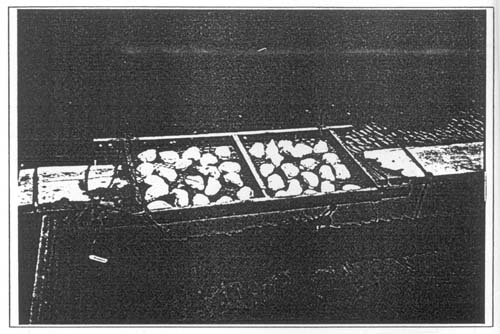
Plate 3. Oyster broodstock holding netcage.
Plate 4. Oyster broodstock holding pearl nets.
The flow-through system is certainly more practical in countries where the running seawater does not require to be heated (Fig. 4). In temperate countries heat exchanges are used to heat the water in the tray. In the recirculation system standing aerated seawater is utilized provided that the specimens are not crowded. Water is usually changed daily and care should be taken to provide water at the same temperature as temperate fluctuation often causes premature spawning.
The importance of supplementary algal feeding of a broodstock has been repeatedly stressed by a number of researchers. Bivalves in good conditions with high levels of lipid and carbohydrate reserves (Shaw et al., 1967; Quayle, 1969; Walne, 1970) show higher fecundity than animals of similar size in poor conditions (Walne, 1964). Walne (1966) described a technique for conditioning the European flat oyster, Ostrea edulis, which included supplementing the natural food in the seawater supply to the breeding stock with cultured unicellular algae. Subsequent work by Helm et al. (1973) and Rogers (1983) showed that Ostrea edulis receiving a food supplement of the unicellular alga Tetraselmis suecica or a mixture of species during laboratory conditioning for spawning produced more broods of larvae than oysters receiving only the natural phytoplankton in the seawater supply. Breber (1981) working on the European carpet shell, Tapes decussatus, and Lovatelli (1985) working on the Manila clam, Tapes semidecussatus clearly demonstrated the advantages of feeding clams undergoing conditioning.
If artificial production of oyster seed is to be carried out, it is essential that mature and good quality gametes are successfully obtained all year round. Conditioning of bivalves for this purpose is a relatively well established procedure (Loosanoff and Davis, 1950).
Before discussing methods to artificially manipulate and induce spawning, the process of gonad maturation is briefly described. The description is based on the biology of Crassostrea species, however it is very similar in all other bivalves.
After spawning, leucocyte invade the gonad and phagocytize the remaining gametes and cells of the follicle wall. When the process is complete, the gonad presents a picture of a disorganized mass. However, this situation rapidly changes.
Figure 4. Bivalve molluscs flow-through conditioning unit. (A) Seawater header tank, (B) broodstock holding troughs, and (C) water drainage unit.
During early gametogenesis, the first follicles begin to form. At this point the gonads appears sexually undifferentiated, and the individual can develop into male or female. It may go through a hermaphroditic phase before becoming one sex or the other. In the bivalves, hermaphroditic gonads are usually non-functional, and usually represent a transition from one sex to another.
As the follicles develop, rudimentary eggs, called primary oogonia, begin to bud off the follicle wall. In the male gonad, these are called primary spermatogonia. It is at this stage and in the secondary oogonial or spermatogonia that meiosis occurs.
In more advanced follicles, mature spermatocytes begin to appear, although spermatogonia are still present and the follicle wall is still relatively thick. In the female the budding process continues and stalked oocytes begin to appear. The stalk attaches the oocyte to the follicle wall (Plate 5). At this time the nucleus becomes distinct and nucleoli begin to appear.
In mature gonads the follicle walls are thin and membrane-like and there are no oogonia or spermatogonia present. In the male, the follicle is full of mature spermatocytes, their tails all pointing towards the centre. In the female, the follicle wall is also thin, and the follicle is full of mature oocytes. There are no stalked oocytes and the nucleolus is clearly visible.
The follicles are connected to the gonophore by a series of ciliated ducts. During spawning, spermatocytes and oocytes are carried to the gonophore by these ciliated ducts and released into the water.
Before maturation, the oyster accumulates glycogen in its connective tissues, principally the mantle, and this is why it appears thick and milky before spawning. After spawning, the mantle may be quite thin and transparent. As maturation proceeds, lipids are stored in the digestive diverticula and metabolism shifts from lipid-based to glycogen-based to allow lipids to accumulate. These stored lipids will be used for gamete formation. This process is grossly indicated by the thinning of the mantle (exhaustion of glycogen reserves).
Before attempting to induce spawning, the ripeness of the broodstock should be determined in order to avoid causing abortion of premature gametes. A simple method is to sacrifice few specimens taken from the spawning stock and examine the gonad content (Fig. 5 A). However, a good indication of maturity is usually the appearance of a full and enlarged gonad. If the gonad is incised and lightly pressed a milky fluid will be obtained. In some bivalves there is a color difference between males and females as in the case of the blood cockle, Anadara granosa and the green mussel Perna viridis, where the female produces an orange fluid. A smear of the fluid obtained should be placed under the microscope and examine for gamete maturity. Another method for obtaining a small sample of the gonad contents is to drill a small hole through the shell of the bivalve in the region above the gonad (Fig. 5 B). The gonad sample is then gathered with the aid of a hypodermic syringe and needle. The animal is then returned to the water, and in most cases it will produce a new shell to seal the hole. This method is usually carried out on bivalve species of a certain value, such as the giant clam (Tridacna spp.), where only few specimens are kept as broodstock. The most common method of induced spawning in bivalves is by temperature shock. This method involve raising and lowering the water temperature repeatedly until spawning occurs. The range of temperature employed varies according to species, however generally spawning occurs by raising and lowering the ambient temperature by several degrees (e.g. 22–26 °C to 28–32 °C).
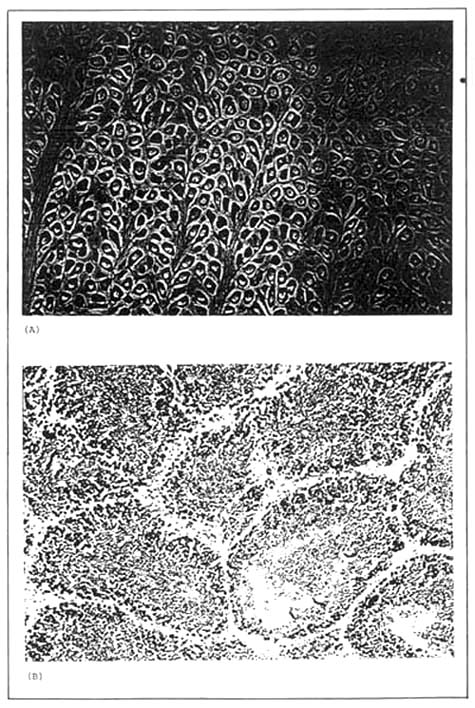
Plate 5. Histological sections of mature gonads of a (A) female and (B) male carpet clam, Tapes semidecussatus. (Source: Lovatelli, 1985).
Two methods can be used to spawn the animals: (1) mass spawning and (2) individual spawning. The first is more useful in obtaining large numbers of eggs, while the latter can be used to selectively breed certain animals.
Mass spawning is usually adopted and preferable in a commercial operation. The mature individuals to be spawned should be brushed clean in cold water and placed in a large spawning tray of running seawater. The temperature is raised to the desired level using a heat exchanger. The bivalves should then be allowed to remain undisturbed in the warm water until about 50% are actively pumping. Water temperature can then be lowered to ambient. The above process should be repeated as many times as necessary in about 30-minutes cycles. The duration of the cycles allows the bivalves to acclimate to the changes in temperature. This will often trigger spawning on the second or third or even more cycles, depending on the state of maturity. If spawning does not occur after a number of cycles of temperature change, a suspension of sperm and/or ova from sacrificed specimens, diluted in filtered seawater, should be added. The presence of eggs or sperm stimulate spawning. These gonadal products will act as a stimulant even after they have been refrigerated or frozen. Male bivalves usually spawn first. Sperm appears milky and individual cells are not visible, while the eggs appear less milky and have a granular texture. If the bivalves do not spawn, they are not ripe and should be thorougly rinsed with fresh water to remove sperm or eggs and placed back in the conditioning troughs or in running seawater. They may be induced to spawn by following the same procedure on a later date.
Once the bivalves starts spawning, individuals are then singly transferred to a 1–2 litre beaker containing filtered seawater at ambient temperature and allowed to complete its spawning in the vessel. If the female is a heavy spawner and the water becomes highly milky it is transferred to another beaker to complete spawning. The males spawn by continuous ejection of white stream and the females by rhythmic ejection of ova at intervals. The spawning broodstock in the glass beakers are carefully observed and each removed as spawning is completed. This is done to prevent the oysters or clams from filtering and damaging the gametes.
To spawn small numbers of bivalves, scrubbed specimens are placed separately in 1-litre beakers. Filtered or cultured water is then added to each beaker. The dishes are then placed in a water bath which is then flooded with hot water from the tap, raising the temperature of the water in the dishes. The bath can be drained when the desired temperature is reached. Be sure that no tap water goes into the dishes. The water should not float the dishes, but should come up only about 1 or 2 inches on their sides. Cold tap water may be flowed onto the bath to cool the bivalve, or temper the hot water.
To make a sperm or ovum suspension, a bivalve should be sacrificed and the gonad cut with a sharp scalpel and the tissue teased apart (Fig. 6 A). The sperm or eggs exuding from the cut tissue can be rinsed into a beaker with filtered seawater (Fig. 6 B). This infusion can then be slowly introduced into the incurrent siphon of actively pumping bivalves, or added to the water in the vicinity of actively pumping specimens undergoing thermal stimulation.
The filtered seawater containing the eggs from each spawning beaker should then be poured through a 100 um stainless or nylon sieve into a larger glass beaker (5–10 litres depending on the amount of gametes being handled).
Figure 5. Collection of gametes for determining the ripeness of bivalve broodstock. (A) The selected specimen is either sacrifized or the (B) hole-method is applied to avoid killing the bivalve. (Source: Castagna and Kraeuter, 1981).
Figure 6. Preparation of a sperm and/or egg suspension. (Source: Castagna and Kraeuter, 1981).
Fertilization of the ova should be carried out within 45 minutes after their liberation, and this is done by adding a sperm suspension obtained from many males as possible. Fertilization is usually effected by mixing 2 ml of the dense sperm suspension to every 1 litre of an even suspension of eggs, and should be carried out within 60–90 minutes of gamete liberation. This procedure has been shown to yield a high % of straight-hinged D-larvae (Helm and Millican, 1977). After 30 minutes a sample of the fertilized eggs should be taken for examination under microscope to ascertain the extent of fertilization. This will be indicated by the presence of the fertilization membrane and formation of the polar body.
After the eggs have been washed into one or more of the larger pre-calibrated containers, the suspension can be brought up to a given volume with filtered seawater. The water-egg mixture is then thoroughly mixed in an up-and-down motion with the aid of a plunger. Stirring the mixture should be avoided as the eggs will be concentrated in the vortex caused by the stirring, and an improper sample and count will result. While mixing with the plunger, a 1 ml sample is drawn quickly with a pipette. An automatic pipette is simpler to used and is relatively foolproof, but also more expensive. The sample should be drawn quickly as the eggs have a tendency to settle out of suspension (Fig. 7). The sample obtained is then placed on a Sedgwick-Rafter counting cell, spreaded over the entire area of the cell, and scanned under a compound microscope with a mechanical stage at a low power of 40–100 magnification (4X or 10X objective and 10X ocular). The number of fertilized eggs/ml is then recorded, multiplied by the dilution factor (if carried out) and multiplied by 1000 to determine the number of eggs per litre.
The total number of eggs must be estimated as described above to decide how much water to put with the eggs in the growing containers. The initial concentration in the growing containers should be about 30–60 eggs per ml.
There is usually no need to change the water until the fertilized eggs reach the straight-hinge stage. It is generally felt that it is better to allow the organisms to pass through the soft-bodied embryo stages without being subjected to possible damage from collection on sieves.
Figure 7. Collection and determination of the number of fertilized eggs by evenly suspending them through the up-and-down motion of the plunger. (Source: Castagna and Kraeuter, 1981).
All containers must be carefully labeled. A piece of ordinary masking tape and felt-tipped marking pen works well. The following information is necessary: (1) batch # or code, (2) number of organisms and (3) the size of the smallest sieve they were caught on.
Although the shape and size of bivalve larvae vary from species to species, the pattern of larval development is very similar. It is impossible to put an exact figure on the length of time of the larval period, since it depends on temperature and food availability, both quantity and quality.
Fertilized eggs will develop best at salinities of 28–32 ‰ and from 18–28 °C. More rapid development is achieved at higher temperature. An optimum temperature range is 23– 25 °C, because disease problems are minimized at lower temperatures. Growth is faster above 25 °C, but bacterial diseases are a greater problem at higher temperatures.
The following description of larval development is for Crassostrea gigas, but would be almost identical for any other species of Crassostrea. In its general features, it would also apply to other species of bivalves (Fig. 8).
Fertilized egg. The fertilization membrane forms immediately after one spermatozoa enters the egg.
Ciliated trochophore stage. Generally develops within 12 hours of fertilization.
Straight-hinge stage. The straight hinge of 'D' shell larval stage is attained at the end of 20 hours. The larvae are semi-transparent with the velum protruding out and creating a strong ciliary current which directs minute particles of food into the stomodaeum. The larvae swim vigorously and some of the larvae show a slow circular movement under the microscope. The larvae are fed with phyto-flagellates at the end of 24 hours.
Umbo stage. On the third day, the larvae become slightly oval; in one week-old larvae, the umbo is seen distinctly and pronounced concentric rings are found on the shells as the larvae grow. Up to this stage the larvae of most bivalves are very difficult to distinguish between species.
Eyed stage. This stage typically occurs among oyster species. An irregular eye spot is observed between 13 and 17 days.
Pediveliger stage. After two weeks or so, the functional foot develops. At this stage the larvae usually measure over 300 micron and tend to descend to the bottom and start crawling. At this stage significant differences in shape and size can be observed between species. At this stage the bivalves are known as spat (i.e. newly set individuals) and begin to lose their larval organs (velum, foot, and eyespot) and form the structures of adult specimens almost immediately after setting. New shell is rapidly laid down by the mantle.
Figure 8. Developmental stages of an oyster larva: (1) fertilized egg, (2) early cleavage, 4-cell stage, (3) Morula stage, (4) ciliate trochophore, (5) Veliger and (6) Straight-hinge larva. (Source: Castagna and Kraeuter, 1981).
The tanks containing the larvae may be gently aerated. The air stone should be suspended about 15 centimeters above the bottom of the container to prevent mixing dead or diseased animals from the bottom of the tank with healthier specimens. After two days, the eggs should have reached the straight-hinge veliger stage. The water in the larval tanks should be drained through the appropriate sized sieve, and the animals concentrated in a pre-volumed container. The tank should be cleaned and filled with fresh filtered seawater. It is sometimes desirable to examine the animals' development without draining the tank. This can be accomplished by taking a sample from near the edge of the container using an eye dropper. Place this sample on a clean Sedgwick-Rafter cell and examine it under the microscope (40 or 100X) for straight-hinge individuals. Once this stage has been reached the water should be changed three times a week or every other day.
The large larval growing tanks should be drained into tall sieves placed in support boxes (Fig. 9). The sieve utilized should be of the mesh size noted on the tank label, corresponding to the smallest animal size in the tank. The use of this sieve will prevent loss of animals. The support boxes are designed to partially flood the sieves with water. This prevents the larvae from striking against the mesh too vigorously and being damaged. The large tanks are usually emptied by gravity, but smaller ones, may be siphoned. Larvae should be rinsed from the sides of the tank with cultured water. Great care should be taken to monitor the drain down process because the sieves may clog and overflow. Following drain down, the larvae on the sieve are rinsed into pre-calibrated containers using filtered seawater and diluted to 10 or 15 liters (depending on the estimated density).
The bottom of a culture vessel should never be drained, there is in fact a greater possibility of diseased or dying animals in this water. Until the larvae are retained on an 86 micron sieve, the bottom few centimeters should be discarded. Beyond this point, all larvae should be retained.
developing larvae should be separated by size and counted on a weekly basis. This is best accomplished in conjunction with a routine water change in the following manner. After the larvae are rinsed into pre-calibrated containers, they are ready to be sorted by size. This is accomplished by rinsing the larvae through a descending sized series of sieves (Fig. 10). The top sieve should be two or three mesh sizes larger than the bottom sieve. The bottom sieve should be the same mesh size as the smallest mesh size sieve used to collect the larvae during the drain down of the culture vessel. One or two intermediate mesh size sieves can be placed between these two.
The larvae in the pre-calibrated container should be poured onto the stack of descending sized sieves and rinsed through to the proper sized mesh with cultured seawater. This procedure should be carried out carefully so that the larvae are not flooded over the top of a sieve. The larvae from each of the sieves are then rinsed into a separate pre-calibrated container that is appropriately labeled (mesh size, batch number, sieve size). Empty sieves are washed with fresh water before they are used to sieve any other batches; this will help prevent cross contamination of larvae and reduce the spread of disease. The larvae are then sampled and counted. The bottom sieve will usually contain slow growing individuals or larvae which are not developing well. A commercial hatchery should discard these as a matter of course. The other sieve-sized lots can be divided and placed into the rearing containers at densities of about 15 larvae/ml separate from smaller larvae to prevent competition. The above process should be repeated until the bivalve larvae metamorphose and set. Care must be taken to prevent over-crowding as larvae, under these conditions, will compete for food, and become subjected to problems related to the high levels of metabolic wastes in the culture medium. Physical damage also occurs. Microscopic examination of the larvae during each drain down should be carried out to identify disease problems, and to prevent the spread of a disease to other containers.
Figure 9. Seawater change of a bivalve larval culture vessel. (Source: Castagna and Kraeuter, 1981).
Figure 10. Separation of bivalve larvae by size. The larvae are rinsed through a descending sized series of sieves. (Source: Castagna and Kraeuter, 1981).
The time of setting of bivalve larvae is closely dependent on the rearing water temperature. Setting clam larvae are usually found attached to the sides and bottom of the culture tanks by byssal threads. The clams will be about 200–300 um long at this stage. They can be freed from the containers by squirting them gently with a jet of filtered seawater. Fresh water can be used and is often more effective in freeing the larvae, but they should not be allowed to remain in fresh water. Post set survival is enhanced if setting clams are treated as larvae for an additional 8–10 days. Clam spat should be placed in containers with a larger bottom surface. In the case of oysters, spat collectors of same form are used for setting larvae. After settlement these are usually removed.
Pumped up-welling systems (Bayes, 1981) used as nursery stages for growing hatchery bivalve seed prior to planting them in the sea have been studied by Rodhouse et al. (1981), Rodhouse & O'Kelly (1981), Claus et al. (1983) and Spencer et al. (1986). It is generally accepted that the nursery phase is an essential step in bivalve rearing as it increase the survival of spat once they are transplanted in the ongrowing areas.
Indoor fibreglass tanks can be used to contain the filtered UV-treated seawater into which cultured algae will be added. The tank will therefore act as a reservoir vessel (Fig. 11).
The bivalve spat are held in up-welling tubes contained in a fiberglass tank placed just above the reservoir tank (Fig. 12). The up-welling tubes are convenient made of PVC or transparent acrylic fitted at the bottom with a fine (depending on the initial size of the spat) nylon monofilament mesh. Water will be pumped from the reservoir tank into the overhead fiberglass tank at a known flow rate after passing through the up-welling tubes or through an overflow pipe.
Nurseries are constructed to provide semi-controlled conditions for intermediate growth between hatcheries and field grow-out. Many culture trial investigations believe that present field grow-out techniques require a minimum initial seed size of 8–10 mm (Castagna and Kraeuter 1977; Manzi et al., 1980, 1981; Claus, 1981). Seed producers, however, consider 4- to 6-mm seed to be the maximum profitable size and actually prefer to sell seed at much smaller sizes. Consequently, commercial and noncommercial grow-out facilities are usually forced to incorporate some nursery protocols into grow-out operations. Aside from providing intermediate growth, nurseries are also used for acclimation and quarantine of imported seed stocks and for wet storage of animals between various stages of field grow-out.
Figure 11. Indoor fibreglass up-welling tank. (A) Seawater reservoir vessel and (B) upwelling tubes.
Figure 12. Schematic drawing of an up-welling tube (A) with a meshed bottom (B), water outlet (C), and water flow control valve (D). The up-welling tubes are contained in a fibreglass tank usually placed above the reservoir tank (E).
Nurseries are classified into two major types: field systems, in which young seed are placed in protected plots in the natural environment, and onshore systems, in which seawater is pumped to land-based seed support units.
Several techniques are used in field system nurseries to provide a protected suitable environment for young spat. These include bottom culture, tray or rack culture, and suspended culture.
Castagna and Kraeuter (1981) described bottom nurseries for the American hardshell clam, M. mercenaria in shallow subtidal or low intertidal areas utilizing aggregate cover and either baffles and pens or plastic mesh tenting. The aggregate cover and plastic mesh provide protection from predators, and the tenting or baffles allow some control over siltation. Anderson et al. (1982) suggested protective netting for intertidal culture plots of small T. japonica on the basis of experiments that showed covered plots exhibited much higher recoveries than unprotected areas.
Tray of rack nursery culture utilizes either intertidal or subtidal grounds. Trays constructed of frames and mesh of various materials are either placed directly on the bottom or stacked in tiers. These systems provide good protection and growth for dense populations of bivalve spat (Spencer and Gough, 1978) but tend to require appreciable maintenance because of fouling and siltation.
Suspended nursery culture utilizes a wide variety of devices including rafts, suspended trays, lantern and pearl nets, and up-flow or vertical flow systems. Rafts have been used by commercial facilities for many years. Although many different designs have been employed, they all attempt to hold high densities of spat within the water column in either a single layer or in a stacked configuration (Lucas and Gerard, 1981; Shaw, 1981). Rafts are usually very simple in design, consisting of flotation devices and suspended culture units. They are normally anchored, either singly or in chains in areas providing optimum water characteristics. The culture units are suspended below the raft and thus maintained in the warmer more productive surface waters and out of contact with benthic predators.
In recent years, three-dimensional culture units consisting of prefabricated plastic trays, lantern nets, or pearl nets have replaced the more traditional single-layer wood trays and mesh baskets (Shaw 1981) (Fig. 13). One recent technique that is receiving considerable attention is up-flow culture. This system is used primarily in land-based nurseries but has been modified for suspended field nurseries (Lintell, 1981). Water is pulled up through a packed column of seed by an airlift. The seed rests on a mesh bottom, which provides water access, and airlift flows exit at the top of the column, thus creating a vertical water flow through the seed. Field nurseries provide simple, low-energy input systems for preliminary growth of spat. They do, however, have several distinct disadvantages including susceptibility to storm damage, limited access, minimum control over stocked populations, incomplete predator protection, and high maintenance requirements.
Most bivalve hatcheries support spat holding and grow-out facilities as a natural extension of their operations. These nurseries utilize raceway (shallow trays or tanks) and/or up-flow systems to provide semi-controlled environments for early seed growth. In areas with high natural phytoplankton populations, seawater is pumped directly to raceway or up-flow culture systems.
Raceways are any of an assortment of shallow trays or tanks through which seawater is directed in a horizontal flow. They can be almost any shape (although most are long and narrow) and are constructed of many different materials including fiberglass, epoxy-coated wood, and cement. In shallow raceways, clam seed are spread over the bottom and water is introduced at one end. The water passes over the clams along the length of the raceway and is drained from a standpipe at the opposite end. In deeper trays and tanks, clam seed are often layered on individual mesh sheets forming a rack within the raceway. This three-dimensional design allows for a much greater capacity over a given tank bottom area.
Up-flow systems for land-based nurseries have become increasingly popular in recent years (Bayes, 1979, 1981; Lucas and Gerard 1981; Manzi and Whetstone, 1981; Rodhouse et al., 1981). These systems utilize a vertical water flow that passes up through the bivalve seed rather than across the seed as in race-ways (Fig 14). Two up-flow systems are in common use: forced flow and passive flow. Forced-flow systems introduce water under pressure into a closed bottom cylinder with an intermediately positioned screen of an appropriate mesh size to hold small spat (Fig. 15 B). Water is forced vertically through the screen and eventually exits at the top of the cylinder. Passive-flow systems use open-ended cylinders positioned in a reservoir of appropriate size and configuration (Fig. 15 A). A screen of an appropriate mesh forms the bottom of each cylinder and supports the contained seed mass, which is several centimeters thick. Seawater is pumped into the reservoir and is drawn up through the seed populations of each up-flow cylinder by drains located in the upper cylinder.

Figure 13. (A) Lantern net and (B) pearl net typically used for the intermediate culture of scallop spat.
Both active and passive up-flow systems are supplied with enough water flow to partially fluidize their contained populations. The conditions created by up-flow systems provide rapid growth at extremely dense concentrations of seed. Up-flow systems appear attractive for commercial nursery application because they have the potential to significantly reduce costs. They are inexpensive to fabricate and require less space and water per unit biomass to operate. In addition, maintenance requirements for these systems are much less than for traditional raceways and thus they may provide a way to reduce nursery labour costs.
![]()
![]()
![]()