![]()
![]()
![]()
On
Artemia Production in Salt Ponds
PRACTICAL WORK
DEHYDRATED CYSTS (40 x)
| Fig. 3 |  |
OC. outer cyst shell (color variates from grey-white to dark brown), D. dent caused by dehydration.
Note debris in cyst sample. Debris includes broken and empty shells, sand, feathers, parts of Artemia skeletons etc.
HYDRATED CYSTS (40 x)
| Fig. 4 |  |
OC. outer cyst shell.
Dent has disappeared due to water absorption (hydration).
HATCHING CYST (40 x)
 |  |
| Fig. 5 breaking stage | Fig. 6 hatching stage |
OC. outer cyst shell, EM. embryo surrounded by hatching membrane, NE. nauplius eye, HM. hatching membrane.
HATCHED NAUPLIUS INSTAR I (40 x)
| Fig. 7 |  |
NE. nauplius eye, ANL. antennula, ANN. Antenna.
GROWING LARVA (40 x)
(Instar IV)
| Fig. 8 |  |
NE. nauplius eye, ANL. antennula, ANN. antenna, L. labrum, PT. primitive thoracopod, DT. digestive tract.
SUBADULT (20 x)
(male)
| Fig. 9 |  |
NE. nauplius eye, ANL. antennula, ANN. antenna developing in hooked graspers, LE. lateral eye, T. thoracopods, DT. digestive tract, F. furca.
ADULTS (20 x)
 |  |
| Fig. 10 male | Fig. 11 female |
NE. nauplius eye, ANL. antennula, ANN. antenna, LE. lateral eye, T. theracopods, UT. uterus or brood pouch, EG. eggs, OV. ovaries with oocytes, F. furca, DT. digestive tract, GR. graspers (antenna).
DETAIL OF THORACOPODS (40 x)
| Fig. 12 |  |
TE. telepodite, EX. exopodite, EN. endopodite.
RIDING COUPLE (10 x)
 | Fig. 13 |
UT. uterus (or ovisac or brood pouch), GR. male graspers P. penis
EGG DEVELOPMENT (20 x)
| Fig. 14 |  |  |  |
| oocytes in ovaries | eggs in oviducts ( = lateral pouches of uterus) | eggs in uterus and 2nd brood developing |
BROOD POUCH (40 x)
| Fig. 15 |  |
EG. eggs, SG. shell gland, UA. uterus aperture.
Distinction between oviparous eggs (cysts) and ovoviviparous eggs (will develop into naupliae)
| Cysts | “nauplius”eggs |
| - hard and dark shell | - no shell, soft |
| - brown shell gland | - whitish shell gland |
1. REFRACTOMETER (American Optical)
Scale: 0 – 160 ppt (natural seawater = 32 ppt)
| Procedure: | 1. | Flip back the lid |
| 2. | Moisten glass with a few drops of water | |
| 3. | Replace the lid and hold it with one finger on the label against the glass | |
| 4. | Hold the instrument against the light and read through the ocular the salinity at the right hand scale (Fig. 16) | |
| 5. | After use clean with fresh water and dry with tissue or cloth. | |
| 6. | If salinity exceeds the scale, dilute a sample of the water with freshwater in a measuring cylinder. Mix well, make reading and reconvert result. |
2. HYDROMETER (Nektonics, expanded scale)
| Scale: | 1.000 (0 ppt) - 1.050 (75 ppt) Specific Gravity (SG) |
| Procedure: | 1. | Fill plastic tube with water sample |
| 2. | Insert hydrometer. Make sure no airbubbles are attached to hydrometer and that there is no friction between tube wall and hydrometer. | |
| 3. | After stabilization read lower miniscus down to 0.001 SG accuracy | |
| 4. | Convert SG - reading to ppt. salinity by using the conversion table. (Table 1) | |
| 5. | After use, rinse tube and hydrometer with freshwater and dry with cloth. | |
| 6. | Store with care | |
| 7. | If salinity exceeds the scale, dilute a sample of the water with freshwater in a measuring cylinder. Mix well, transfer to tube, make reading as above, convert to ppt. salinity and calculate salinity prior to dilution. | |
| exercise: | Determine salinity of solution A (about 40 ppt) and B (more than 160 ppt) with both the hydrometer and refractometer. | |
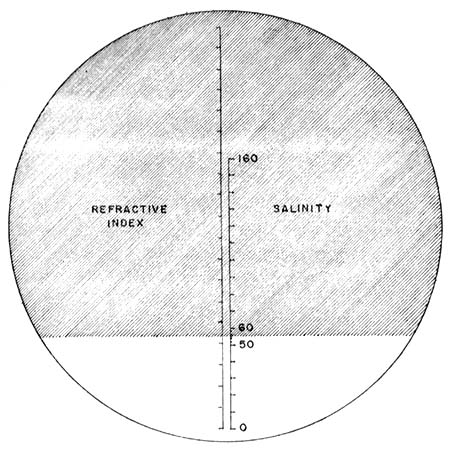
Fig. 16 Refractometer (American Optical) Reading of 56 ppt. salinity
CONVERSION TABLE
Tested at 26°C or 78°F with A.O. refractometer.
| Specific Gravity | Salinity |
| (S.G.) | (p.p.t.) |
| 1.000 | 0 |
| 1.003 | 5 |
| 1.007 | 10 |
| 1.010 | 15 |
| 1.013 | 20 |
| 1.016 | 25 |
| 1.019 | 30 |
| 1.023 | 35 |
| 1.026 | 40 |
| 1.029 | 45 |
| 1.032 | 50 |
| 1.036 | 55 |
| 1.040 | 60 |
| 1.043 | 65 |
| 1.047 | 70 |
| 1.049 | 75 |
| 1.053 | 80 |
Table I
PROCEDURE AND REQUIREMENTS
Maximum hatching density is 7–8 g cysts per liter. Use clean natural seawater. If necessary filter the water over a cloth.
Aerate hatching container from the bottom with open end airtubes. Never use airstones.
Aerate so as not to have sedimentation of the cysts. Therefore use several airlines to obtain strong turbulence and if possible use container with funnel-shaped bottom.
Since the cysts need a light impulse during the first hours of hatching, start hatching during daytime, if possible during the morning. Use a transparent container, glass or plastic. If you have to start hatching during the evening, place a TL-light tube in front of hatching container. Cover top of container to prevent insects from entering.
Complete hatching takes 24–36 hrs. Take samples now and then to ascertain good hatching.
Stand by during hatching in case of power failures or for changing batteries. If nontheless aeration is stopped this will not affect hatching if it happens during the first 10 hrs. Just continue aeration after power has returned.
If you hatch for an inoculation, schedule start of hatching in such a way that you can inoculate during late evening or early morning. This is to prevent too high temperatures in the pond upon inoculation.
Once hatching is completed, switch off aeration to let empty cyst shells float in layer at surface. (max. 5 minutes). Siphon naupliae from bottom of container. Screen naupliae over 100 μm net and transfer them to a container with clean seawater. Discard hatching water.
If required naupliae can be kept alive for max. 1 hour in a volume of seawater twice as much as used for hatching. Keep them in suspension by slow aeration from the bottom of container. (no airstones).
exercise: A pond has a surface of 1400 m2 and the average depth is 30 cm. An inoculation density of 40 naupliae per liter is required and the hatching efficiency (HE) of the cysts is 4 g/ 1.106 naupliae.
How many naupliae do you have to inoculate to obtain that density? (Answer: 16,800,000)
How many grams of cysts will have to be hatched, if you know that due to manipulation and transport 30% of the hatched naupliae will be lost? (Answer: 96 g).
Available hatching containers can hold 8 liters of water. How many containers will be needed and what will then be the hatching density if each container is used at full capacity? (Answer: 2; 6 g cysts per liter)
WATER INTAKE BY GATE OR CULVERT PIPE
exercise: A pond has a surface of 1500 m2 and an average depth of 20 cm. Salinity is 150 ppt. You want to lower salinity to 120 ppt by taking in 40 ppt water through a gate or culvert pipe.
How many cm of water should be taken in and what will be the the final total depth? (Answers: 7.5 cm; 27.5 cm)
WATER INTAKE BY PUMP
exercise: A pond has a surface of 2000 m2 and an average depth of 25 cm. Salinity is 140 ppt. You want to lower salinity to 110 ppt by pumping in water of 40 ppt with a pump of 100 gallons/minute capacity. (1 US gallon = 3.785 liter)
What is the volume of water (in m3) you will have to pump in, and how long will it take? (Answers: 214 m3; 9.42 hrs.)
What will be the final depth after pumping? (Answer: 35.7 cm).
Supposing the pump consumes a full tank (4 liters) in 7 hrs. and you start with a full tank, how many extra liters of gasoline should you prepare for? (Answer: 1.4 liter)
1. DETERMINATION OF HATCHING EFFICIENCY (HE)
a. Standard method
Fig. 17 explains the standard procedure to determine the hatching efficiency of a batch of cysts.
| equipment needed: | - | accurate balance |
| - | 100 ml measuring cylinder | |
| - | aerator | |
| - | 250 μl automatic pipet with plastic tips or 0.5 ml pipet | |
| - | 5 ml plastic tubes with stopper | |
| - | washbottle | |
| - | rotating hatching apparatus | |
| - | Lugol's solution or iodine tincture | |
| - | binocular dissecting scope | |
| - | plastic petridish for counting |
| exercise: | To determine the hatching efficiency, 5 samples are counted with the standard method, giving the following results: | ||
| Tube 1: 110, tube 2: 125, tube 3: 108, tube 4: 112, tube 5: 109. | |||
| Calculate: | 1. the number of naupliae one gram of product can produce | ||
| 2. the amount of product needed to produce one million naupliae. (answers: (1) = 180,480 (2) = 5.54 g | |||
b. Simplified method
Fig. 18 explains the simplified method.
| equipment needed | - | accurate balance |
| - | 100 ml measuring cylinder | |
| - | aerator | |
| - | 0.5 ml pipet | |
| - | iodine tincture | |
| - | binocular dissecting scope | |
| - | plastic petridish for counting |
DETERMINATION OF HATCHING PERCENTAGE (HP)
Fig. 19 explains the method.
| equipment needed: | - | 100 ml measuring cylinder |
| - | aerator | |
| - | iodine tincture | |
| - | plastic petridish for counting | |
| - | binocular dissecting scope |
exercise: In 5 samples from an Artemia hatching, the counted numbers of naupliae and cysts + shells are:
| sample | naupliae | cysts + shells |
| 1 | 82 | 130 |
| 2 | 93 | 125 |
| 3 | 74 | 110 |
| 4 | 96 | 124 |
| 5 | 88 | 112 |
What is the average hatching percentage (HP) for that batch of cysts ? (answer: HP = 72%)
exercise: Of a certain batch of cysts the HE = 4.5 g/ 1.106 naupliae and HP = 85%.
How many grams of the product do you have to hatch to obtain 250,000 naupliae? (Answer: 1.13 g)
How many cysts are there in that of amount of product? (Answer: 294,118)
Supposing that 5% of the weight of the product is debris, what is the weight of 1 cyst in μg? (Answer: 3.65 μg).
from: Artemia Reference Center
Fig. 17. STANDARD METHOD FOR THE DETERMINATION OF THE HATCHING EFFICIENCY OF ARTEMIA CYST-BATCHES
Fig. 18 SIMPLIFIED METHOD FOR THE DETERMINATION OF THE HATCHING EFFICIENCY
Fig. 19 METHOD FOR THE DETERMINATION OF THE HATCHING PERCENTAGE
CLEANING
Harvest cysts from pond. Drain excess water over 100 or 200 μm screen and transport drained cysts to processing site.
Wash cysts over 400 and 100 μm screen with freshwater. Large dirt particles, dead Artemia, algae debris etc. will be retained on 400 μm screen and cysts with finer debris on 100 μm screen.
Transfer the cyst mass to a brine container for preliminary cleaning and temporary storage until further processing. Mix now and then by aeration or manually by means of a stick. The brine will dehydrate the cysts and a first part of the heavy debris will sink to the bottom. Full cysts and light debris will float in a layer at the surface.
Transfer the cyst mass to a funnel-shaped brine container. Aerate at half height of container. This separates the rest of the heavy debris from the cysts. This brine separation must be carried out for 24 hrs. to guatantee complete dehydration (dented cysts). With the funnel-shaped container, the floating cyst mass can be very precisely separated from the sedimented debris.
Wash the cysts thoroughly with freshwater over a 100 μm screen to remove all salt. This step should not take longer than 5 minutes.
Transfer the cysts to a funnel-shaped freshwater container. Again agitate the surface by means of slow aeration from half the height of the container. Full cysts will sink and light debris and empty cysts will float. This freshwater separation should not take longer than 15 minutes. Otherwise the cysts will reach the hydration level which sets off metabolism. Collect full cysts.
Wash shortly over 100 μm screenbag with freshwater spray.
Remove excess water by shaking out water, gently squeezing the bag and dipping dry with absorbent cloth.
DRYING
Distribute the cysts in thin layers on a drying surface, consisting of a table or trays made of wire screen covered with cotton muslin (tight woven grade). This will absorb water. By shaking a woven wire basket (5 mm mesh) containing the cysts, the cysts will be sifted through the mesh and be evenly distributed over the drying surface.
Place these trays in a drying box or on outdoor racks for sun-drying. The latter will not affect viability of the cysts if they were well dehydrated during the brine separation (step 4). The drying box can be made of ordinary wood. Make slits at the bottom and top of the box for air exchange and use a 75 Watt light bulb as heating element, fixed on the bottom of the box.
Stop the drying process as soon as the cysts do not lose further weight. (completed dehydration).
Pulverize the cyst lumps and screen over a 300 to 500 μm screen to powder the cysts.
STORING
Depending on expected duration of storage three possibilities exist.
For storage up to a few months, cysts can be stored in vials containing clear brine. This can already be done after brine separation in the cleaning phase (step 4), thus omitting the airdrying procedure.
If storage is for a term up to 6 months or a year, it is sufficient to store the air-dried cysts in closed glass or plastic vials filled to the brim. As long as they are kept dry viability will not be affected significantly over a period of 1 year. There is no need to keep them in the refrigerator.
If storage is for more than a year, or if the cysts have to be packed for commercial purposes, it is necessary to pack them dry and under vacuum or nitrogen atmosphere (away from oxygen). Commercial brands mostly vacuum can their cysts.
![]()
![]()
![]()