
Better freshwater fish farming in Zambia
| Better freshwater fish farming in Zambia |
This manual is an adaptation for Zambian conditions and has been compiled from four titles of the FAO Better Farming Series:
Freshwater fish farming: how to begin
Freshwater fish farming: the pond
Freshwater fish farming: the fish
Freshwater fish farming: further improvement
This version has been prepared by the FAO Fish Culture Development Project in Zambia for the use of extension workers dealing with small scale fish farmers.
The publication of this manual and its translation in other Zambian languages is subject to the approval of the Director, Publications Division, Food and Agriculture Organization of the United Nations, Via delle Terme di Caracalla, 00100 Rome, Italy.
Hyperlinks to non-FAO Internet sites do not imply any official endorsement of or responsibility for the opinions, ideas, data or products presented at these locations, or guarantee the validity of the information provided. The sole purpose of links to non-FAO sites is to indicate further information available on related topics.
This electronic document has been scanned using optical character recognition (OCR) software. FAO declines all responsibility for any discrepancies that may exist between the present document and its original printed version.
What do you need to raise fish?
How large should your pond be?
Fertilizing the water in your pond
Putting fertilizer into the crib
PUTTING THE FISH INTO YOUR POND
Feeding the fish in your nursery pond
Putting baby fish into your big pond
Harvest without draining the water
Harvest by draining all the water
Harvest by draining part of the water
What to do with your baby fish
Raising the level of your water supply
Controlling the water in your supply ditch
Harvesting fish when you have a monk
YOUR FISH PONDS AND YOUR HEALTH
1. Fish farming is the raising of fish for personal use or profit. It is sometimes called fish culture.
2. By raising fish we make better use of our land and our water.
3. By raising fish your family will have more to eat. The protein in fish will keep your family strong and healthy. Fish are tasty, like chicken, sheep and goat.
4. If your family is not too big you will have more fish than you need for food and you can sell them at the market.

5. If your family is not too big with more food and more money you and your family can live better.
6. But fish farming is not easy. To raise fish is as hard work as to raise anything else, such as maize, rice, cassava or groundnuts.
7. You will need to learn to do many things.
8. You will need a piece of land where you can build a pond,
a supply of water,
baby fish to begin,
food for your fish.
9. You will need time to build a pond and to care for it regularly. Fish farming takes a lot of time.
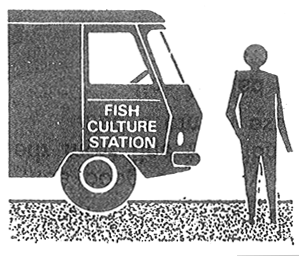
10. If there is a fish culture station near where you live you may be able to get help from an extension agent.
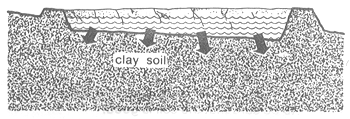
11. If there is no extension agent you will need to learn many things by yourself.
12. You will need to know the type of soil best for your pond, how to dig your pond,
how to fill it with water,
how to fertilize it.
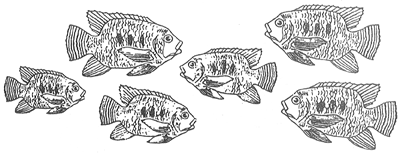
13. You will need to know what kind of fish to raise.
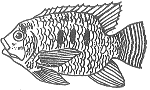
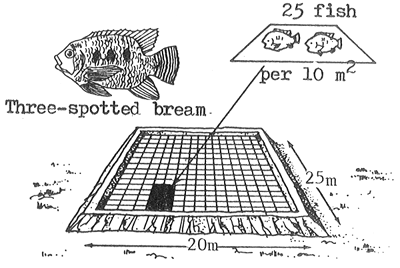
Tilapia andersonii
Local name: Three-spotted bream
how to put the baby fish into your pond,
what to feed your fish, how to feed them.
14. You will need to know how to take care of the pond,
how to drain it,
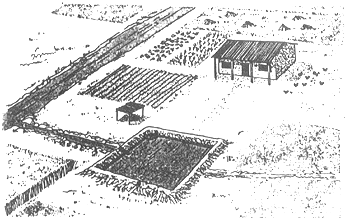
how to harvest the fish,
how to use your own baby fish to start again.
15. This book will help you to begin good fish farming.
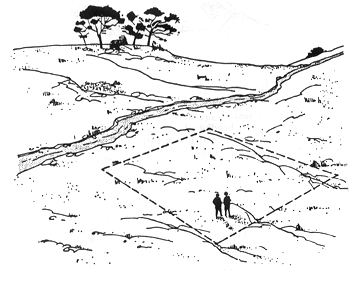
16. You must choose a good place to put your pond.
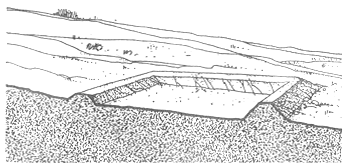
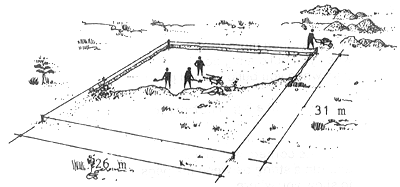
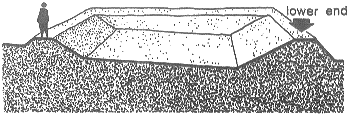
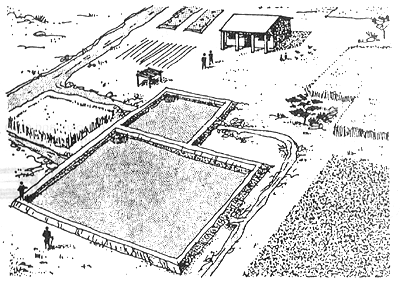
17. Remember that a pond for fish is only one use for your land. Be careful not to build a pond on land that could be better used for something else.
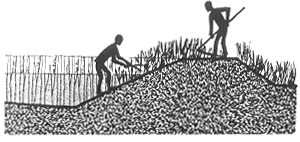
18. It is best to choose a piece of land that has a gentle slope.
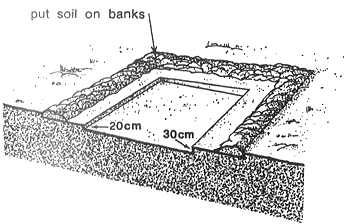
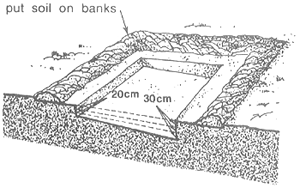
19. Do not build your pond on a steep hill or where it can be flooded in the rainy season.
20. Choose a sunny place for your pond, close to your home so people will not come and take your fish away.
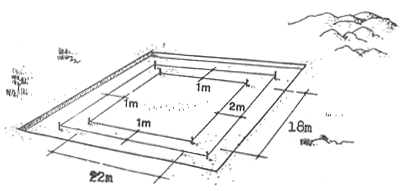
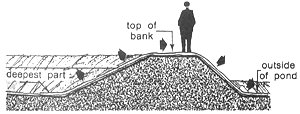
Near your home it is also easier to take care of the fish.
21. The pond should be near water such as a stream or a spring, or in marshy ground where the water in the soil will fill up your pond.

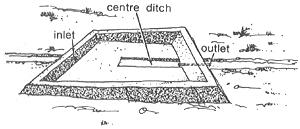
22. The soil in the place you choose must be good for a fish pond.
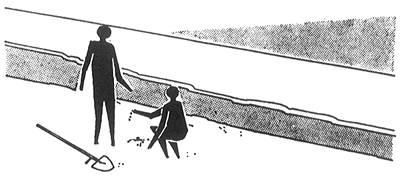
23. To test if you have good soil, take a handful of soil from the surface and squeeze it into a ball.
24. Throw the ball of soil into the air and catch it.
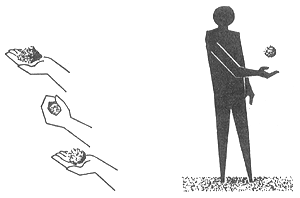
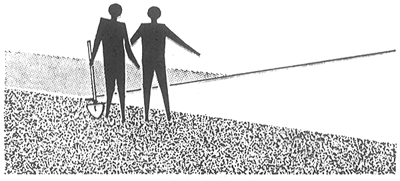
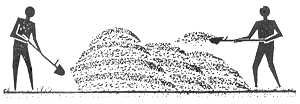
25. If it sticks together it is good soil and will hold water well.
26. Bad soil with sand or gravel in it will not stick together and will not hold water.
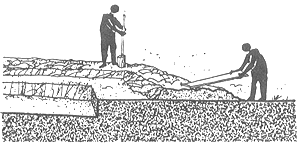
27. Your pond must be near a good supply of water such as a spring, stream, lake or reservoir with plenty of water all year round.
28. You must be sure that you have enough water to fill your pond when it is time to fill it and to add more water when you need it.
29. Do not depend on rain-water to fill your pond. When it does not rain, there may not be enough water to keep your pond full and the fish may die.
30. Your water must come from a place that is higher than the pond so that the water will flow into the pond by itself.
The water should not have a bad smell, taste or colour. It should not be too muddy.
31. The water should not have wild fish in it. You do not want wild fish in your pond because they may eat your fish or keep them from growing.
32. Water from a natural spring close to the pond site is usually good and there will not be wild fish in it.
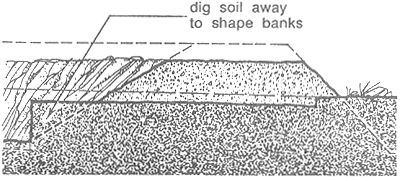
33. Water from a stream or from a lake or reservoir is usually good but it may have wild fish in it. You will have to be careful that the wild fish do not swim into your pond.
34. It is best to put a pond in a place with a slope or on a hillside because you will not have to dig as much soil to build it. A pond built on a slope is also easier to drain.
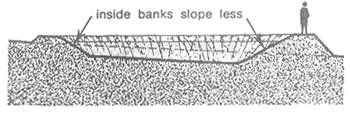
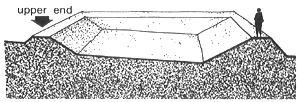
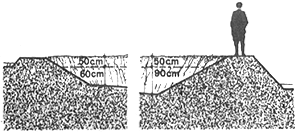
35. Do not build your pond in a place that is so low that it is flooded during the rainy season.
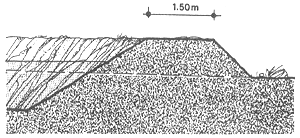
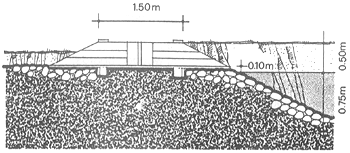
36. The soil where you build your pond should not be too sandy. Soil with too much sand or gravel in it will not hold water.
37. In sandy soil the water will sink into the ground and there will not be enough water for your fish.
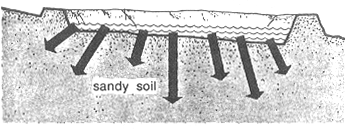
38. If the banks of your pond are built of sandy soil, they will not be strong enough to keep the water from flowing away.
39. The soil where you build your pond should have enough clay in it. Clay soil holds water very well.
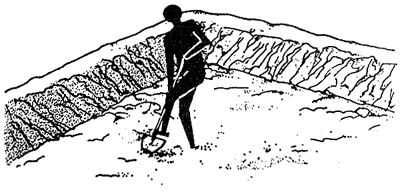
40. In clay soil, very little water will sink into the ground, and banks of clay will be strong enough to hold the water in the pond.
41. You should test the soil to see if it is good for building a pond.
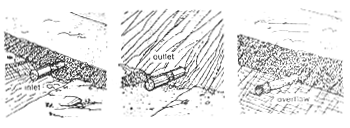
42. The first test is easy. Take a handful of soil from the surface and squeeze it into a ball.
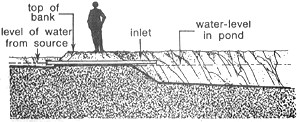
| 43. Throw the ball of soil into the air and catch it. |  |
44. Bad soil with too much sand or gravel in it will not stick together and the ball will fall apart.
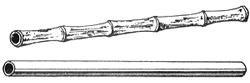
45. If the ball sticks together well, the soil may be good but you cannot be sure. Now you should make a second test to be sure that the soil is good.
| 46. Dig a hole as deep as your waist. | 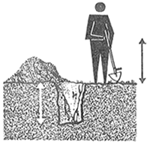 |
Early in the morning fill it with water. Fill it to the top.

| 47. By evening some of the water will have sunk into the soil. | 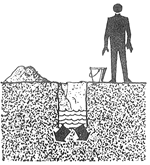 |
48. Then fill the hole with water again. Fill it to the top. Cover the hole with boards or leafy branches.
49. The next morning if most of the water is still in the hole, the soil will hold enough water to build a fish pond there.

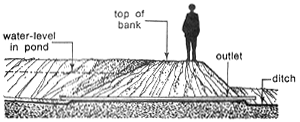
50. It is good to start with a pond big enough to feed your family.
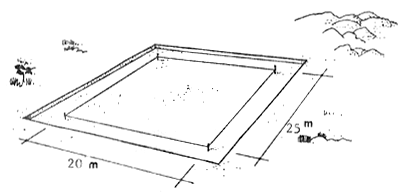
51. For example, if you build a pond 20 by 25 metres, the pond will measure about 500 square metres.
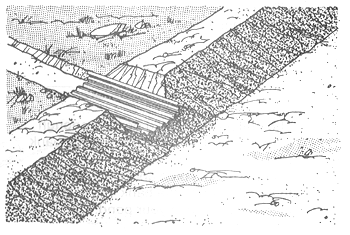
20m × 25m = 500m2
52. A square or rectangular pond is easier to build.
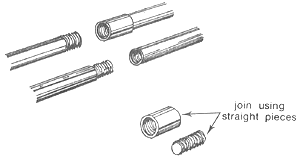
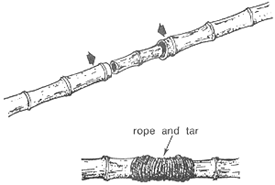
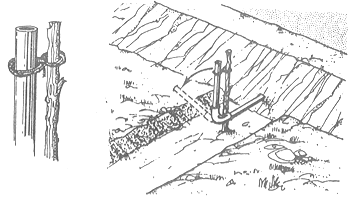
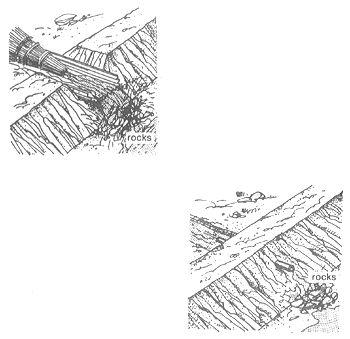
but your pond can have a different shape to fit the size and shape of your land.
53. There is much more work to do when you build a big pond than when you build a small pond.
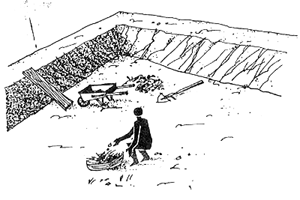
54. First mark out a big rectangle on the site you have chosen, about 26 by 31 metres. Mark the corners with pegs and run a string between the pegs to show you where the outside of the banks will be.
55. Clear the big rectangle of all trees, bushes and grass and take away all the big roots you can.
56. Take away about 20 centimetres of topsoil from all over the square. Put the topsoil aside. Later you will put it back on the top and outer sides of the banks.
57. Then mark out a small rectangle inside the big rectangle about 20 by 25 metres. Mark the corners with pegs and run a string between the pegs to show you where the inside of the banks will be.
58. The bottom of the bank in the shallow part of your pond and along the sides should be about 1 metre from the upper end and sides of the small rectangle
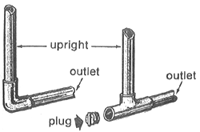
59. The bottom of the bank in the deepest part of your pond should be about 2 metres from the lower end of the small rectangle
60. Now mark out a third smaller area in the centre of your pond, about 18 by 22 metres. We will call this the central area. Mark the corners with pegs and run a string between the pegs to show where the bottom of the banks will be.
61. Be sure that all the pegs and strings 26×31 metre rectangle 20×25 metre rectangle and the central area are set up in the way shown in the drawings.
62. Now you are ready to begin digging out soil from inside the central area to build the banks of your pond.
63. Ask your neighbours to help you to dig your big pond. Then you can help them in turn to dig their ponds.
64. Shared work is lighter work. When we work together with our neighbours, the work is easier and better.
65. Begin digging at the 1-metre string marking the central area at the upper end of your pond. Dig about 20 centimetres deep. As you dig toward the lower end, dig a little deeper. When you get to the deepest part, at the 2-metre string marking the central area, you should be digging about 30 centimetres deep.
66. As you dig out the soil, put it between the 20 by 25 metre rectangle and the 26 by 31 metre rectangle where the banks will be. Put it nearest to where you are digging. This way, the banks will be higher and wider as you move toward the lower end.
67. When you come to roots, take away as much of them as you can.
68. Whenever the loose soil you put on the banks reaches half as high as your knees, pack it down tightly. You can do this by beating the soil with a heavy plank, a length of tree trunk or an earth tamper.
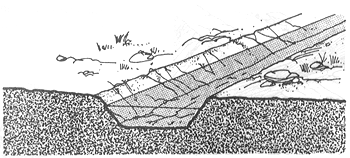
69. When you are digging, keep the slope of the pond bottom as regular as you can. It should slope gently down from the upper end to the deepest part. The bottom of the pond should have slopes like those in the drawings.
70. Begin again to dig soil out of the central area. Dig 20 more centimetres from the upper end and 30 more centimetres from the deepest part. Put the soil on the banks and pack it down tightly as before.
71. Now begin again, for the third and last time, to dig soil out of the central area. Dig 20 more centimetres from the upper end and 30 more centimetres from the deepest part. Put the soil on the banks and pack it down tightly.
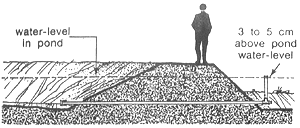
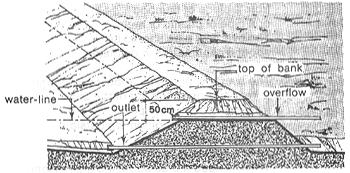
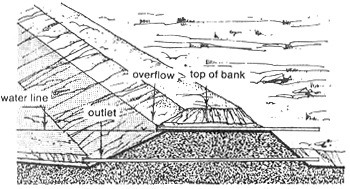
72. When you have finished digging out the central area and you have put on the banks all the soil that you have taken out, you will have a hole 18 by 22 metres with straight sides. Now it is time to shape the banks.
73. Dig the soil away from the edges of the central area to form the slope of the banks. Put this soil on top of the banks and pack it down tightly.
74. The inside of the banks should slope less steeply than the outside. The drawing shows you what the banks should look like when they are finished.
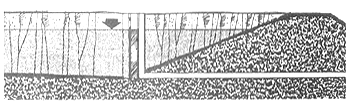
75. The top of the banks should be about 1.5 metres wide and should be straight and flat all the way around the pond.
76. Put the 20 centimetres of topsoil you took away when you began digging on the top and outer sides of the banks. Plant grass on the banks. Banks covered with grass last longer.
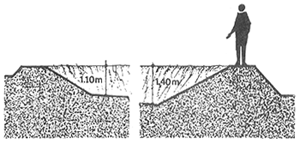
77. The bottom of your pond should be about 1.10 metres from the top of the banks at the shallow upper end and about 1.40 metres from the top of the banks at the deepest part.
78. Be sure that the bottom of the pond is fairly smooth and regular.
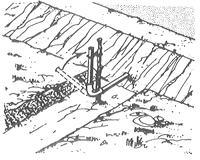
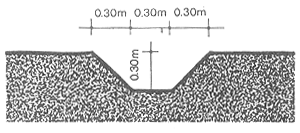
79. Now dig a ditch in the bottom of the pond from the centre to the lower end. The ditch should be about 50 centimetres wide and about 20 centimetres deep. This ditch will help to drain out all the water when you empty your pond.
80. When the ditch is finished, remove all loose soil and other trash from the bottom of the pond.
81. Now you are ready to install your inlet, outlet and overflow.
82. You will need an inlet to let water into your pond when you want to fill it.
83. You should place the inlet at the point nearest to the water supply. Most often this will be at or near the upper end of your pond.
84. Your inlet can be made from a piece of heavy bamboo or a pipe of plastic or metal. The inlet pipe should be about 10 centimetres in diameter.
85. The inlet pipe should be long enough to reach through the top of the bank from one side to the other. You will need a pipe about 3 metres long to reach through the bank at the upper end of your pond.
86. Now dig a gap in the bank where you want the inlet to be. It should be a little above the water-level on the inside of your pond and a little below the level of the water which flows from the source on the outside of your pond.
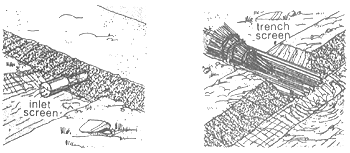
87. Put the inlet pipe in the gap in the bank and rebuild the bank over it.
88. You can also make an inlet by cutting a shallow trench through the bank to let the water into the pond.
89. If you use a shallow trench to get water into your pond, you can improve it and keep it from washing away by using a trough of roofing metal to line the bottom of the trench.
90. You will need an outlet to let water out of your pond when you want to empty it.
91. You should place the outlet at the bottom of the bank at the lower end of your pond at the deepest part.

92. The outlet can be made from a piece of heavy bamboo or a pipe of plastic or metal. The outlet pipe should be about 10 centimetres in diameter. The bank of your pond is much wider at the lower end than at the upper end, so the outlet pipe will have to be longer than the inlet pipe.
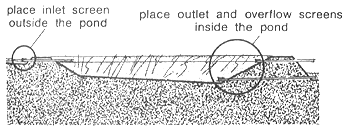
93. The outlet pipe should be long enough to reach through the bottom of the bank from one side to the other. You will need a pipe about 6.5 metres long to reach through the bank at the lower end of your pond.
94. If you cannot get a pipe that is long enough to go through the bank, you can join shorter pieces of pipe together using straight pieces of pipe like the ones in the drawing.
95. If you are using bamboo, you can join short pieces of bamboo together with pieces of smaller bamboo in the centre, but the smaller pieces should be at least 8 to 9 centimetres in diameter. Wrap the bamboo joints with rope and close them with tar to keep water from seeping out.
96. Now dig a gap in the bank where you want the outlet to be. It should reach from the deepest part on the inside of the pond through the bank to the outside of the pond.
97. If the outlet pipe is below ground level on the outside of the pond, you will have to dig a ditch to take the water away from the outlet.
98. Put the outlet pipe in the gap in the bank and rebuild the bank over it.
99. If you use an outlet of about 10 centimetres in diameter, it will take about half a day to empty your pond.
100. It is easier to place the outlet where you want it to be before you dig out the centre of the pond and build the banks. When you build another pond, you will understand this and you will be able to do it when you are building the banks. But now, when you are building your first pond, you should place the outlet in the way you have just learned in this booklet because it is easier to understand.
101. If you use a plastic or metal pipe for the outlet of your pond, you can make it better by putting an upright length of pipe on the end of the outlet using an L or a T piece like the ones in the drawing. Close the T piece with a plug as shown.
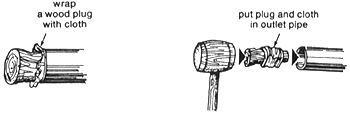
102. Put the L or T piece and the upright pipe on the end of the outlet outside the pond, but protect it so that it cannot be reached by animals or other people.
103. The top of the upright pipe should reach about 3 to 5 centimetres above the water-level of your pond. If the water rises above this level, it will overflow from the upright pipe.
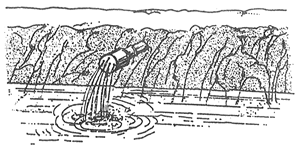
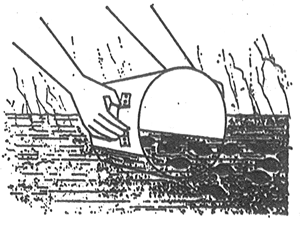
104. Tie the upright pipe to a pole which has been pounded into the ground so that it will not slip down and let the water out of the pond before you want it to.
105. When you want to let out the water, untie the upright pipe and push it down. The water will then flow out of the pond.
106. There is still another way to let water out of your pond, using a siphon. You will learn how to use a siphon in Items 118–128
107. If there is too much water in your pond, some of the water may flow over the banks. This may wash the banks away and some of your fish may get out.
108. You can use an overflow to keep the water in your pond from rising over the banks.
109. The better outlet you learned about in Items 101–105 will act as an overflow.
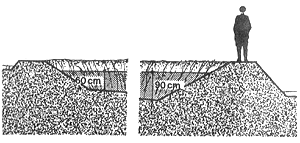
110. If you use a straight pipe outlet or a siphon to let water out of your pond, you will need another kind of overflow.
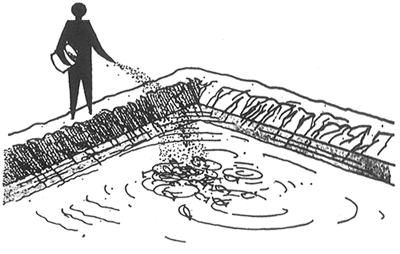
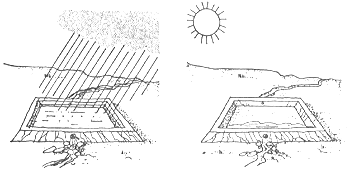
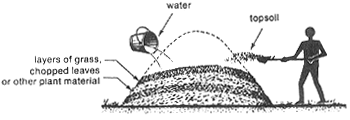
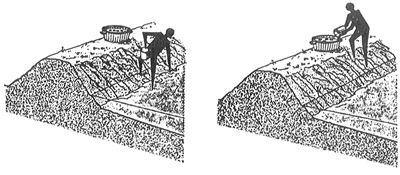
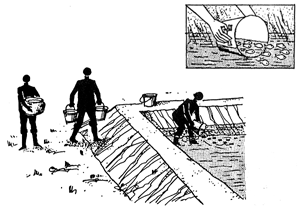
111. This kind of overflow can be made from a piece of bamboo or a pipe of plastic or metal. The overflow pipe should be about 6 centimetres in diameter.
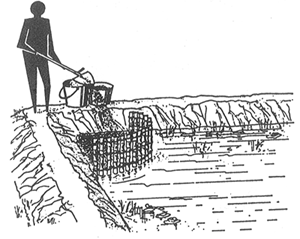
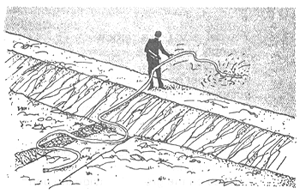
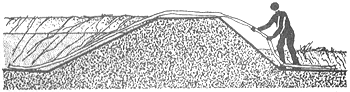
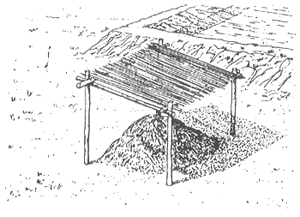
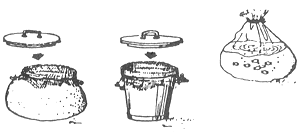
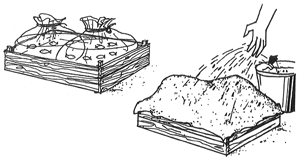
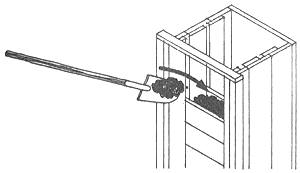
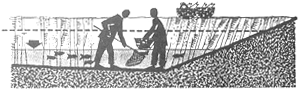
112. The overflow pipe should be long enough to reach through the top of the bank from the inside of the pond to a place far enough on the outside to keep overflow water from washing away the bank. You will need a pipe about 4.5 metres long to do this.
113. If you cannot get a pipe that is long enough, join short pieces of pipe or bamboo together. (see Items 94 and 95).
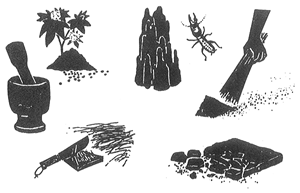
114. It is best to place your overflow in the bank at the lower end of your pond right above the outlet so that the water that overflows can run off in the outlet ditch.
115. If you are going to put the overflow over the outlet, you can put it in the same gap that you dug for the outlet in Item 96 The water-line should be about 50 centimetres below the top of the bank, so put your overflow there as you rebuild the bank.
116. If you are going to put the overflow in another place, you will have to dig another gap in the bank about 50 centimetres deep.
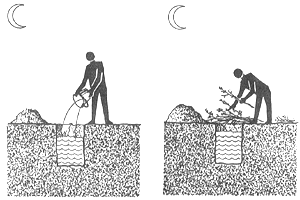
117. When the pond is full, the overflow will keep the water about 60 centimetres deep at the shallow upper end and about 90 centimetres deep at the deepest part.
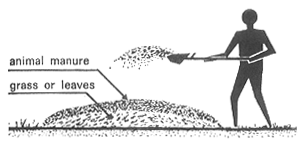
118. You can also use a siphon to empty your pond. If you use a siphon, you will not need an outlet but you will need an overflow like the one described in Items 107–117
119. A siphon is a simple tube that runs from the inside of the pond over the bank and lies on the ground outside the pond.
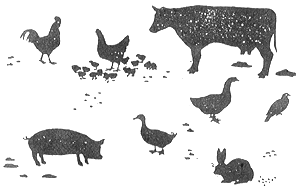
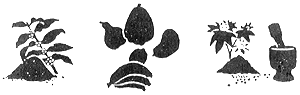
120. A siphon can be made of plastic or rubber tubing at least 3 centimetres in diameter.
121. The siphon must be long enough to reach from the deepest part of the pond, run over the top of the bank and down the outside of the bank. You will need a siphon about 8 metres long to reach over the top of the bank from the deep part to the outside.
122. When you are ready to empty your pond, put all of the siphon into the pond. It will fill with water. Be sure the tube is full of water from one end to the other. If the siphon is not full of water, it will not work.
123. While the siphon is still in the water, close one end of the tube with a plug and leave the other end open.
124. Leave the open end of the siphon below the surface of the water. You can use stones to hold the siphon under the water, but be sure that they are not so heavy that the water will be shut off.
125. Take the other end of the siphon, which is closed with the plug, over the top of the bank and put it on the ground outside the pond.
If the ground on the outside of the pond is higher than the pond bottom at the deepest part, you will have to dig a ditch so that the end of the siphon on the outside of the pond will be lower than the end of the siphon in the pond.
The ditch will also take the water away when you empty your pond.
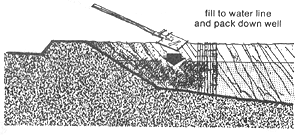
126. Now, take the plug out of the siphon. If the end on the outside is lower than the end in the pond and if the end in the pond is under water, water will start to flow through the tube and out of your pond.

127. If the end of the siphon in the pond comes to the surface, the water may stop flowing. If this happens, put the siphon into the pond to fill it with water and begin again.
128. It will take a lot more time to empty a pond with a siphon than with an outlet. If you use a siphon of about 3 centimetres in diameter, it will take about three days to empty your pond.
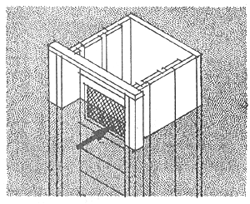
129. Your inlet should have a screen to keep out wild fish, dirt and trash when you fill the pond.
130. If you fill your pond with an inlet trench, it should have a screen, too.
131. A siphon, which is very small, usually does not have a screen.
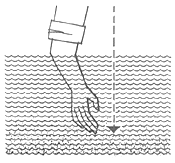
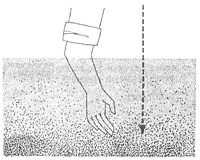
132. Your outlet should have a screen to keep your fish from getting away when you empty your pond.
133. Your overflow should have a screen to keep your fish from getting away when the pond is too full and the water begins to overflow.

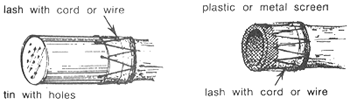
134. You can easily make screens for your inlet, outlet and overflow from fine-mesh plastic or metal or from a tin with holes in the end.
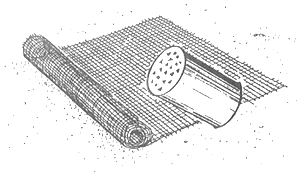
135. Screens should be placed outside the pond on the inlet pipe and inside the pond on the outlet and overflow pipes.
136. This will keep the pipes from filling with trash which could stop the flow of water.
137. Lash the screens tightly in place on the pipes, using heavy cord or light wire.
138. If you fill your pond by cutting a trench through the bank, you can screen the opening using a fish trap, split and woven bamboo, a clay pot with holes in the bottom or a piece of metal roofing with holes.
139. When you are filling or emptying your pond, clean the screens often. If you do not do this, dirt and leaves will cover them up and the water will not flow.
140. This book has told you how to build a bigger pond and how to build it better.
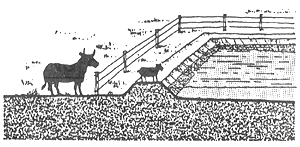
141. Now that your new pond is built, you will have to learn more. You will need to learn
how to fill your pond with water
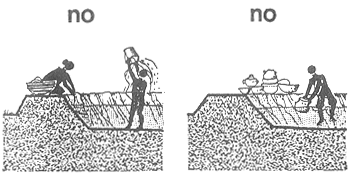
how to fertilize your pond
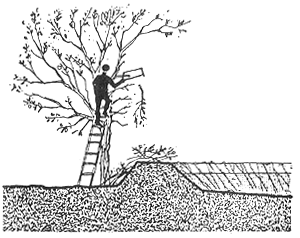
about the fish you will put into your pond
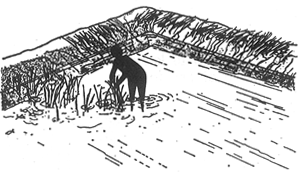
how to feed your fish every day
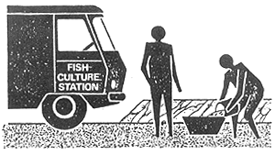
how to care for your fish
how to harvest your fish
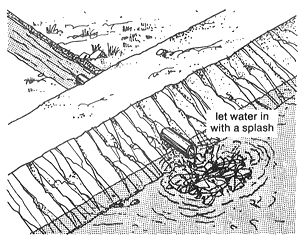
142. Before you let the water into your new pond, there are a few things that you must do.
143. Make sure that the screens on the inlet, outlet and overflow are in place and tight.
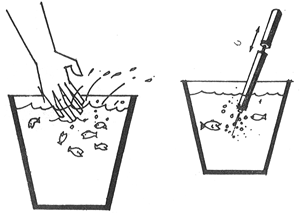
144. Make sure that the outlet is tightly closed. To do this, wrap a wood plug with old cloth, put it in the outlet pipe on the outside of the pond and tap it lightly with a hammer so that it will stay in the pipe when the pond fills with water.
145. If you have built a better outlet with a T or an L piece
turn it to the upright position.
146. Put rocks on the bottom of your pond under the inlet where the water will fall when it begins to come into the pond.
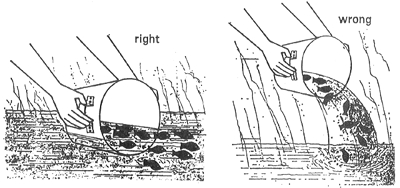
147. This will keep the bottom from washing away. It will keep the water from getting too muddy. It will make the water splash when it first comes into the pond and bring air for the fish to breathe.
148. Now you are ready to fill your pond.
149. Dig a small ditch from the water source to the inlet to bring the water to your pond.
150. Let the water run into the pond until it reaches the level of the overflow pipe on the inside of the pond.
151. If your inlet pipe is about 10 centimetres in diameter, you will need about half a day to fill your pond.
152. When the water reaches the level of the overflow pipe it will be about 60 centimetres deep at the shallow upper part of the pond and about 90 centimetres deep at the deepest part.
153. Now you are ready to fertilize the water in your pond.
154. Build a crib from bamboo or wood to hold the fertilizer as you did with your first small pond. Build it in one corner in the shallow part of the pond. The drawing below will show you how.

155. You can fertilize the water in your new pond with
156. You can fertilize your pond with animal or plant compost
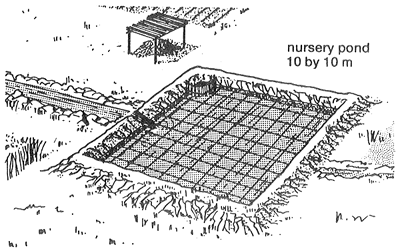
157. Items 159 to 169 tell you how to make animal compost. If you do not have animal manure, you can fertilize your pond with compost made with plant material.
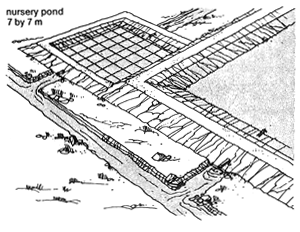
158. To make compost with plant material make a compost pile using layers of grass, chopped leaves or other plant material mixed with a little topsoil and damp it with water to make it rot faster.
159. Make a compost pile near the pond. Put it in a shady place protected from rain.
160. Make your pile in layers. Make the first layer of grass or leaves mixed with a spadeful of topsoil, and damp it with water to make it rot faster.
161. Then make a second layer of animal manure mixed with a spadeful of topsoil and some water.
162. Use animal manure from sheep, goats, cattle, pigs, chickens or ducks.
163. In place of animal manure you can also use cotton seed, spoiled fruit, household garbage, ashes from the fireplace or night soil.
164. Then make another layer of grass or leaves, and another of manure, until you have a large pile.

165. Keep your compost pile damp by watering it every few days.
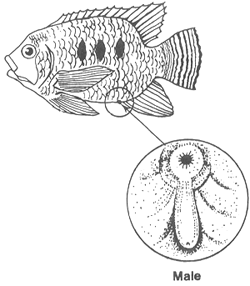
166. Let the compost pile rot for about a month.
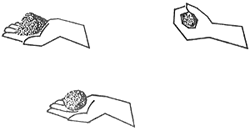
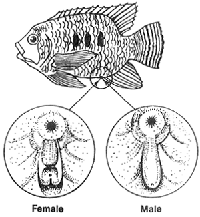
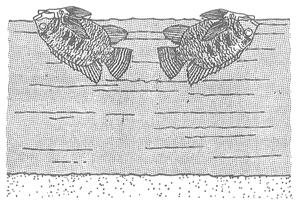
167. Take compost from the bottom of the pile, or the old part of the pile, where it is most rotten, to put in your pond.
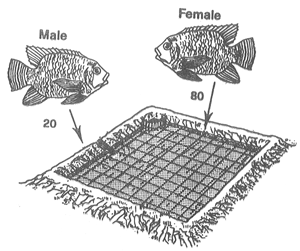
168. Add new layers to your pile every week so that you will always have compost.
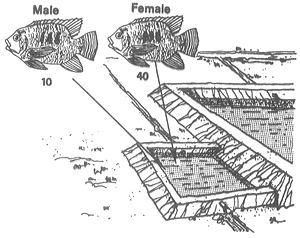
169. If you have too much compost you can use some to fertilize your land.
170. When you first put fertilizer into your crib, pack it down well and fill the crib to the water line. This will be about 60 centimetres deep in the shallow part of the pond.
171. If you are going to use compost, you will need enough to fill your crib at the beginning and later you will need enough compost to add about a bucket each week.
172. If you are going to use animal manure, you will need about two buckets to put in your crib at the beginning. Mix the two buckets of animal manure with enough fresh plant material to fill your crib to the water line. Later, you will need enough animal manure to add about a bucket each week.
173. If you are going to use plant material or compost made with plant material, you will need enough to fill your crib at the beginning and later you will need enough to keep the crib full to the water line.
174. If you fertilize your pond with animal compost or animal manure, the water will start to turn green in two or three days. If you fertilize your pond with plant compost or plant material, it will take one week or longer.
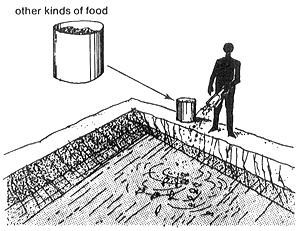
175. When the water begins to turn green, you will know that natural food is growing in your pond. It will take about a week to become green enough.
176. You can make a simple test to be sure that the water is green enough. Put your arm in the water up to your elbow. If you are just able to see the ends of your fingers, the water is green enough.
177. You must take care of your pond every day when you take food to your fish.
178. Be sure the pond is full of water.
179. Be sure the screens are in place so that your fish cannot get away.
180. Do not let weeds cover more than one quarter of the surface. If there are too many pull them up.
181. Cut the weeds and grass on the banks of the pond.
182. Be sure the water is not leaking through the banks. If you find leaks stop them up right away with good soil.
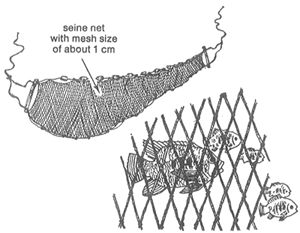
183. Get rid of birds, frogs, turtles, rats and snakes. They can hurt your fish.
184. Here are some more ways to take care of your pond.
185. Do not let large animals such as cows, buffalo, horses or donkeys graze on the banks of your pond. They are too heavy and may break the banks down.
186. You may let small animals such as goats and sheep graze on the banks.
187. Do not use your pond, your pond water source or your water supply ditch for bathing, or washing clothes, dishes or cooking pots.
188. Do not plant big trees near your pond. If there are already big trees there, cut any branches that hang over the pond. The water in your pond may not turn green enough if your pond is in the shade.
189. The first time you stock your pond you will need to find some baby fish.
190. You can get them from a fish-culture station
or from another fish farmer.
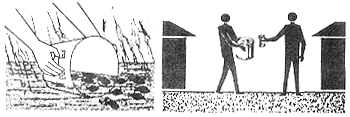
191. If you use Three-spotted bream you will need 25 baby fish for every 10 square metres
192. Be careful not to put too many fish in your pond. Stocking a fish pond is like planting a field. If plants are too close together they grow badly. If there there are too many fish in your pond they will grow badly, too, and they will stay small.
193. If you want to use a different fish, ask your extension agent for help.
194. Before you put the baby fish in the pond, be sure that the water where they are is not hotter or colder than the water in the pond.
195. You can find this out by putting one of your hands in the water with the fish and the other in the pond.
196. If one is hotter or colder slowly put water from the pond in the water with the fish until they are both the same.
197. If you do not do this the fish may die when you put them in the pond.
198. Do not pour the fish into the pond. Gently put the container into the water, tip it a little, and let the fish swim out by themselves.
199. When you grow fish in your first pond you may get the baby fish from a fish culture station or from another fish farmer.
200. If you improve your fish farm and it is bigger than it was before, you will need more baby fish than you did before.
201. If you are using Three-spotted bream as you did with your first pond, you will need 25 baby fish for every 10 square metres of pond.
202. If your pond is 20 by 25 metres or 500 square metres, you will need 1250 baby fish.
20 × 25 = 500
500 m2 area has 50 × 10m2
50 × 25 = 1250
203. Three-spotted bream
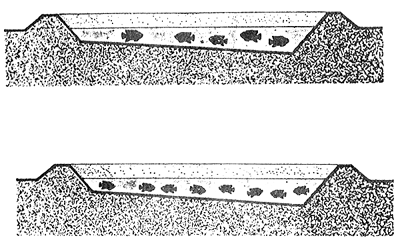
204. To make sure that you have enough baby fish you must grow your own.
205. Since you will need more baby fish it is easier to grow your own baby fish.
It is easier and cheaper than getting them from a fish culture station or another fish farmer.
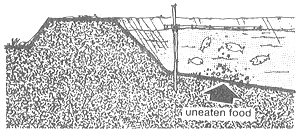
206. Also, if you are going to improve your fish farm even more by building more ponds it is better to have your own supply of baby fish.
207. When you grow your own baby fish, you will be sure to always have enough of them when you need them
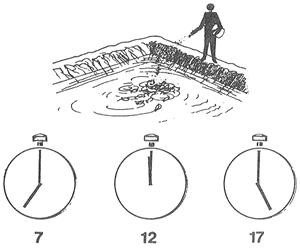
208. To grow your own baby fish, you will need a nursery pond.
209. A nursery pond of about 7 by 7 metres, or about 50 square metres, will be large enough to grow the baby fish you will need.
210. A nursery pond can be built just like a big pond but since the nursery pond is smaller the banks need not be as high or as wide.
211. You can build your nursery pond with an inlet, outlet and overflow like those you used in your big pond.
212. You can also use a shallow trench to let water into your nursery pond and use a siphon to drain the water out but you will still need an overflow to control the water level in the nursery pond.
213. You will also need a crib to hold the fertilizer in your nursery pond.
214. If you build your nursery pond next to your big pond so that they share a bank, you will only need to build three new banks for it.
215. If you grow baby fish near your pond, you will not have to carry them far and they will not be hurt when you are carrying them.
216. Fill your nursery pond with water and fertilize it with compost, animal manure or plant material as you did with your big pond. Wait for the water to turn green.
217. Now you are ready to put fully grown male and female fish into your nursery pond. A fully grown Three-spotted bream is about 20 centimetres long.
218. Be careful to put the right number of male fish and female fish into your nursery pond. The drawing shows you how to see the difference between male fish and female fish.
219. If you are using your pond of 10 by 10 metres as a nursery pond and you are using Three-spotted bream you will need to put 20 fully grown male fish and 80 fully grown female fish into the pond.
220. If you use a nursery pond of 7 by 7 metres and you are using Three-spotted bream you will need to put 10 fully grown male fish and 40 fully grown female fish into the pond.
221. The fully grown fish in your nursery pond will get much of their food from small plants and animals which grow in the green water.
222. When the baby fish are born they will be very, very small and at first they will get all of their food from small plants and animals which grow in the green water.
223. These plants and animals are so small that they can hardly be seen or they cannot be seen at all. But if the water is green in your nursery pond, you can be sure that they are there.
224. So in your nursery pond you must always be very careful that the water stays green so that your baby fish will have enough to eat.
225. To keep the water green, do not forget to put a bucket of fertilizer in the crib in your nursery pond each week. If you are using plant compost or plant material, keep the crib filled to the water line.
226. To keep the full-grown fish in your nursery pond healthy, you must also feed them other kinds of food.
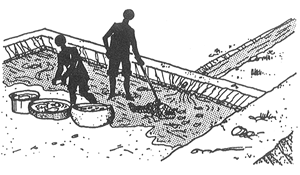
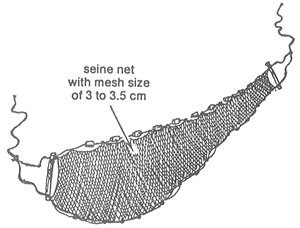
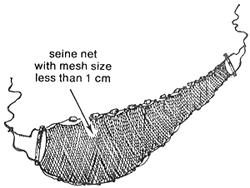
227. When the baby fish begin to grow, they, too, will eat the other kinds of food.
228. You can give the fish in your nursery pond many things to eat. But you must be sure that this food is ground or cut very small so that the baby fish can swallow it.
229. You can give the fish in your nursery pond termites or finely ground or cut
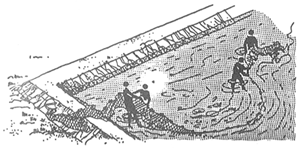
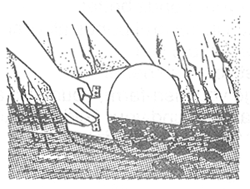
230. The bigger your baby fish grow, the more food they will need. Feed the fish in your nursery pond (7 by 7 metres)
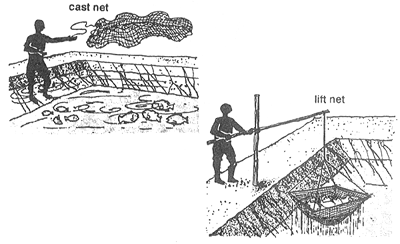
231. If you see that the fish do not eat all of their food, give them a little less the next day.
232. If you see that the fish eat all of their food very quickly, give them a little more the next day.
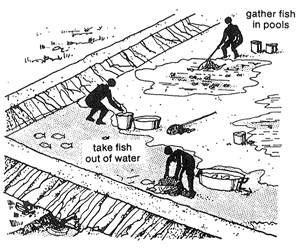
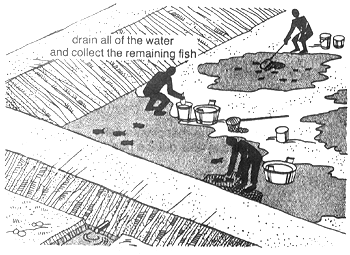
233. After about three months, there will be many baby fish of different sizes in your pond. Then you can begin to take baby fish out of your nursery pond to put into your big pond.
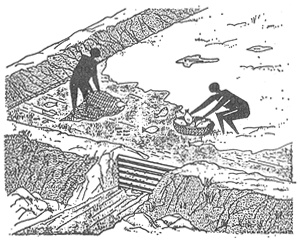
234. Use baby fish which are 5 centimetres or longer to put into your big pond. If there are many baby fish which are 5 centimetres or longer, choose the biggest ones to put into your big pond.
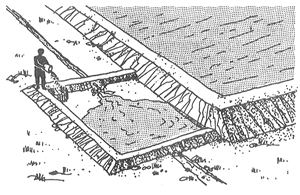
235. The easiest way to take out your baby fish is to use a seine net. If you use a seine net with a mesh size of about 1 centimetre the smaller fish will swim through and you will catch the fish of 5 centimetres or longer. But be sure to put the fully grown fish back in your nursery pond.
236. From now on, you can take baby fish out of your nursery pond each month for your own use or to sell.
237. Be careful that your nursery pond does not become too full of fish. If there are too many fish, they will not grow well and your baby fish will not be strong and healthy.
238. To keep your nursery pond from becoming too full of fish, drain all of the water out of the pond each year and collect all of the fish.
239. You can eat the big fish that were in the nursery pond. Item 300 will tell you what to do with the baby fish.
240. Wait until the bottom of the nursery pond is dry, then clean and repair the bottom and the banks. Items 311 to 316 will tell you how.
241. Now fill the nursery pond with water and fertilize it as you did before. When the water is green, put in the right number of fully grown female fish and male fish. Items 218 to 220 will tell you how many fully grown fish to use.
242. In about three months, you will be able to take more baby fish out of your nursery pond.
243. You must be very careful when you carry your baby fish from one place to another. Baby fish can be hurt easily.
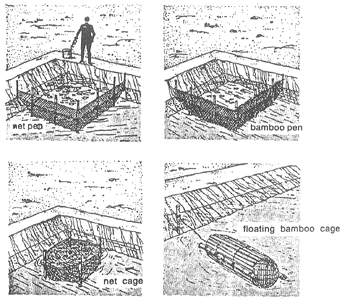
244. When you take the baby fish out of your nursery pond using a seine net, do not carry them in the seine net. Carry them in a container such as
245. When you carry baby fish, you must be careful to
246. If you carry your baby fish in plastic bags, carry the bags in a box so that they will not break. Cover the box and the plastic bags with a wet cloth to keep them cool.
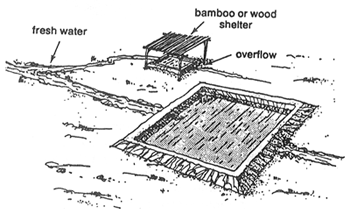
247. If you see that the baby fish are gasping for air, put some air into the water from time to time by
248. When your new big pond is full of water, you have fertilized it and the water has become green enough, you are ready to put in the baby fish.
249. You already know that if you use Three-spotted bream in a pond 20 bv 25 metres, you will need 1250 baby fish which are 5 centimetres or longer.
250. Put the baby fish gently into your pond.
251. You already have learned that the big fish in your pond will get much of their food from small plants and animals which grow in the green water.
252. To keep the water green, do not forget to put a bucket of fertilizer in the crib in your pond each week. If you are using plant compost or plant material, keep the crib filled to the water line.
253. To make your big fish grow more quickly, you must also feed them other kinds of food. You can feed them
254. You can feed your fish once a day. But your fish will eat better and grow faster if you feed them two or three times during the day.
255. Prepare all the food for one day's feeding at the same time and give the fish part of the food at two or three different times during the day.
256. Always try to feed your fish at the same times every day.
257. The bigger your fish grow, the more food they will need. If your pond has 1250 fish in it, feed them
258. It is not easy to know exactly how much food to feed your fish. You must watch them when they eat to learn how much food they need.
259. Feed your fish in the shallow part of the pond so that you can see them eat.
260. If you see that the fish do not eat all of their food, give them a little less the next day.
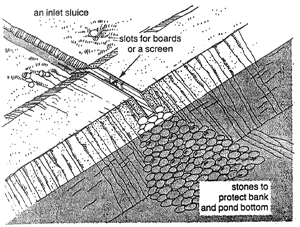
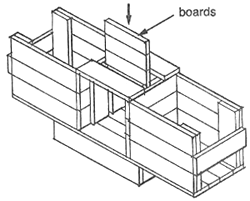
261. If you see that the fish eat all of their food quickly, give them a little more the next day.
262. If you feed your fish at the same place every day, you will see whether the fish are eating well. If you give them too much, the food which is not eaten will stay on the bottom.
263. Too much uneaten food on the bottom of the pond will take the air out of the water.
264. To make it easier to see if your fish are eating well, mark several places in your pond to feed them.
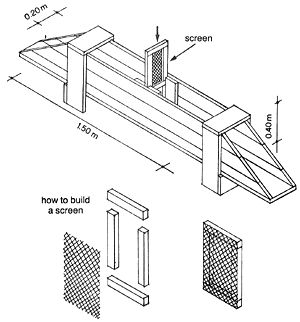
265. Mark each place by making a square or a ring of light wood or bamboo. Drive a pole into the pond bottom and attach the square or ring, as shown in the drawing.

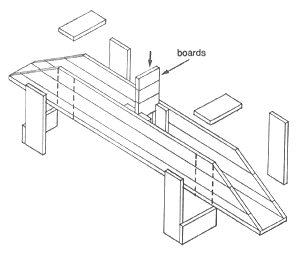
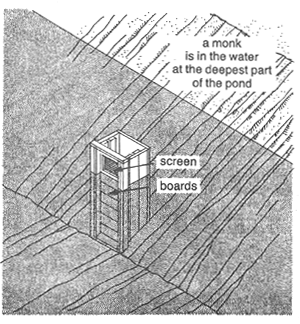
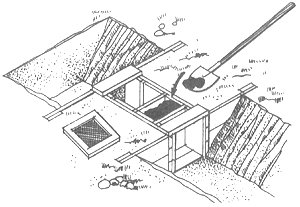
266. When you feed the fish, put the food inside the square or ring. You may be able to see any uneaten food on the bottom under the square or ring. If you cannot see the bottom, feel with your hands to find any uneaten food that may be there.
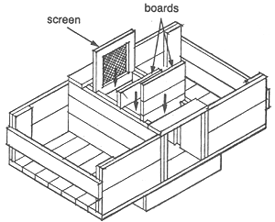
267. You must take very good care of your fish. Watch them carefully to see that they are healthy and swimming strongly.
268. If you find any dead fish floating in your pond, take them out right away and change some of the water in your pond.
269. To do this, open the inlet and let in some new clean water. The old water will drain out of the pond at the overflow. Do this for 2 or 3 hours each day for several days until you see that your fish are well.
270. If the weather is too hot, if you feed your fish too much, or if you put too much fertilizer into the pond, there may be too little air in the water for your fish to breathe.
271. If you see your fish coming to the surface gasping for air, give them less food and do not put any fertilizer into your pond for several weeks.
272. Put more air into the water of your pond by changing some of the water for several days, as you did in Item 269.
273. When you let new water into the pond, let it in quickly so that it will come with a splash and bring more air into the water. This will help your fish to breathe easily.
274. If you see any other things wrong with your fish that you do not understand, stop feeding them and stop putting fertilizer into the pond. Then change some of the water in your pond every day for several days, as you did in Item 269.
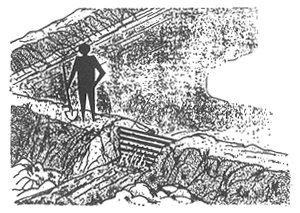
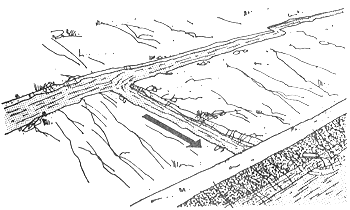
275. After several days if your fish are still not well, if they are not eating well or gasping for air or are not swimming strongly, ask your extension agent or your fish culture station for help.
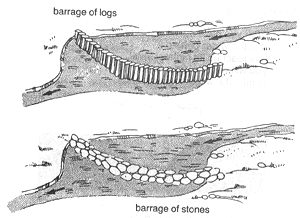
276. Do not take any fish out of your pond during the first five months. After five months you may catch four or five big fish each week to eat with your family.
277. When the fish are big enough, it is time to harvest all of them. Usually, they will be big enough to harvest in about six months.
278. Harvest the fish early in the morning when it is cool.
279. Have some watertight containers ready to store live fish.
280. The easiest way to harvest is by draining the water out of the pond.
281. But there are several ways to harvest your fish. You can harvest them
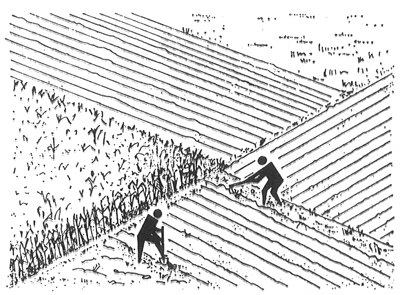
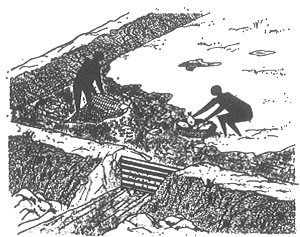
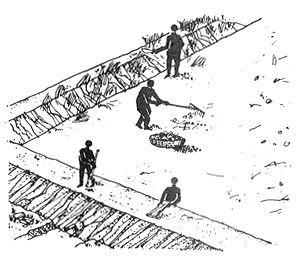
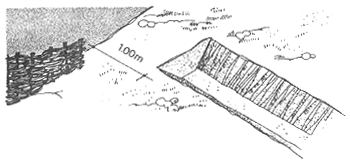
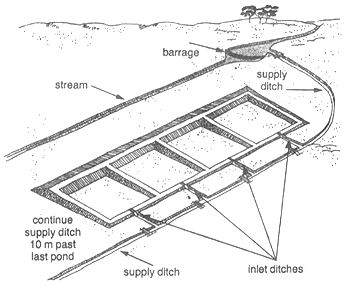
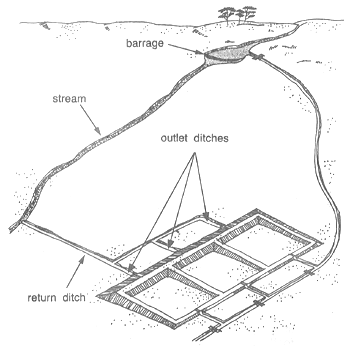
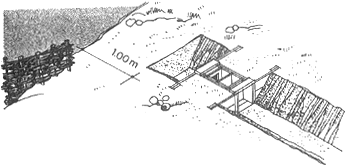
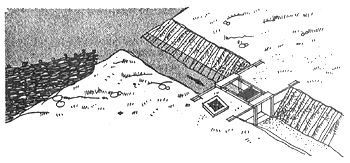
282. Here are some things that you should know about these different ways of harvesting your fish.
283. If you do not have enough water to fill your pond again and you want to harvest only part of your fish, you can use a seine net to gather them without draining the water.
284. A seine net with a mesh of 3 to 3.5 centimetres will catch the biggest fish and allow the small fish to escape through the net.
285. You will need several people to harvest with a seine net. Perhaps your family can help you. Perhaps you can ask your neighbours for help, and later help them with their work or give them some fish to pay them for their help.
286. Start at the deep end of the pond and pull the seine net slowly toward the shallow end. The drawing shows you how.

287. You can also use a cast net or a lift net to harvest some of the fish from your pond without draining the water.
288. With a cast net or a lift net. It is easier to catch the fish while they are eating and they are all together. Keep the biggest fish and put the smaller fish back into the pond.
289. If you have enough good water to fill the pond again, it is best to drain all of the water. If you drain all of the water, you will be sure to catch all of the fish and you can clean the bottom of your pond.
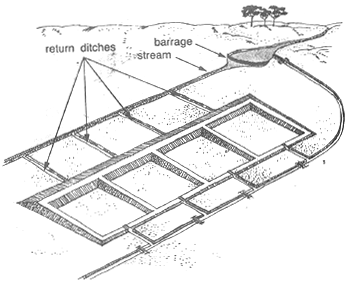
290. While the pond is being drained, use baskets or hand-nets to take the fish out of the water. After all of the water has been drained from the pond, you may still find small pools here and there on the bottom. Be careful to gather all of the fish in the pools.
291. If you have only enough water to fill part of your pond, do not drain out all of the water. Drain only part of it out.
292. Pull the wood plug closing the outlet, or, if you are using a siphon, put the siphon in place and begin to let the water out.
293. Let half the water flow out through the outlet or siphon. Then put the plug back in the outlet or remove the siphon.
294. Now you can begin to harvest your fish with a seine net. Do it the same way as you did in Item 286. If you have a seine net with a mesh size of less than 1 centimetre, you will be able to catch all of your fish.
295. Take all the big fish and put the small fish back. If you have too many baby fish, Item 310. will tell you what to do with them.
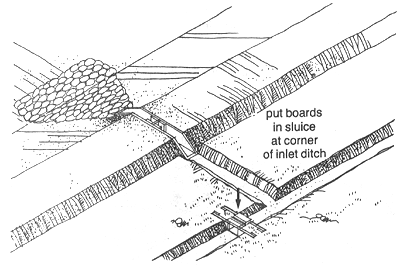
296. When you are finished harvesting, let water flow back into the pond until it reaches the level of the overflow pipe.
297. You will harvest more big fish from your big pond
298. When you harvest your big fish, you must be ready to eat them or sell them or preserve them the same day.
299. When you harvest your pond, you will also catch many fish that are too small to eat or to be sold at the market.
300. If you have not built a nursery pond, you may need some of these baby fish to put back into the big pond you are harvesting. You may also be able to sell some to another fish farmer. But you must take good care of the baby fish until you are ready to use them or sell them.
301. If you have another pond that is full of water, you can put these baby fish in a pen of split bamboo or net in the corner of the other pond. You can also keep these baby fish in a net pen or in a floating cage of split bamboo.
302. If you do not have another pond, you should keep the baby fish alive in a special small pond nearby, until you are ready to use them.
303. The smallpond can be a simple hole in the ground about 3 by 3 metres and about 40 centimetres deep. You should have it ready before you begin to harvest.
304. Your baby fish will stay alive longer if they are out of the sun. Build the small pond in the shade, under a tree or put a shelter over it. You can build a simple shelter using bamboo or wood.
305. Your baby fish will stay alive longer if they have fresh water. Build the small pond with an overflow and put the small pond near the ditch which brings water to your big pond. That way you can have fresh water running through your small pond.
306. You can also let fresh water into your small pond with a small ditch or a siphon.
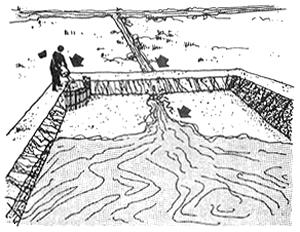
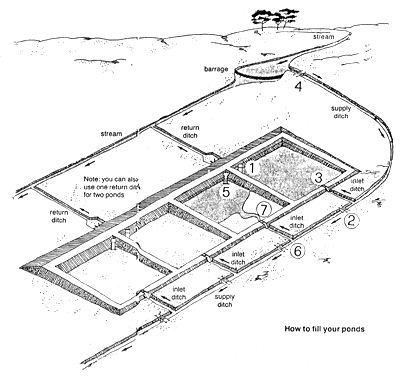
307. Your baby fish will stay alive longer if you feed them a little food each day. Feed your baby fish termites or finely ground rice bran, cottonseed cake or groundnut cake when they are in the small pond.
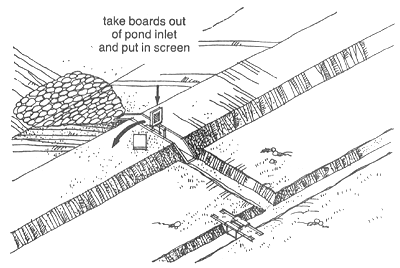
308. If you keep your baby fish in a small pond out of the sun in fresh water and if you feed them each day, they will stay alive for about 5 days. This is enough time to dry and clean and repair the bottom of your big pond, to fill it with water and begin to fertilize it, and to put the baby fish back into your big pond.
309. If you have built your own nursery pond, you will not need these baby fish.
310. If you have more baby fish then you can use or sell, you can dry them in the sun. After you have dried the baby fish, grind or pound them and mix them with crushed cottonseed or groundnut cake or with rice bran to feed your big fish, your poultry or your pigs. You can also use the baby fish to fertilize your farm garden.
311. If you have drained all of the water from your pond, you can clean the bottom of the pond.
312. But do not let your pond bottom become too dry. If the bottom of your pond becomes too dry, it may crack and will not hold water well when you are ready to fill the pond with water again.
313. Repair the banks and cut the weeds and grass on the banks around the pond.
314. If there are any water leaks in the banks or around the inlet, outlet or overflow, stop them by packing them with good clay soil.
315. When you are finished, let water into the pond and fertilize the water with animal compost, plant compost, animal manure or plant material, as you did before.
316. When the pond is green again, put 1250 baby fish into the pond (500 m2). Use only healthy fish which are 5 centimetres or longer.
Ways to improve
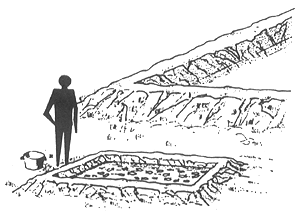
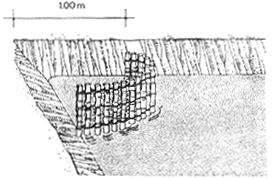
However, there are still more things that you can do to improve your fish-farming. You can
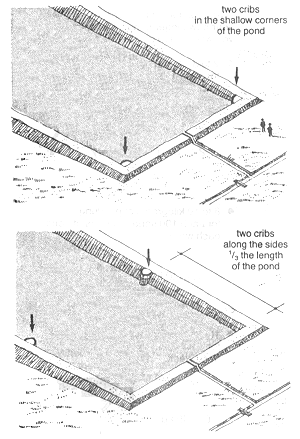
317. You can also build a kind of gate in the trench to control the flow of water into the pond. This is called a sluice.
318. A sluice has a wall on each side of the trench and a floor set into the bottom of the trench. There are slots in the walls to hold wooden boards or a screen.
319. Boards are put into the slots to keep water out of the pond or taken out to let water in. When you are filling the pond, put in a screen to keep out wild fish.
320. You can build a sluice from wood, or if you know how to build with bricks or blocks, you can use these.
321. The drawings below and on the next page show you how to build an inlet sluice using wood.
Building a wooden inlet sluice
Parts of a wooden inlet sluice
this wooden sluice can be built using rough wood boards at least 2 cm thick
build the sluice using nails or wooden screws
this sluice is 20 cm wide and 40 cm deep
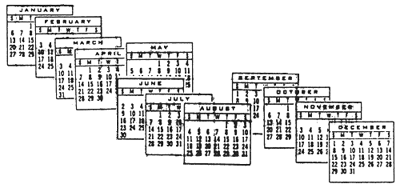
Where to put an inlet sluice in the pond bank
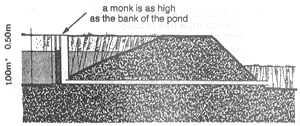
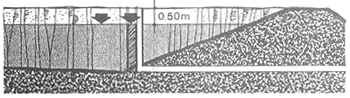
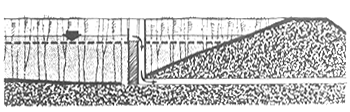
322. You can build another kind of outlet to empty a bigger pond faster. It is built inside the bank at the deep end of the pond. This kind of outlet is called a monk. When the pond is filled, the monk will be in the water.
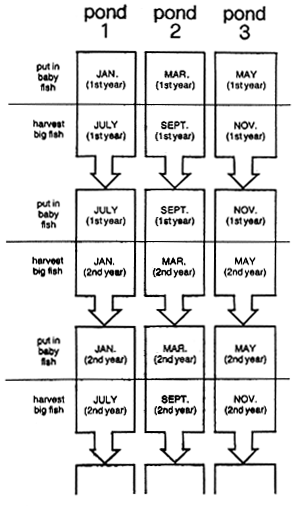
323. A monk is a tall box with two sides, a back, a front formed by wooden boards, and a bottom. Each side has two slots to hold two rows of the wooden boards.
324. Boards are put into the slots to keep water in the pond or taken out to let water out.
325. A monk also has a screen
The screen fits on top of the first row of boards and keeps your fish from getting out when the pond is too full or when you are emptying it.

326. A monk also serves as an overflow. So, you will not need to have an overflow pipe like the one shown on item 115.
327. You can build a monk from wood, or if you know how to build with bricks or blocks, you can use these.
328. The drawings on the next pages will show you how to build a monk using wood, and how to fill and empty a pond using a monk.
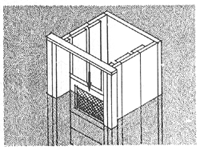
Building a wooden monk
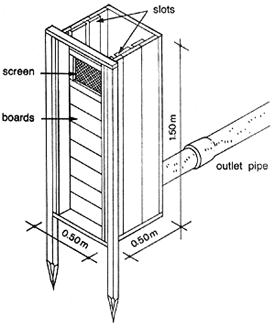
Note: the outer pipe should be placed at the very bottom of the monk
Where to put a monk in the pond
Parts of a wooden monk
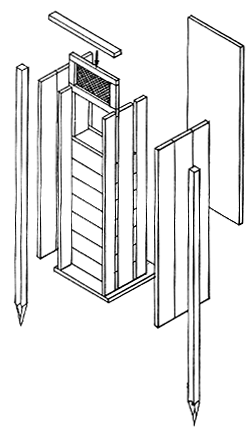
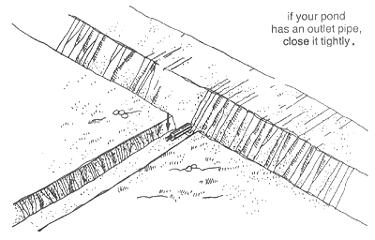
a monk can be built using rough wooden boards at least 3 cm thick
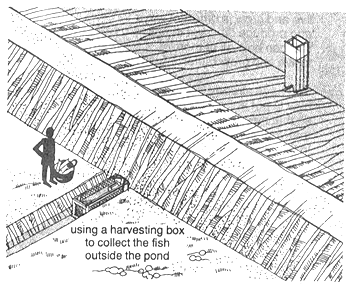
build the monk using nails or wooden screws, or you can also use bolts
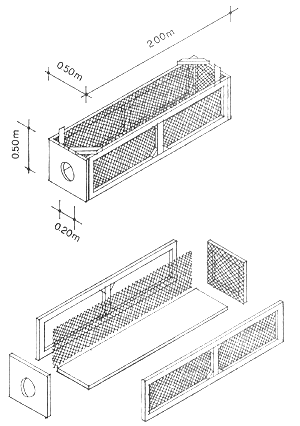
this monk is 0.50 m wide, 0.50 m deep and 1.50 m high
Note: try to use wood that will not easily rot when it is in the water
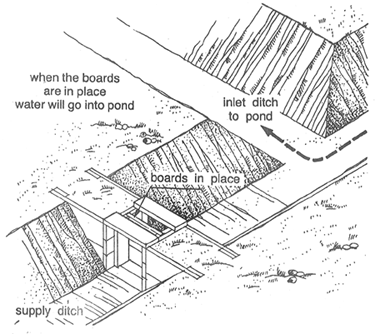
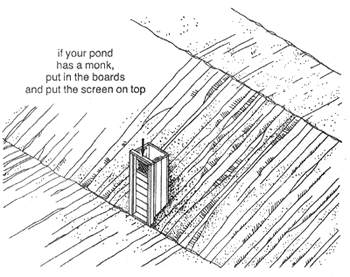
How to fill a pond when you have a monk
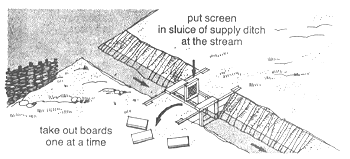
| 1 put both sets of wooden boards in the slots in the monk and put the screen in place on top of the first row of boards | 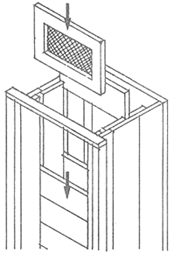 |
2 the boards should be as high as the water depth that you want in the pond
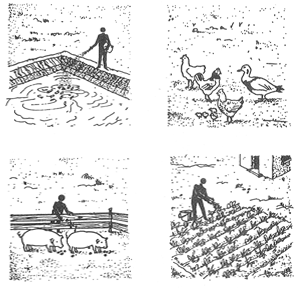
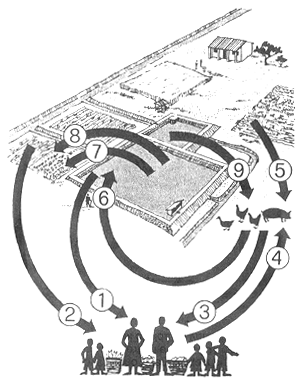
3 pack the space between them with good clay soil to keep water from leaking out
4 let water into the pond

5 when the water reaches the top of the boards, stop the flow of water
6 leave the screen in place to act as an overflow if the water becomes too high
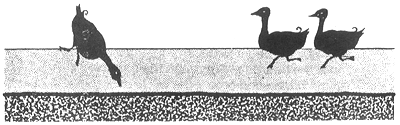
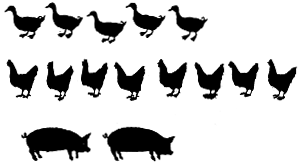
Note: you may have to let water into your pond from time to time if the water-level gets too low
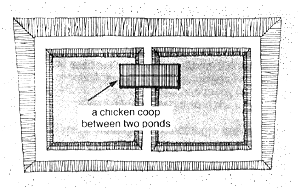
| How to empty a pond when you have a monk | 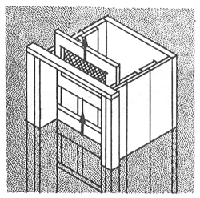 |
| 1 take out the screen and remove the top board from each slot |
2 the water will begin to flow out and wash away the clay that was between the boards
3 quickly put back the screen to keep the fish from getting out
 |
4 water will flow out until it reaches the level of the next row of boards
5 when this happens, take out the screen again, remove the top row of boards and quickly put back the screen
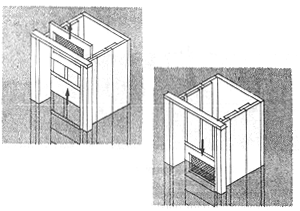
6 more water will flow out
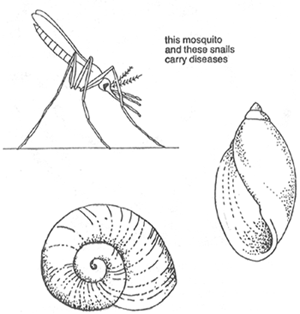
7 continue to take out boards one row at a time, always putting back the screen, until the pond is empty
Note: later in this booklet, you will learn how to harvest fish when you have a monk
329. You can further improve a pipe outlet by placing a collar of cement around the centre of the pipe.
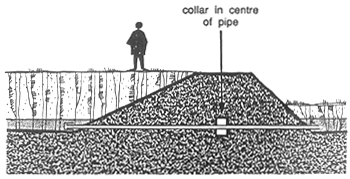
The collar will hold the pipe in place in the bank and keep water from seeping through the bank outside the pipe.
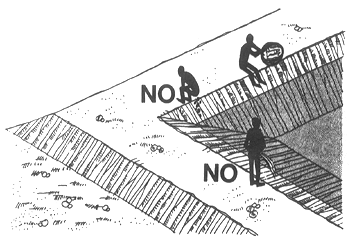
330. The drawings below show you how to build a wooden form to make a cement collar.
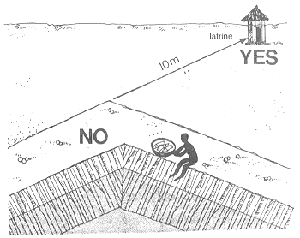
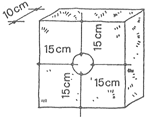 | 1 a collar should be about 10 cm thick and at least 15 cm from the pipe to each edge of the collar |
| 2 build a wooden form to mould the cement around the pipe | 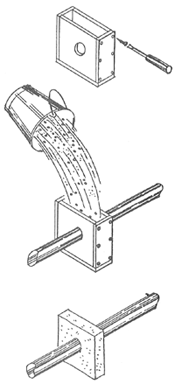 |
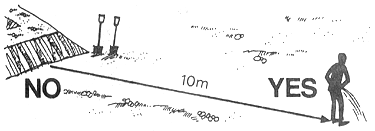
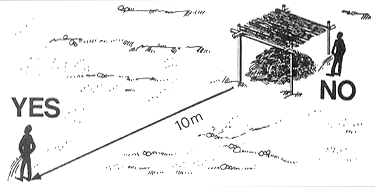
| 3 place the pipe in the form and fill the form with a mixture of one part cement to two parts sand, and some water | |
| 4 remove the form after the cement has completely dried | |
| Note: you can make a form using nails; however, if you use wooden screws, you can take the form apart and use it again |
331. If the stream that supplies your water is not much higher than your ponds, it may be difficult to get the water to run down when you want to fill them.
332. By building a barrage, you can raise the level of the stream so that water will run down more easily into your fish-ponds.
barrage of tree branches
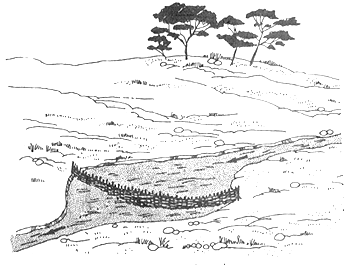
333. You can build a simple barrage (using a woven mesh of tree branches like the one shown above). You can also use loose stones or rocks or logs set into the stream bottom.
334. A barrage does not hold back all of the water that runs down the stream. Depending on how it is built, some of the water will be held back and some of the water will flow through or over the barrage.
335. If the tree branches, logs or rocks are placed tightly together, the water level behind the barrage will be higher.
336. If the tree branches, logs or rocks are not placed so tightly, the water level behind the barrage will be lower.
337. If you build a barrage and too much water flows through, you can hold back more water by putting more branches, logs or rocks on the barrage.
338. After you have built a barrage and the water behind it has reached its highest level, you will need to dig a supply ditch to take the water to your ponds.
339. Begin by digging the supply ditch just behind the barrage where the water is deepest. However, dig it in such a way that the water in the stream will not flow into the ditch.
340. You can do this by starting the supply ditch about 1 metre away from the edge of the water. When you are ready to fill your ponds, you can remove this 1-metre strip (see Item 358) and the water will flow into the ditch.
341. The ditch should run near the shallow ends of your ponds and in the same direction as the stream that supplies your water.
342. The ditch should have very little slope. You can use a straight board and a mason's level to help you to dig your ditch.
343. When you reach your highest pond, the ditch should be near the inlet. Continue to dig your water-supply ditch until you reach your lowest pond.
344. When the supply ditch is past the end of the lowest pond, continue to dig it downhill for about 10 metres. Then bring it slowly to the surface. That way, when you fill your ponds, any extra water will flow out at ground level.
345. Now, dig a small ditch to connect the inlet of each pond to the supply ditch.
346. You will also need to dig one or more ditches to take the water back to the stream when you empty your ponds.
347. These are called return ditches and how you dig them will depend on how your ponds are placed and how near they are to the stream. Try to choose the easiest and shortest path to take the water back to the stream.
348. If your ponds are near the stream, the easiest way to get the water back is to dig a return ditch from the outlet of each pond straight to the stream. You can also use one ditch for two ponds (see the drawing on item 370)
349. If your ponds are not near the stream or if you cannot dig a ditch straight to the stream, dig only one return ditch along the outlet side of your ponds, which can take all the water from all the ponds.
350. Start this ditch at the outlet of your highest pond. The ditch should run past the outlet of the lowest pond and then back to the stream.
351. Now, dig a small ditch to connect the outlet of each pond to the return ditch.
352. When you have built your ditches, you will need a way to control the flow of water from the stream into your supply ditch and from your supply ditch into the inlet ditches of each of your ponds.
From the stream into your supply ditch
353. To control the flow of water into your supply ditch, you can build a sluice somewhat like the one you learned to build for an inlet (see item 321)
354. However, instead of one slot in each wall, this sluice will have three slots in each wall. Two sets of slots are for wooden boards and the third set is for a screen to keep out wild fish.
355. Build this sluice at the top of the supply ditch just behind the 1-metre strip of soil that you left at the edge of the water when you began digging the ditch.
356. The drawing at the top of the next page shows you how to build a wooden sluice for the supply ditch at the stream.
Building a wooden sluice for the supply ditch
357. Pack the space between the boards with good clay soil to keep the water from leaking through. However, do not put in the screen until you are ready to use the sluice. Put it aside so that it will not be broken.
358. Now, remove the 1-metre strip of soil you left at the edge of the stream. The water will flow into the ditch up to the wooden planks in the sluice.
From the supply ditch into your ponds
359. You can build a smaller sluice to control the flow of water into your ponds. With this sluice you need only one set of boards. The drawing below shows you how.
Building a wooden sluice for a pond inlet
360. You will need one sluice for each of your ponds. Build them at the lower corners of each inlet ditch. The drawing below shows you where to put this kind of sluice.
361. Slide wooden boards into the slots of this sluice to send all the water into a pond, or take them out to let all the water flow farther down the supply ditch into another pond.
362. You can also adjust the boards in each sluice so that part of the water will go into one pond and the rest will flow down to feed the other ponds.
363. When you have finished digging your supply and return ditches and have built all of the sluices, you are ready to fill your ponds.
Note
Ponds are filled one by one. Items 364 & 366 will tell you, step by step, how to begin filling your ponds. The large drawing on pages 38 and 39 will also help you to understand the various steps.
364. To fill the first pond do the following
make sure that the outlet of the first pond you are going to fill is closed
put the wooden boards in the sluice at the corner of the inlet ditch to the first pond
take out the wooden boards of the inlet sluice to the first pond and put in the screen
put the screen in the sluice at the top of the supply ditch and take out the wooden boards one at a time until water begins to flow down the ditch and into the first pond.
365. If you are going to fill another pond you should prepare it now, while the first pond is being filled.
366. To prepare the next pond, do the following
make sure the outlet of the next pond you want to fill is closed
put the board in the sluice at the corner of the inlet ditch
take the boards out of the inlet sluice and put in the screen.
367. Watch your first pond carefully. When it is full of water put back the boards in the inlet sluice and take out the boards in the sluice at the corner of the inlet ditch (see Item 75 in this booklet).
368. The water will now flow further down the supply ditch and begin to fill the next pond.
369 Continue to do this until all of the ponds are full.
370. When your ponds are full of water, put a few of the wooden boards back in the sluice at the top of your supply ditch. However, make sure that some water is always running into each of your ponds so that they will always be full.
Ponds are filled one by one
The first pond
close outlet
close sluice at corner of inlet ditch
open inlet sluice
open sluice at stream one board at a time
The first pond will begin to fill
Prepare the second pond
close outlet
close sluice at corner of inlet ditch
open inlet sluice
When the first pond is full
close the inlet sluice (3) and open the sluice at corner of inlet ditch (2)
The second pond will begin to fill
Continue to do this until all ponds are full
Note:
Make sure that some water is always running down the supply ditch and into each of your ponds so that they will always be full.
371. To grow the natural foods that your fish need, you can fertilize your bigger ponds just as you did your smaller ponds. You can fertilize them with
372. However, with bigger ponds you will have to be especially careful to fertilize them very well.
373. In Items 155 to 173, you learned some things that you need to know to fertilize a pond. Here are some other things that you should know.
374. With your old smaller ponds, you built a crib in one corner in the shallow part of the pond to hold the fertilizer just like the one shown below.
375. If you build a new pond that is bigger than 500 square metres, you should build two cribs in the corners of the shallow part of the pond. The drawings below show you where to put them.
376. If you are going to fertilize your new bigger ponds with compost, you will need to put in
10 kilograms of compost for each 100 square metres of pond each week.
377. If you are going to fertilize your new bigger ponds with animal manure, you will need to put in
2 to 3 kilograms of poultry droppings for each 100 square metres of pond each week
| 2 to 3 kg |  |
or
8 to 10 kilograms of pig dung for each 100 square metres of pond each week
| 8 to 10 kg |  |
or
10 to 15 kilograms of cow dung for each 100 square metres of pond each week.
| 10 to 15 kg |  |
378. If you are going to fertilize your new bigger ponds with animal manure but you do not have enough of any one kind of animal manure, you can make a mixture of several kinds.
379. You can make a mixture using 1 part of poultry droppings, 2 parts of pig dung and 3 parts of cow dung.
| 1 part |  |
| + | |
| 2 parts |  |
| + |  |
| 3 parts |
You will need to put in
10 kilograms of this mixture for each 100 square metres of pond each week.
380. When the water is green, you will know that there is enough natural food in the water for your fish.
381. You learned before that when you have fertilized a pond it will take about a week for the water to turn green.
382. To make sure that the water in your pond is green enough, you should test it each week. To do this, put your arm in the water up to the elbow.
383. If you are just able to see the ends of your fingers, the water is green enough. If you are able to see the ends of your fingers well, you will know that the water is not green enough.
384. If the water is not green enough, add more fertilizer each week and test the water from time to time until you see that it is green enough.
Note
Remember, you must still feed your fish the other kinds of food that they need to grow strona and healthy. Items 253 to 266 tell you what to feed them and how to feed them.
385. Now that you have several fish-ponds, you can grow fish all year round.
386. If you put baby fish in different ponds at different times, you will harvest them at different times. This way, you will not harvest too many fish at the same time and you can harvest fish all year round.
387. If you have three ponds and a good supply of baby fish, you can stock each pond in a different month of the year and harvest each pond six months later. The diagram on the next page will show you how to harvest and stock three ponds.
388. If you need help, your extension agent or fishery officer will be able to give you good advice on when to put in the baby fish and when to harvest them.
389. You can further improve your fish-farming by growing only male tilapia in your ponds. Male tilapia grow bigger faster because without baby fish to feed, all the food that you put into your ponds will be eaten by the male fish.
390. If you decide to grow male fish, use fish that are at least 10 centimetres long so that you can harvest them sooner. A male fish of this length will be fully grown in three to four months.
391. If you have a nursery pond, you can get male fish from it.
392. If you do not have a nursery pond, you may be able to buy male fish from another fish farmer or from a fish culture station.
Harvesting your fish
393. Items 276 to 300 tell you how to harvest your fish and what to do with them after they have been harvested.
394. Here are some other things that you should know about harvesting to improve your fish-farming further.
395. With bigger ponds and more ponds, you will harvest many more fish. You must be sure, however, that you will be able to use, sell or preserve all of the fish that you harvest.
396. If you will have too many fish to use, sell or preserve by harvesting all of them at the same time, harvest them at different times. You can harvest a few of your fish at two or three different times.
397. You can do this by draining part of the water from your pond and collecting only some of the fish on the first day you harvest. When you have used, sold or preserved these fish, you can harvest more of them.
drain all of the water and collect part of the fish
398. When you are ready to harvest the last of the fish, drain all of the water from the pond and harvest the remaining fish. First, collect the baby fish for your nursery pond and then collect the big fish.
399. If you have built a monk for the outlet of any of your ponds (see 328) you can harvest your fish in two ways:
you can harvest inside your pond just in front of the monk
you can harvest outside your pond after the fish have passed through the monk.
Harvesting inside the pond
To harvest your fish inside the pond, remove the wooden boards from the monk one row at a time. Each time you remove a row of boards from the monk, be sure to put the screen back on top to keep your fish from getting out.
When the water is partly drained from your pond, harvest part of the fish from the water just in front of the monk.
When you are ready
to harvest the rest of your fish,
continue to take out the boards
one by one.
However, put back the screen each time
until the pond is empty.
When all of the water is out,
you can harvest the remaining fish.
First collect the baby fish
and then collect the big fish.
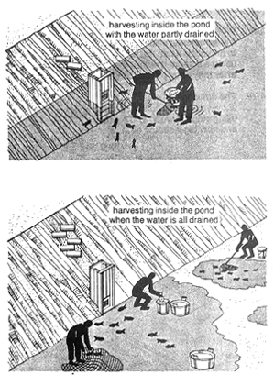
Note
Muddy water is bad for baby fish. If you must walk in the water to collect the baby fish, let a little clean water flow through the pond to keep it from getting too muddy.
Harvesting outside the pond
400. When you have a monk it is sometimes easier to harvest outside the pond using a screened wooden box to collect the fish, after they have passed through the monk.
401. The drawings below show you how to build a harvesting box, using strips of wood and screen, and how big it should be.
402. When you are ready to harvest your fish, put the harvesting box in the outlet ditch outside your pond at the end of the pipe from the monk. Make sure that the pipe is well inside the harvesting box so that the fish will not get out.
403. Now, take the screen out of your monk and remove the wooden boards one row at a time. The water will begin to flow out of your pond.
404. Do not put back the screen. When the level of the water in your pond is low enough, the fish will begin to pass over the boards and through the monk to the harvesting box. When they are in the box, you can collect them easily.
405. Today, many farmers have learned that they can manage their fish-ponds together with their farm animals, gardens and fields so that they will all grow better and produce more.
406. Fish, animals and plants live and grow in different ways and produce different things that can help all of them to live and grow better.
407. You have already learned how to put animal manure into your ponds so that the water will be rich in the natural foods that your fish need to eat. In this way, the animals help the fish to live and grow better.
408. Here are some other ways to manage your farm animals, gardens and fields so that they will help each other to grow better and produce more.
409. You can raise ducks in your fish-ponds so that much of their manure will go into the water. This will help your fish to grow. At the same time, the ducks will feed on the plants that grow in your ponds and help to keep your ponds free of plants, weeds and snails.
410. You can raise chickens or pigs near your ponds. If you build chicken coops or pig pens on the banks or over the ponds, you can sweep the manure into the ponds. Your ponds will supply water for the animals and the animals will supply fertilizer to help keep the water in your ponds rich.

Note
If you have built your ponds side by side, you can build a chicken coop or a pig pen on top of the bank between two ponds and sweep the manure into both ponds.
411. Begin with either four to five ducks, five to eight chickens or one to two pigs for each 100 square metres of pond. Later you may be able to keep even more.
412. You can plant vegetables on the banks of your ponds. You can plant such things as tomatoes, beans, soybeans, groundnuts or maize.
413. You can also have a garden nearby. This way, you can use the water from your ponds to water your vegetables.
414. When you drain the water from your ponds to harvest the fish, you will find a layer of soft mud on the bottom. This soft mud is a very good fertilizer to put on your garden or fields, or on your pond banks if you are growing vegetables there.
415. Spoiled vegetables or vegetable wastes such as plant leaves and stalks can be fed to your chickens, ducks or pigs, or they can be put into your ponds for your fish to eat or to help keep the water green and rich.
416. So, you can see that with very little extra work you can manage your fish, ducks, chickens, pigs, farm fields and garden in such a way that they will help each other to produce more.
417. If you want to know more about how to manage your farm and your fish-ponds together, your extension agent or fishery officer will be able to give you good advice.
418. The following are some very important things that you should know to keep you and your family healthy.
419. A certain kind of mosquito and some kinds of freshwater snails carry diseases that can make you very sick.
420. If the plants or weeds in your ponds or on the banks of your ponds become too thick, snails and mosquitoes can live and grow very easily.
421. So, from time to time, clean out the plants in your ponds and cut the weeds and grass on the banks. The weeds and grass on the banks should not hang into the water of any of your ponds.
422. Never use one of your ponds as a toilet, or you and your family may become sick.
423. If you have a latrine, use it. However, a latrine should be at least 10 metres away from any of your ponds and from your water supply.
424. If you have to relieve yourself while you are working near your ponds, near the stream that supplies your water or near your supply or inlet ditches, first walk at least 10 metres away.
425. Never relieve yourself on or near your compost pile. Use your latrine, or relieve yourself at least 10 metres away.
426. If you are careful about all of these things, it will help to keep you and your family from getting sick.
