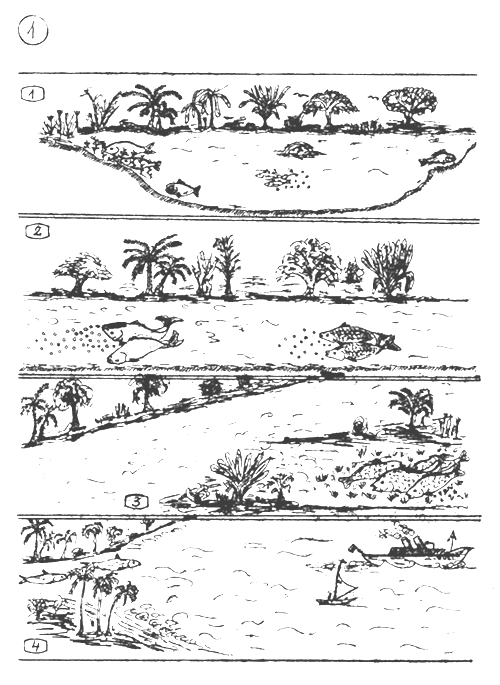
THE NATURAL SPAWNING ENVIRONMENT OF DIFFERENT FISH SPECIES.
Fishes spawn in confined waters (lakes, ponds) finding there suitable spawning place. Many of them practice parental care especially in tropics and subtropics, due to the many kinds of predators.
Fishes spawn in the rivers. The scattered eggs are floating or rolling and drifted downstream. They hatch there, and the young fish is growing up in the shore waters of the inundated rivers.
Fishes spawn in freshly inundated grass land of the rivers or lakes. They abandon the eggs. The young fishes feed on the animals developing on the rotting grass (At the beginning when the fish spawn there are not too many eggs and larvae predators).
Fishes which grow up and mature in fresh waters, and migrate into the sea to spawn. The young fry or fingerling migrate back into the rivers and connected lakes.
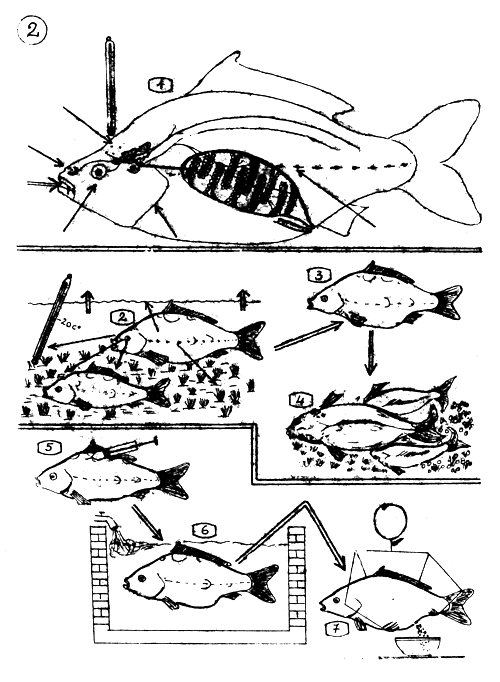
THE NATURAL SPAWNING AND INDUCED OVULATION OF THE COMMON CARP.
Sensory organs, brain, pituitary gland, ovarium which play the main role in the natural propagation process. The ovary "reports" back that the eggs are materially ready for final development.
The sensory organs "report" to the brain that the conditions of the spawning environment are met. The brain (Hypothalamus) gives order to the pituitary gland to release the gonadotrop hormones.
The female carp retreats to the spawning place, the hormones bring about the preovulation and ovulation uninterruptedly.
When ovulation occurs (ripe eggs are fallen into the cavity of the ovary) the female carp suddenly appears in the spawning place and starts to spawn. The males are waiting there for the appearing females.
5–7 INDUCED OVULATION
The carp breeders get injected with suitable doses of hypophysis (pituitary gland) extract, which contents enough gonadotrop hormones to bring about the ovulation and sperm production.
The breeders are kept in tanks (separated) among calm and appropriate conditions (oxygen supply). The ovulation occurs here.
The ovulated eggs are stripped off the female, the sperm from the male, and fertilised artificially.
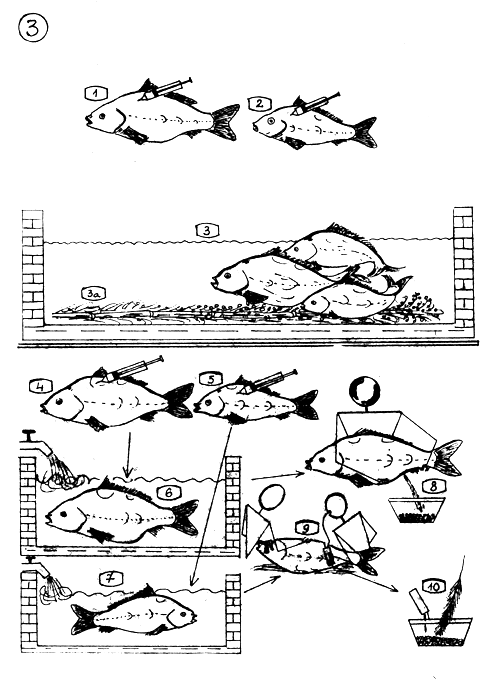
ARTIFICIAL PROPAGATION TECHNIQUES
1–3 INDUCED PROPAGATION
The female and …
the male are injected with adequate dose of hypophysis extract and they are put in a tank which bottom is partly covered with egg recipient (3a) (kakaban, grass matt, pine or bamboo branches etc…)
After 6–8 hours (depending from temperature) the breeders will spawn naturally over the egg collectors.
4–10 ARTIFICIAL OVULATION
The female is injected two times with hypophysis gland extract. I dose 10% of the II one. II dose 3–5 mg aceton dried gland per kg. body weight.
The male is injected one time with 1–2 mg gland, when female gets its II dose.
The female is kept separately …
from the male.
After a certain time span (depending from temperature) the female will ovulate. The "flowing eggs" are stripped off.
The male sheds the milt which is collected in milt collector.
The sexual products are mixed "dry" and fertilised artificially.
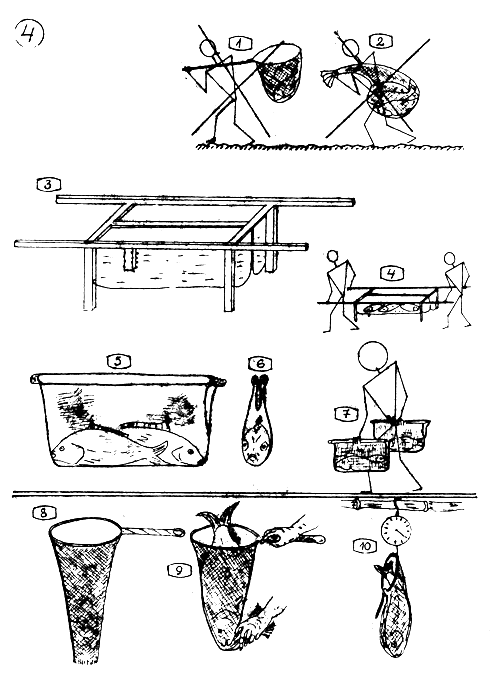
TRANSPORT AND HANDLING OF THE BREEDERS.
1.2. The breeders especially the females are very sensitive “gravid” animals. Never transport or transfer them in scoop net or sack or similar rough way.
Hammock for transporting breeders. Made of wooden or iron-pipe frame and tarpaulin or other waterproof material. Here a twin solution. The size of tarpaulin through 85 cm long 30 cm deep and 15–17 cm wide. The feets are 45 cm and the carrying handles 60 cm.
How to carry the breeders in hammock.
5.6. (Satchel) A frail (bag) for transporting 1 or 2 breeders. Made of a half sack and stiffened with a pair of sticks.
How to carry the breeders in the frail (satchel).
Both ends open scoop net …
for easy and considerate handling …
and weighing the breeders.
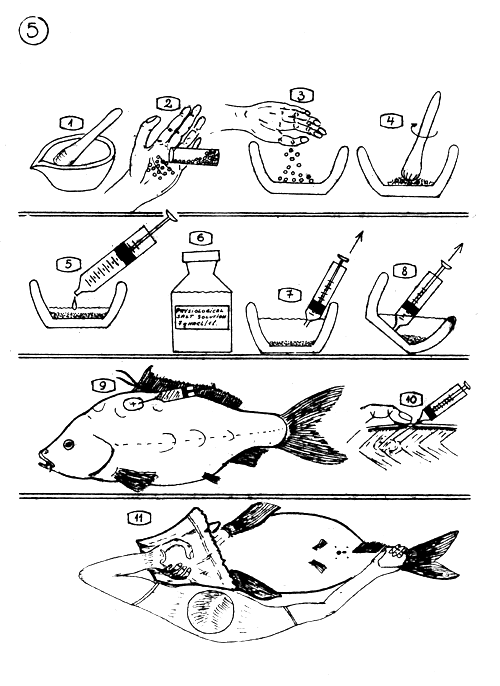
PREPARATION OF HORMONE SOLUTION OUT OF ACETON DRIED PITUITARY GLANDS.
The mortar and pistil for powdering finely the dry glands.
Counting out the dry glands. Dose is calculated according to the average weight of the glands.
The counted glands are put into the mortar.
Powdering the glands.
Adding measured physiological salt solution to the gland powder.
Salt solution is made of 7–8 g common salt in 1 liter boiled and filtered drinking water (Or such solution are for human use, available in drug stores.)
7.8. Taking out the doses from the mortar with syringe avoiding to take out “debris” (dryed gland tissues).
Where to inject ? The ellips shows the place.
The needle of the syringe is stuck into the dorsal muscles and rubbed (massaged) with finger during and after the administration of the injection.
How to hold the female carp during the stitching in operation. One hand seizes the head wrapped in towel, the other hand the tail.
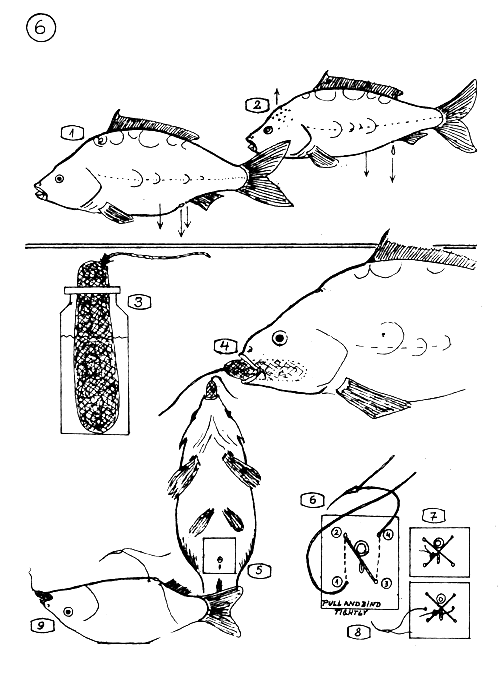
THE SIGNS OF THE BREEDERS SHOWING THEIR READYNESS FOR INDUCED PROPAGATION.
The female carp has bulky soft or semi-soft belly, (abdomen) the anal ring is protruding and enlarged, the sexual opening is reddish and protruding.
The male has a slender appearance, the abdomen is not bulky, it releases a few drop of milt when pressing the belly. Sometimes roughness occurs on the head.
3–9 THE ANAESTHETIZING AND STITCHING IN THE FEMALE CARP.
Preparation of the anaesthetizing “sausage” soaked in MS 222 solution (0.2–0.3 g MS 222 in 50–80 cm3 water). The sausage is a fine net bag filled with cotton.
Put the soaked sausage into the mouth of the female. The fish will sleep soon.
The area where to stitch in.
The sequence of the stitches (according to the numbers)
Stitching in with two stitches,
and three stitches.
The position of the female when stitched in.
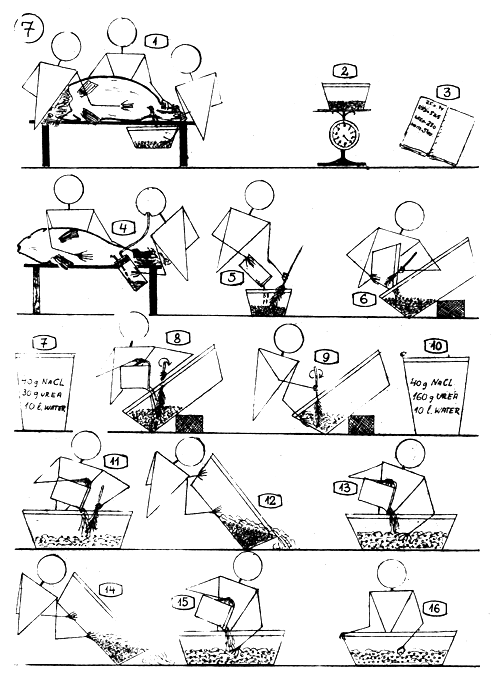
STRIPPING, FERTILIZING, AND TREATMENT OF THE CARP EGGS.
Stripping the female with light pressure on its belly after cutting and removing the stitches,
Weighing the dry eggs …
and register the weight.
Collecting the milt with milt collector.
The sexual products are mixed “dry”.
If the eggs is half a kg. or more, pour in a bigger 10–20 liters plastic bowl.
Earlier prepare the fertilizing solution : 40 g. common salt (NaCl) and 30 g. urea (carbamid) in 10 liters water.
Add about 1–3 deciliters fertilizing solution to the egg mass and stir throughly, carefully.
Add some more fertilizing solution and stir the egg mass 3 minutes long.
Earlier, prepare stickiness dissolving solution : 40 g. common salt and 160 g. urea (carbamid) in 10 liters of water.
Pour 1–3 liters (according to the egg mass) stickiness dissolving solution to the eggs and stir about 5–8 minutes long.
Pour off the superfluous liquid from the settled eggs.
Pour to the eggs solution again (1–3 liters) and stir the content of the bowl only time to time.
After 15–20 minutes pour off the solution and …
change it with fresh one and let stay 15–20 minutes long.
Check the hardness of the eggs with your fingers, and if they are already hard … make the TANNIN treatment.
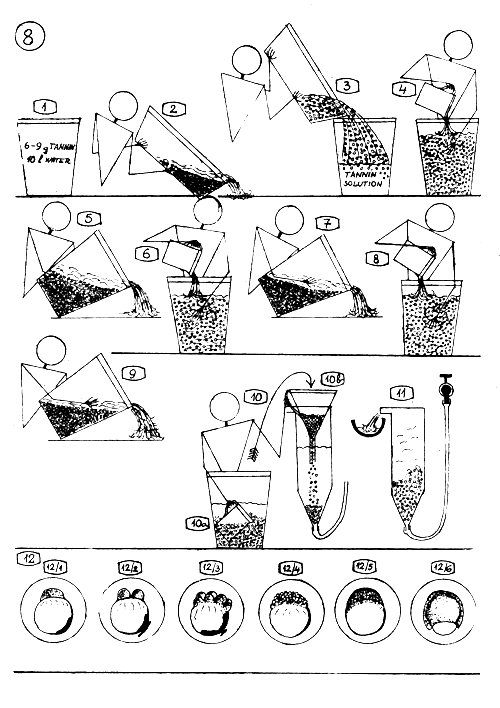
TREATMENT OF COMMON CARP EGGS, TANNIN TREATMENT.
Prepare tannin solution for each batch of eggs separately, short before the treatment : 6–9 g. tannin (a small spoonful) in 10 l. water.
When the eggs become hard (one can feel it with his fingers), pour off the stickiness dissolving solution…
and pour into a bucket 2–4 liters tannin solution prepared before ; and pour the egg mass into the bucket quick and all at once.
Stir it one-two times with hand and after 4–6 seconds add more clean water.
Let sink down the eggs and pour off the superfluous liquid.
Add 2–3 liters tannin solution into the bucket, stir and add clean water.
Let sink down the eggs and pour off the liquid.
Add again 2–3 liters tannin solution and repeat the 6. point.
Pour off the solution and wash the eggs 2–3 times with clean water.
Transfer the eggs into the incubation jars using plastic cup (10 a) or ladle and funnel (10 b)
Start slow waterflow through the incubation jar (0.3–0.5 liter/min.)
THE EARLY DEVELOPMENT OF THE COMMON CARP EGGS.
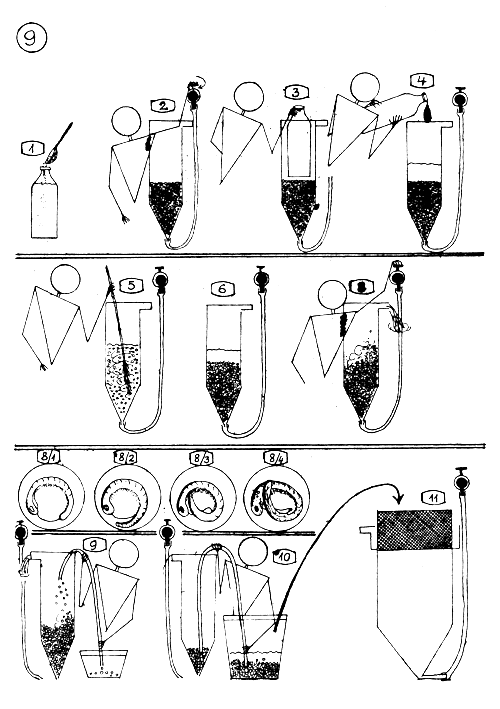
PREVENTIVE MALACHIT GREEN TREATMENT OF THE EGGS.
Prepare a concentrate malachit green solution : in 1 liter water, one soup spoonful or 2–3 small spoonfuls malachit green.
Stop the waterflow in the incubation jar.
Push out a part of the water from the jar with a bigger bottle.
Add 5–10 cm3 malachit green solution into the jar.
Stir throughly with a feather fixed to a long stick.
Let stay the solution 3–5 minutes long on the eggs and stir in the mean time once or twice.
Restore the water flow which wash out the blue solution.
EMBRYO DEVELOPMENT OF THE COMMON CARP EGGS.
9–11 - HANDLING THE EGGS DURING THE INCUBATION.
Removing by syphoning the bad eggs from the jar. Bad eggs float above the good ones (They are white and opaque).
The ready to hatch eggs are syphoned into a bucket and …
transfered into the hatching-larvae rearing jar.
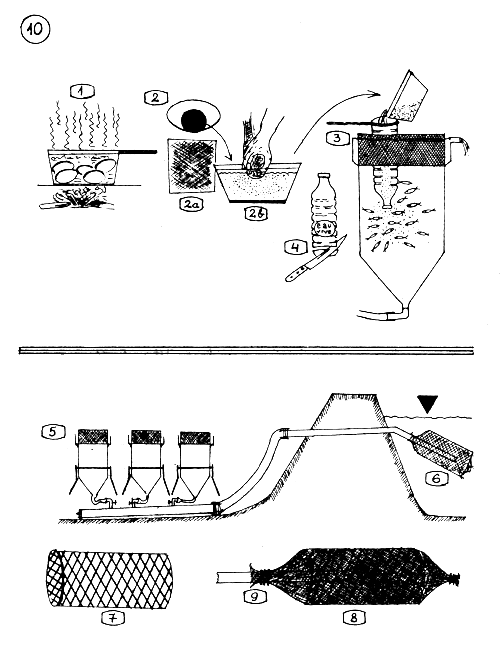
FEEDING THE LARVAE WITH HARD BOILED EGG YOLK.
Boil the eggs 6–8 minutes long.
Take out the egg yellow (yolk), put in a fine mesh sieve cloth (2 a) (plancton net material mesh 100–150 microns) and press through (2 b) in water, making by this way egg yolk suspension.
Pour the suspension into the larvae rearing jar where the larvae already filled up their air bladder with air, and are ready to take food.
Preparation a feeding funnel.
5–9 - INSTALLATION OF LARVAE REARING JARS.
Jars installed for receiving transported carp eggs. Jars are placed on the dry side of a pond which supplies the water in the jars.
Application of the filtering cylinder.
Preparation of the filtering cylinder. Wire mesh or strong plastic screen skeleton is made for the filter cylinder …
and covered with fine mesh material (bronce or plastic, mesh 0.5–1 mm) and …
fixed to the end of the water supplying pipe.
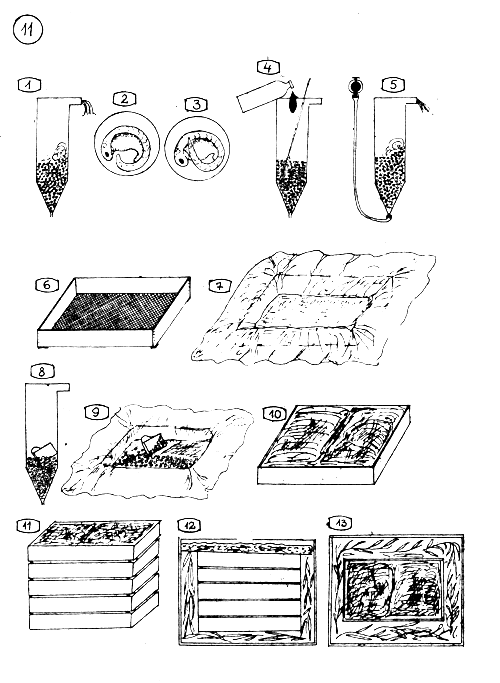
TRANSPORT OF COMMON CARP EGGS. PACKING THE EGGS FOR TRANSPORT.
Transport can begin when the eggs are in the middle of the embryo development stage which the picture 2. and 3. shows.
The eggs have to be treated before the transport, with malachit green
and washed throughly in the jar.
For packing it is used screen bottomed wooden box (40 × 20 × 7 cm).
Line the box with well moistered sheet of flannel of cotton (90 × 90 cm piece)
With a cup, draw out the eggs from the jar …
and spread carefully on the flannel in 1–2 cm thickness.
Fold the moist flannel over the eggs.
Put the boxes over each other (Let 1–2 mm gap between the boxes).
Pack up the boxes into a bigger carton. Put first bamboo branches or other springy leaves on the bottom,
put the same springy branches around the boxes, cover the top with plastic foam dipped in clean and cool water. Close the cover of the carton. The eggs are packed ready for a 6–8 hours long transport.
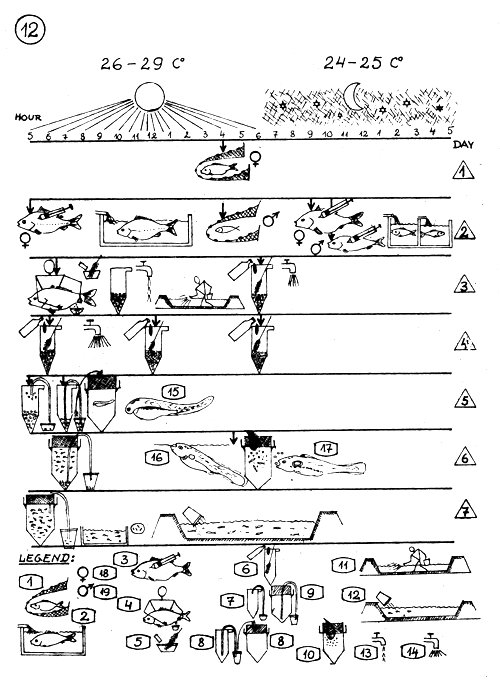
TIME TABLE OF DIFFERENT ACTIVITIES DURING THE ARTIFICIAL PROPAGATION OF COMMON CARP IN WARM CLIMATE.
Temperature 26–29 C° during day, 24–25 C° during night.
LEGEND :
Capturing the breeders (separately females and males).
Keeping the breeders in tank (continuous water supply).
Injecting of the breeders. I and II injection at the arrow indicated time.
Stripping the eggs and milt at the time as the arrow indicats.
Fertilization and treatment of the eggs
(see details in page 7. – 8.)
Malachit green treatment (see details page 9.).
Removing the bad eggs.
Transferring the ready-to-hatch eggs into the larvae rearing jar.
Removing bad eggs and debris from the larvae rearing jar.
Feeding the larvae with boiled egg yolk. (See page 10)
Filling up, manuring and fertilizing the nursery pond (s).
Stocking the counted young fry into the nursery pond.
Less water supply in the jars (0.3–0.5 liter per minute)
More water supply in the jars (1–2 liters per minute)
Just hatched larva.
Larva takes air bubles from the surface and fills up its air bladder.
Larva starts to feed.
Female.
Male.
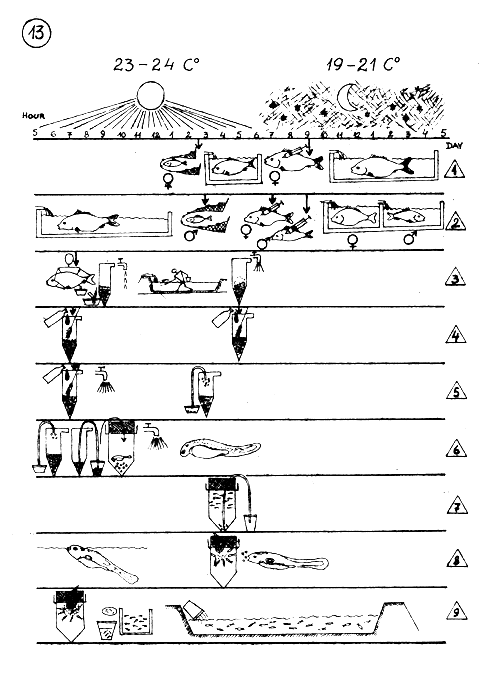
TIME TABLE OF DIFFERENT ACTIVITIES DURING THE ARTIFICIAL PROPAGATION OF COMMON CARP IN TEMPERATE CLIMATE.
Temperature : 23–24 C° during day 19–21 C° during night.
LEGEND : The same as 12 page.
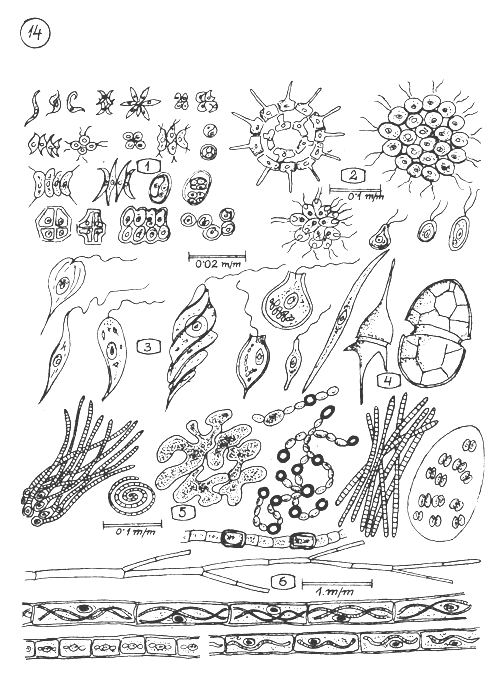
MICROSCOPIC PLANTS (ALGAE) OF THE WATER COLUMN (PHYTOPLANCTON) AND SHORE AREA IN GROUPS.
Different forms (species) of green algae. (Approx size indicated)
Bigger green algae colonies.
Euglenophita algae.
Algae with hard capsule (Dinoflagellatae).
Blue-green algae often causing water bloom in the water column.
Filamentous algae growing on objects of the shore area.
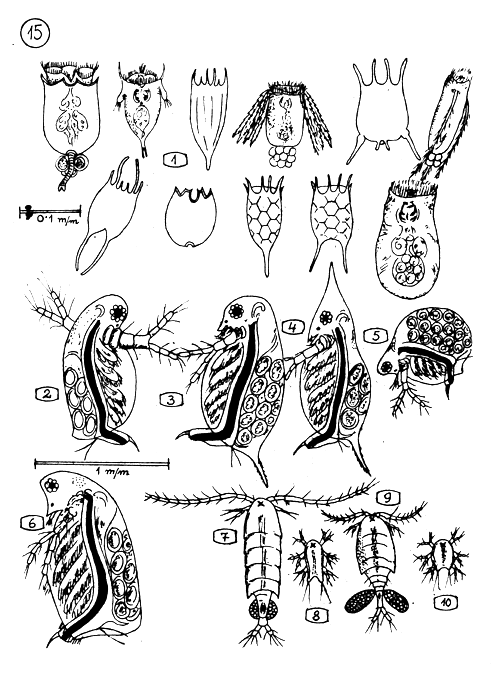
THE MOST IMPORTANT PLANCTON ANIMALS (ZOOPLANCTON) OF THE FISH POND.
Rotifers (Rotatoria) the scientific names are not listed here. Their approximate size is shown on measure line.
2–6 CLADOCERAS (WATERFLEAS)
Diaphanosoma
3.4. Daphnia
Moina
Sida
7–10 COPEPODS
Diaptomus
Diaptomus nauplius(larva)
Cyclops
Cyclops nauplius (larva)
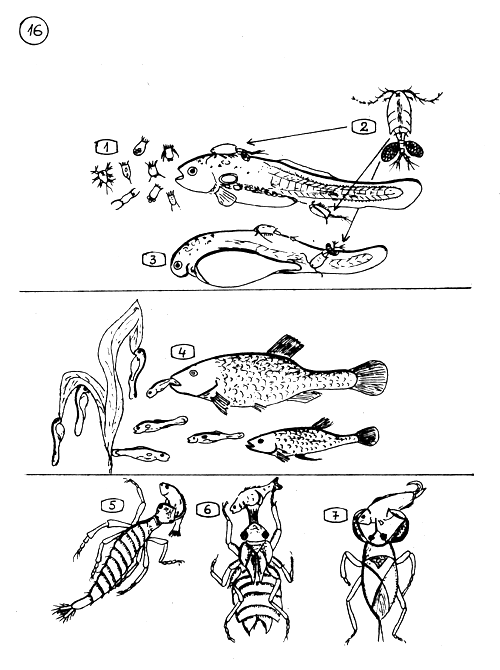
THE FIRST NATURAL FOOD AND THE ENEMIES OF YOUNG CARP.
The rotifers and nauplii of Copepods are the suitable natural food of very young carp.
Carnivorous Cyclops adults attack the larvae (3) and the early fry. They scrape wounds on the tender skin of the fish with their thorny legs and kill them.
Gambusia eats plenty of fish larvae and young fry because they are similar by shape to mosquito larvae. Very young fish can not flee from the danger.
5.–7. - THE MAIN INSECT PREDATORS
Ditiscus (waterbeetle) larva.
Larva of dragonfly.
Waterbug (water scorpion).
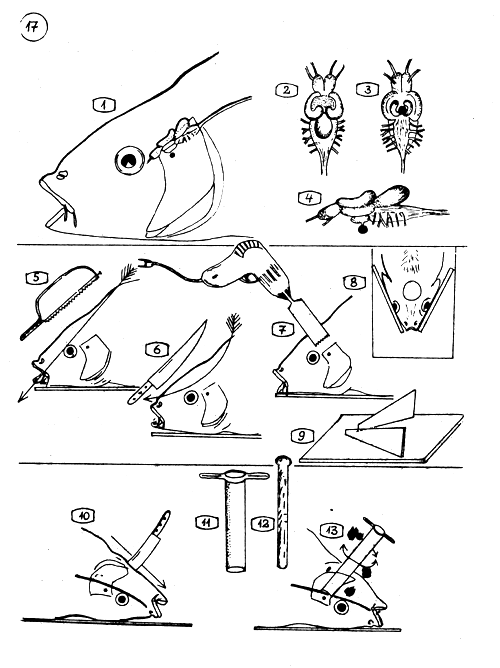
THE EXTRACTION OF HYPOPHYSIS (PITUITARY GLAND) OF THE COMMON CARP.
The location of the pituitary gland as compared to the brain, eyes, and gill cover (operculum).
The brain of common carp from above …
from below with the pituitary gland (black).
Side view of the brain with the infundibulum (funnel) which connects the mid brain and the pituitary gland.
5–9 - HOW TO OPEN THE SKULL TOP FOR GLAND EXTRACTION.
The skull top is sawed off as the arrow shows,
or cut off with a strong, sharp knife, …
or a round skull top with the brain and gland is taken out with an electric hole drill (hole bit).
To electric drilling the head of, the fish has to be fixed in a wooden console.
The wooden console without fish.
10–13 - EXTRACTION OF THE GLAND FROM THE MOUTH CAVITY (FROM BELOW).
The mouth cavity is out open as the arrow shows.
Sharp edged perforator tube (used in chem.labs).
A stick to push out the kernel from the tube.
The perforator tube is placed on the skull base pushed toward the gland with half circling movement. Pull out the perforator with the same movement. In the kernel should be the gland and parts of the brain.
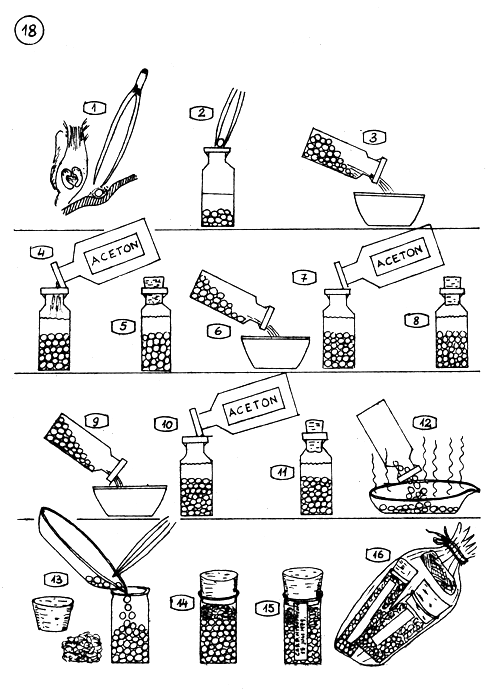
PRESERVATION OF PITUITARY GLAND IN ACETON.
The brain is turned aside and the gland is taken out carefully with a pair of fine pinzers. Remove fatty tissues from the gland,
and put in aceton (pure fatfree aceton is used).
3.4. When the extraction of many glands finished, the aceton is changed first time.
The glands remain in aceton 8–10 hours long.
6.7. The aceton will be changed again (second time).
The glands remain in aceton 8–10 hours long.
9.10. The third and last change of the aceton.
The glands left in the fresh aceton 4–6 hours long.
The aceton is spilled off and the glands spread on a flat plate (porcelain or glass). The aceton evaporates quickly.
13.14. The already dry glands (without aceton smell) in a well closable glass or plastic vial ; clean cotton is pressed over and corked.
A slip is pasted on the vial, with data written on : the origin and date, the average weight of the glands, collector, etc…
The glands have to be protected from vapour and moisture. The vials are kept well corked in plastic bag with a bag of moisture absorbent ; silicogel, or in exsiccator.