Tests of the quality and other characteristics of seed need to be made at several stages during its progress from the parent tree to the seed bed. Tests for maturity and soundness of seed before and during collection in the forest have been described on pp. 34–36 and are usually associated with surveys of the abundance of the seed crop; they are intended to ensure that both the quantity and the quality of seed justify the effort and cost of collection. Several tests may be required at the seed processing depot, after extraction and cleaning and before the seeds are despatched to the nurseries or placed in storage. Testing of moisture content is essential for many species before they are stored for a long time, but is usually unnecessary if the seed is to be sown immediately in the nursery; on the other hand, partial drying may be needed before despatch of seed to a distant forest station, to reduce the risk of deterioration in transit, and any deliberate drying operation must be accompanied by the testing of moisture content. Testing of germination or viability should be repeated at the end of the storage period if this is more than a few months and, in the case of long-term storage for conservation of genetic resources, testing should be done at intervals throughout the storage period (Ellis et al. 1980).
Efficiency and success in raising plants in the nursery and in their subsequent establishment in forest plantations depend to a great extent on the quality of the seeds used. It follows that foresters, nurserymen, seed dealers and others need accurate estimates of the quality of the seeds in which they deal or which form the basis of their afforestation projects (Turnbull 1975 d). This is particularly important when seeds are bought and sold, or move between countries in international trade. The example of estimating seed demand which is shown in Table 3.1, page 26 uses estimates of the number of germinated seeds per kg of Pinus kesiya and Tectona grandis which are averages for the species. In practice, the number varies considerably from year to year and from seed lot to seed lot, so that it is necessary for the forester to have an accurate estimate of germination for every individual seed lot which he receives, if he is to fulfil planting targets while at the same time avoiding the waste of valuable seed caused by sowing too much. Similarly the nurseryman must have a good estimate of germination if he is to adjust sowing rates to produce the optimum spacing of seedlings in the seedbed.
Justice (1972) has defined the following objectives for developing rules for seed testing: (a) to provide methods by which the quality of seed samples can be determined accurately; (b) to prescribe methods by which seed analysts working in different laboratories in different countries throughout the world can obtain uniform results; (c) to relate the laboratory results, insofar as possible, to planting value, (d) to complete the tests within the shortest period of time possible, commensurate with the above-mentioned objectives; and (e) to perform the tests in the most economical manner. For the practising forester, the most important object of seed testing is the provision of an accurate estimate of the capacity of a given seedlot to produce healthy, vigorous plants suitable for field planting. In the present context, seed “quality” refers to the physiological vigour of the seed rather than its genetic quality.
The essence of good seed testing is the application of reliable standard methods of examination to ensure that uniform and reproducible results are obtained (Turnbull 1975 d). Standardization has been greatly facilitated through the adoption by a number of countries of the International Rules for Seed Testing formulated by the International Seed Testing Association (ISTA). ISTA was founded in 1921, drew up its first set of Rules in 1931 and made major revisions of the Rules in 1953, 1966 and 1976. In the early stages ISTA's primary concern was for agricultural seeds, but trees and shrubs have gradually assumed greater importance and the 1976 Rules (ISTA 1976) give (firm) “prescriptions” or (more tentative) “suggestions” as to testing methods appropriate for 61 different genera of these, compared with 26 in the 1953 Rules. The Rules are published in English, French and German.
Although tree species and genera from the tropics and southern hemisphere (notably eucalypts) have begun to figure in the ISTA lists, the balance is still overwhelmingly weighted towards north temperate species. Thus important species such as Tectona grandis, Pinus patula, P. oocarpa and P. kesiya are listed, but only in the list of “suggested” (non prescriptive) seed testing methods, while a recent survey (ISTA 1981 a) has shown that 20 other important tropical species are not included at all; they include Cupressus lusitanica, Gmelina arborea, Cordia alliodora and the genera Albizzia, Araucaria, Casuarina, Swietenia, Terminalia and Triplochiton. Their omission simply reflects the lack of reliable information from research on the best methods of testing these species and genera.
ISTA testing methods involve the maintenance of controlled laboratory conditions and the use of some items of equipment which are relatively expensive. They are therefore well suited to large, well-equipped seed laboratories but are impracticable for small forest stations which have no laboratory and must carry out germination tests in the nursery or the office. Lack of equipment is no reason to omit seed testing altogether. For example simple germination tests carried out in the nursery can produce results which are perfectly satisfactory for local use. But precise details of method should always accompany results whenever this is not standardized, so that the seed user can interpret the results in relation to his own nursery conditions.
An up-to-date guide to the range of equipment available for seed testing is contained in the “Survey of Equipment and Supplies” published by ISTA (ISTA 1982). It lists equipment by type, use, model specification and supplier. The earlier directory, “Equipment and supplies for collecting, processing, storing and testing forest tree seed” (Bonner 1977) includes seed testing equipment and gives the addresses of user laboratories as well as suppliers.
Van der Burg et al. (1983) give a description of how a seed testing station in tropical or subtropical areas could be established. Two alternatives are described: Seedlab 2000, that can test about 2000 samples per year and Seedlab 5000 that can test at least 5000 samples per year. Directives and general considerations concerning the staffing, the organization of the work, the lay-out of the building, and the equipment needed are given. Forty-six figures and two tables give an impression of the equipment and administrative forms used. Equipment which in the experience of the authors has been found suitable for the work is recommended and detailed descriptions and company addresses are mentioned. Some equipment that is not commercially available is described and plans for construction are included. A list of books and journals for a basic seed testing library is appended.
The tests which may be required are purity, authenticity, seed weight, germination, indirect testing of viability, moisture content, and seed health and damage. A prerequisite for all testing is good sampling, which is described in the following section.
When seed is tested, the sample on which the test is made has to be representative of the whole. No matter how accurate the technical work in the test, the results can only show the quality of the sample submitted for analysis (Aldhous 1972). Therefore, every effort must be made to ensure that the submitted sample accurately reflects the composition of the whole seed lot. This is equally applicable, whether a whole series of tests is to be made in a laboratory, or a simple nursery test carried out to determine number of germinated seeds per kg of uncleaned seed. Time spent testing carelessly drawn samples may be time wasted (Carter 1961).
Completely homogeneous seed lots would be easy to sample, but they do not exist (Bonner 1974). Common sense measures can be taken to reduce heterogeneity as much as possible, for example seed lots of the same species should not be mixed if they come from different origins (provenances), differ greatly in age or, in the case of the same introduced provenances, if they come from plantations growing on very different site types in the introducing country. But a seed lot may be heterogeneous even if collected from a homogeneous stand. Paul (1972) has given the simple example of pine seed transported over bad roads in the back of a landrover. The bumps and vibrations to which it is subjected will cause a settling out of different types of material. All the small and empty seeds and other light rubbish will eventually reach the surface layers and a sample taken from the top alone will give a completely false impression of the potential performance of the seeds as a whole.
If the seed lot is a small one consisting of only a few kg of seed, it is possible to improve its homogeneity by thorough mixing of the whole lot before taking a sample. In the case of very large seed lots transported and stored in many different containers, mixing of the whole seed lot is impracticable. Instead, a number of different samples are taken, as described on pp. 194–195, and it is these samples which are thoroughly mixed together to form a homogeneous “composite” sample for testing. The methods of mixing which are quoted below from Paul (1972), are equally applicable to small entire seed lots or to composite samples.
“Methods of mixing. There are two simple ways in which seed may be thoroughly mixed.
Mixing with the aid of a mechanical divider. Mechanical dividers are used to reduce the size of seed lots or samples by repetitive halving. Their operation is described below. The divider has the added advantage that it can also be used to mix seed in the following manner:
Pass entire seed lot through divider.
Take the two equal portions and feed them simultaneously into the divider.
Repeat operation No. 2.
Repeat operation No. 2 once more.
Take the two equal portions and pour them simultaneously into the storage container.
Handmixing. It is surprising how difficult it can be to achieve a homogeneous seed lot using this method. The entire seed lot must be spread out on a sheet of paper or some other suitable smooth surface and mixed by scooping the seed from side to side and from top to bottom. After thoroughly mixing, spread the seed out evenly and divide the lot into four equal parts. Place these separately in four containers and with the aid of an assistant pour them simultaneously into the storage container. Repeat the spreading, quartering and pouring process another two times.”
For a large seed lot contained in a number of different containers, seed triers are used to take small sub samples from different parts of the lot. All of these “primary” samples are mixed together to form a “composite” or bulk sample, which is later reduced in size by successive dividings until it is small enough to form the “working” sample on which the various tests are carried out.
As described by Turnbull (1975 d), a seed trier is a probe, long enough to reach all areas of the seed bag and designed to remove an equal volume of seed from each area through which it travels. Most commonly used is a sleeve-type trier which consists of a hollow brass tube inside a closely fitting outer sleeve. The tube and sleeve have open slots in their walls so that, when the tube is turned or slid, the slots in the tube and the sleeve coincide and seeds can flow into the tube; when the tube is given a half turn or slid in the opposite direction, the openings are closed. Seed triers should have a series of separate compartments and not just a single long tube with several openings. Tubes are available in varying lengths and diameters to cater for different sizes of container and kinds of seeds. Triers known as “thief” triers, with a single open slot, should be avoided, as they can damage the seeds (Magini 1962).
Ideally, the primary samples should be distributed proportionally to the volumes of the different parts of the seed lot (Bonner 1974). For example, if a lot is contained in ten 10-kg containers and ten 20-kg containers, the 20-kg containers should contribute two thirds of the composite sample and the 10-kg containers only one third. For seed lots in containers of uniform size, ISTA (1976) has detailed prescriptions as to the number of primary samples appropriate for varying numbers of containers, e.g. for 6 – 30 containers at least one in three containers is to be sampled and never less than five.
Large seeds and others that are not free-flowing are not suitable for sampling by seed trier. They should be sampled by thrusting the hand into the seeds and removing small portions (Bonner 1974). The hand should be inserted flat with the fingers extended together. The fingers should be kept together as the hand is closed and withdrawn. It is difficult to sample with this method deeper than about 40 cm and containers may have to be partially emptied to facilitate sampling.
The following description of the reduction of the size of the composite sample is taken largely from Turnbull (1975 d).
Usually the composite or bulk sample for testing needs to be reduced to a working sample of standard weight. Whenever possible the sample should be subdivided by a mechanical divider to reduce any operator bias in the dividing. The non-mechanical halving method is described here for use if a mechanical divider is not available, but it is the least desirable method for most types of seed. Manual methods must, however, be used for seeds which are not free-flowing.
Halving method. The sample is placed on a clean surface and thoroughly mixed by hand; it is then divided into quarters with a sharp-edged spatula and opposite quarters discarded. The process is repeated until a final sample of the approximate weight required is obtained.
Random cup method. A series of small cups or thimbles are arranged on a tray in a definite pattern and the sample is poured systematically over this area. The working sample is obtained from randomly selected containers (Thomson and Doyle, 1955). A modification of this method uses a tray divided into an equal number of square compartments, every alternate one of which has no bottom (Justice, 1972).
Most mechanical dividers are designed to split the sample into two approximately equal parts. The working sample is obtained by repeatedly dividing the bulk sample until it reaches the required weight. ISTA recommends three types of dividers as being suitable equipment. They are the conical divider (Boerner type), the soil divider, and the centrifugal divider (Gamet type). They are briefly described as follows:
Boerner Sampler. This divider is made in different sizes. The essential parts consist of a hopper, inverted cone, and a series of baffles directing the seeds into two spouts. The baffles form alternate channels and spaces of equal width. They are arranged in a circle at their summit and are directed inward and downward, the channels leading to one spout and the spaces to an opposite spout. A valve or gate at the base of the hopper controls the seed flow. When the valve is opened the seeds fall by gravity over the inverted cone where they are evenly distributed to the channels and spaces; then, they pass through the spouts into the seed pans below.
In Zimbabwe a similar arrangement on a larger scale is used for dividing and mixing large seed lots. From the inverted cone there are 8 outlets which pass the seed into buckets, and a battery of 8 buckets is available for each outlet. The buckets hold 6 kg of pine seed each, so that a seed lot of up to 384 kg can be handled in any one dividing and remixing operation (Seward 1980).
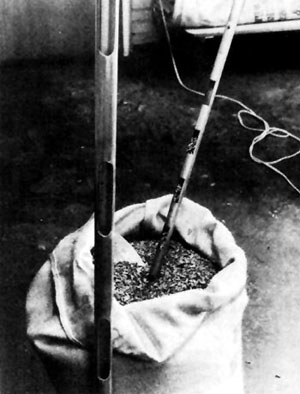 | 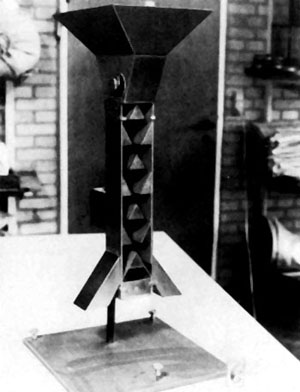 |
| 9.1 A seed trier. (DANIDA Forest Seed Centre) | 9.2 Random cup divider. (DANIDA Forest Seed Centre) |
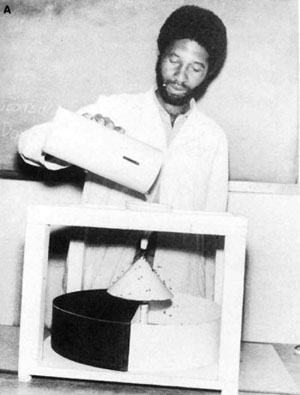 | 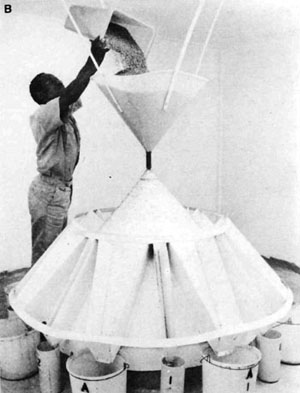 |
| 9.3 Inverted cone dividers used in Zimbabwe (A) for small (B) for large quantities of seed. (Forestry Commission Zimbabwe) | |
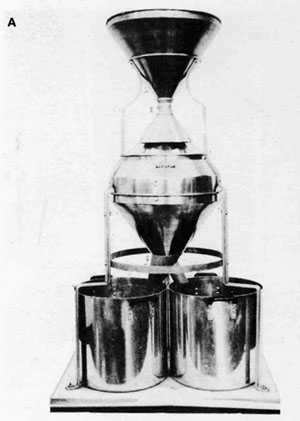 | 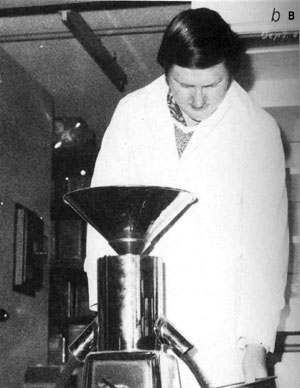 |
| 9.4 Seed dividers (A) Boerner (B) Gamet. (Division of Forest Research, CSIRO) | |
 | 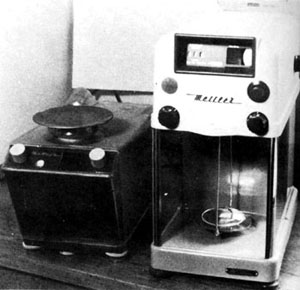 |
| 9.6 Two types of weighing scales used in seed laboratories. (DANIDA Forest Seed Centre) | |
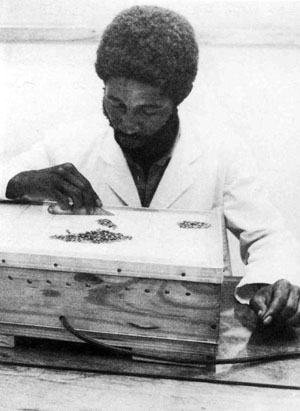
| 9.5 An opaque glass screen, illuminated from below, used in Zimbabwe for purity tests and determinations of the number of seeds per kg. (Forestry Commission Zimbabwe) | |
Soil Divider. A simple divider, built on the same principle as the conical divider, is the so-called soil divider or riffle divider. The channels are here arranged in a straight row instead of a circle as in the conical divider. The soil divider consists of a hopper with attached channels or ducts, a frame to hold the hopper, two receiving pans and a pouring pan. In using the divider the seed is scattered fairly evenly in a pouring pan and poured in at approximately equal rates along the entire length of the hopper. The divider is suitable for large-seeded and chaffy species, but suitable types for small-seeded species can also be made.
Gamet Divider. The Gamet divider makes use of centrifugal force to mix and scatter the seeds over the dividing surface. The seeds flow downward from a hopper onto a shallow rubber cup below. Upon rotation of the rubber cup by an electric motor the seeds are thrown out by centrifugal force and fall downward. The circle or area where the seeds fall is equally divided into two parts by a sharp-edged, stationary baffle so that one-half of the seeds fall in one spout and the other half in the other spout. In using this divider care must be exercised in dividing very small samples as it is possible that a majority of seeds may be thrown out in one spout. Hardin et al. (1965) compared the effectiveness of the Boerner and Gamet dividers and concluded that if used correctly, the Gamet divider yields a slightly more accurate subsample.
Magini (1962) warns that dividers operating on the centrifugal principle should not be used for seed sensitive to damage by vibration as are those of Abies species.
The weight of the working sample depends on the seed size of the species in question. The ISTA rules are intended to provide a minimum of 2500 seeds for all except the very large-seeded species, for which a minimum of 500 seeds is prescribed. These quantities are considered sufficient for most of the usual tests (purity, authenticity, seed weight, germination or viability), but an additional 10 g of most species is needed if moisture content is to be determined (ISTA 1976). Among tropical species listed by ISTA the range of prescribed minimum size of working sample is from 2 g for Eucalyptus deglupta, which averages 4,000 viable seeds per gm of “seed plus chaff” (Boland et al. 1980) to 1 kg for Tectona grandis which averages 2,000 fruits per kg. When seed is despatched to an independent seed laboratory for testing, ISTA recommends that the weight of the submitted sample be double that of the working sample.
Tree seed samples can contain impurities such as weed seeds, seeds of other tree species, detached seed structures, leaf particles and other material. The object of purity analysis is to determine the composition by weight of the sample being tested. To do this the sample is separated into component parts. When purity analysis is done, it is the first test to be carried out because subsequent tests are made only on the pure seed component.
Pure seed refers to the species under consideration and in addition to mature, undamaged seed includes: undersized shrivelled, immature and germinated seeds, provided they can be definitely identified as the species under consideration; and pieces resulting from breakage that are more than one-half their original size (ISTA 1976). Seeds of Leguminosae and Coniferae with the seed coats entirely removed are regarded as inert matter. Other components of the sample may include Other seeds of all species except that under test and Inert matter. Inert matter consists of pieces of broken or damaged seeds less than half the original size, wings of coniferous species, leguminous and coniferous seeds with the seedcoat entirely removed and other matter such as fragments of leaves, twigs, stones, soil. In Coniferae (except Chamaecyparis, Cupressus and Thuja) any remaining seed wings not already removed in cleaning should be detached and classed as inert matter.
The working sample containing all the impurities is weighed and then the pure seed is removed and weighed separately. ISTA rules (1976) prescribe that weighing be done in gms to the minimum number of decimal places necessary to calculate the percentage of its component parts to one decimal place.
The percentage of pure seed is calculated as follows:

When a laboratory is testing a large number of samples for purity, the purity analyst usually examines and separates seed samples on a “workboard” placed on top of a desk or table. The workboard can be adjusted to a desired height, usually 7 – 15 cm above table height. The analyst's equipment should permit him to do his work with a minimum of effort and time, and also with a minimum of eye strain (Justice 1972).
Equipment required for making purity analysis is as follows: forceps and spatula for handling, separating, and pushing seeds over a surface; wide-field hand lens of 5X to 7X magnification; reading magnifiers relatively free of curvature and distortion, wide-field stereoscopic microscope with a range of magnifications from 10X to 75X; scale with capacity up to 1000 g and sensitive to 0.5 g; torsion balance with capacity of 120 g and accurate to 0.01 g ; rapid-acting chemical balance accurate to 1 mg; small seed containers to hold separations; and seed blower (Justice 1972). An assortment of small sieves can help in eliminating many impurities.
Analyses of many samples can be facilitated by removing the lightweight material with the aid of a seed blower. Seed blowers are described in Chapter 6 (pp. 115–117).
Other methods reported by Turnbull (1975 d) as reducing hand labour are specific gravity separation by differences in density, separations by electrostatic charges, a vibrating table working on the basis of seed weight, surface texture and shape, and an X-ray radiograph technique.
The pure seed component from the purity analysis can be subsampled for the germination test, as well as for the determination of seed weight. Since the germination test is based on pure seed, it can be readily seen that the purity analysis and germination test are complementary to each other. The production potential of a seed lot can be determined only when the purity analysis and the germination tests are considered together (Turnbull 1975 d).
Measurement of seed weight is made on the pure seed component separated by the purity test. Weight is normally expressed as the weight of 1000 pure seeds. This figure can be readily converted to number of pure seeds per g or per kg as required. Weight may be determined simply by counting out 1000 seeds and weighing them (Bonner 1974, Paul 1972), but the use of several smaller samples enables the analyst to estimate variation within the sample. ISTA (1976) prescribes 8 replicates of 100 seeds each, from which the standard deviation and coefficient of variation may be calculated, as well as the mean. If the co-efficient of variation is less than 4, the mean is accepted, but, if it is more, 8 additional replicates are prescribed, a new standard deviation for the 16 replicates calculated and any replicate that diverges from the mean by more than twice the standard deviation is discarded before calculating the final mean for the sample.
The counting of seeds for weight may be done by hand or with the assistance of counting boards or vacuum or electronic counter. The following description of the essential features of seed counting devices is taken mainly from Magini (1962).
Counting boards are useful for relatively large seeds of a regular shape, such as Pinus pinea or some leguminous species. The counter consists of two boards, a stationary top board with perforations and a thin solid board below, which serves as a false bottom.
In operating the counter, a quantity of seed is placed at the corner, the board tilted and moved so that one seed goes into each perforation. The board can then be emptied and the known number of seeds from it weighed. Alternatively, if the seeds are being counted in preparation for a germination test, the counter can be placed on the substrate and the bottom is withdrawn permitting the seed to fall through at a uniform spacing. In some types there is a second set of perforations in the bottom board. By slipping the top section about one centimetre, the seed falls through both boards onto the germination bed. In other types, the counting apparatus is perforated by holes too small to allow the seeds to pass through but suitable to allow a flow of air to suck the seeds into position (Tirén 1948).
In connection with tests on soil trays, a simple counting perforated board can also be employed. The board is first placed over the tray. The seeds are placed in the perforations and the board is lifted leaving the seeds on the tray.
Vacuum counters can be used with seeds of various sizes and shapes. For very small and irregularly shaped seeds some difficulties may occur. They are not suitable for very large seeds, such as many nuts.
A vacuum counting device has three essential parts: a vacuum system including pipes; counting heads; a quick release valve. A small house vacuum cleaner with a home-made head may be used, but special power units are generally preferable (1/4 to 1/2 hp electric motors). Perforated heads, with evenly spaced holes (generally 100) to house the seed, hold the seed by suction. When suction is switched off, the seeds are released for weighing or onto the substrate for germination testing. Counting plates or heads are of a square, rectangular or circular form, according to the shape of the substrate employed. Espacement and diameter of holes should be proportionate to the seed size. Heads can be of plastic, chromium, brass or aluminium. The face plate should be relatively opaque and of a colour which contrasts with the seeds being counted, thus making it easier to check that all holes are properly filled. A good valve is needed to allow a quick release of seed, as well as to avoid sucking up too large a proportion of the lightest seeds. The risk of picking up an excessive proportion of light, empty seeds in the counted sample may be reduced by inverting the head so that the holes are upwards and then pouring a large sample of seeds over it (Robbins 1982 b). Operation of vacuum counters with plastic heads may be adversely affected by static electricity.
In the modern types of electronic seed counters a vibrating feed bowl moves seeds past an electric eye in single file. The machine can be programmed to count a certain sample size, then cut itself off (Bonner 1974).
Reservations have been expressed about the accuracy of vacuum and electronic counters on the grounds that they select a biassed sample (Gordon & Wakeman 1978). Manual counting boards, combined with careful random sampling, are likely to be more accurate, although considerably slower.
The 1000 pure seed weight can be converted to seeds per g or per kg as follows:

or

If the sample counted is other than 1000 seeds, the appropriate formula is:

or

Within a given species full seeds have a higher specific gravity and a higher germination rate than seeds of the same size but empty or partially filled. Large seeds weigh more per seed than small ones of the same specific gravity and, because they contain larger food reserves, they are likely to germinate better and produce initially more vigorous seedlings. Goor and Barney (1976) have reported that large seeds of Eucalyptus citriodora had a higher germination rate than medium-sized seeds which in turn had a higher rate than small seeds. Number of pure seeds per unit weight is therefore not in itself a good guide to potential for plant production and must be complemented by germination tests or indirect tests of viability. The effect of seed size on the growth of germinated seedlings of eucalypts usually persists for 8–14 weeks after sowing, thereafter other factors may become more important (Turnbull 1983).
Of all the quality measurements of seed lots, none is more important than the potential germination of the seeds (Bonner 1974). The main aim of a laboratory germination test is to estimate the maximum number of seeds which can germinate in optimum conditions. The use of standardized ideal conditions in the laboratory such as those prescribed by ISTA ensures that results obtained from a given seed lot in one laboratory should be identical with those obtained from any other laboratory in the same or in other countries. A common standard for assessing germinative potential is very valuable for seed moving in international trade. On the other hand, it is clear that results obtained under ideal controlled conditions in the laboratory are not directly applicable in the field nursery, where only limited control over environmental conditions is possible. Each nurseryman should apply his own correction factor, derived from experience over the years, to convert the germination potential of a seed lot, as determined from laboratory tests, to the actual field germination he can expect under his own local conditions.
At the other extreme, a nurseryman may prefer to carry out his own germination test in his own nursery in advance of large scale sowing. The results of the test should be directly applicable to the later sowings of the same seed lot in the same nursery, but would not be applicable to other nurseries. However, there is sometimes insufficient time for germination tests in advance of the main sowing and managers of large operational nurseries may be reluctant to involve themselves in small scale research.
Between the two extremes lies the case of the small silvicultural research station which lacks the laboratory facilities to comply with ISTA prescriptions for testing, but which carries out germination tests in the nursery on bulk seed supplies before distributing them to afforestation projects throughout the country. Here again the local forester or nurseryman must apply his own correction factor to convert actual germination figures from the research nursery to expected germination figures in his large operational nursery.
The following account is largely based on that of Turnbull (1975 d). It is in conformity with ISTA rules (1976), but some of the principles are equally applicable if lack of equipment or trained staff makes it necessary to use simpler methods.
Germination is defined as the emergence and development from the seed embryo of those essential structures which are indicative of the seed's capacity to produce a normal plant under favourable conditions (Justice 1972, ISTA 1976). Germination is expressed as the percentage of pure seeds which produces normal seedlings or as the number of seeds germinating per unit weight of the sample.
In the laboratory the environmental conditions, including moisture, temperature, aeration and light, must not only be specific enough to initiate germination but also favourable for the development of the seedlings to a stage where interpretation of normal and abnormal types may be made.
With a few exceptions, all germination tests should be made with pure seeds separated by the purity test. The pure seed must be well mixed and counted at random into replicates. The seeds should then be spaced uniformly on the test substrate. Normally one test consists of 400 seeds in 4 replicates of 100 seeds each, but if 100 seeds overcrowd the test substrate, the replicates may be broken down into a larger number of smaller replicates of 50 or 25 seeds each (Bonner 1974). A general recommendation is to leave 1.5 to 5 times the normal seed width or diameter between seeds, in order to discourage the spread of fungal moulds (Bonner 1974, Justice 1972).
The exceptions are very small-seeded species in which it is impossible (some species of Eucalyptus) or very difficult (Alnus, Betula, Populus, Salix) to separate the seeds from the accompanying inert matter or chaff. In these cases the test is made with the same number of replicates but the replicates are of equal weight rather than an equal number of seeds (see p. 221).
Counting of seeds for germination tests can be facilitated by the use of counting boards, as described on pp. 200–202.
The kind of germinator can be selected according to the type and amount of seeds being tested and it is acceptable providing it can give good control of prescribed temperature, moisture, and light conditions.
Germinators range in size from small or portable individual units through cabinets of various sizes and large germination tables of the Jacobsen Copenhagen type, to walk-in germination rooms. The major types recommended by ISTA are as follows:
Jacobsen and Rodewald apparatus. In Europe, a germinator called the Jacobsen apparatus or Copenhagen tank is commonly used. It consists of a bath containing water, the temperature of which may be controlled by thermostats. The seeds are distributed on top of paper and placed on metal or glass strips suspended about 5–7 cm above the bath; paper or cotton wicks lie beneath the substrate and pass through slots into the water below. The moisture content of the substrate may be adjusted by altering the water level, and so increasing or decreasing the distance between the seed bed and the water (Kamra 1968).
High humidity is maintained around the seed either by covering the entire tank with a transparent lid or placing an inverted plastic funnel with a hole in the conical end over each germination pad. The apparatus may be exposed to natural daylight but artificial light is usually desirable.
One of the disadvantages of the standard Copenhagen tank is the absence of direct temperature control at the seed bed. In the tropics it tends to overheat (Robbins 1982 b). Improved models have been developed, such as the one by Overaa (1962) which uses hollow stainless-steel strips, through which the water for heating and cooling is circulated.
Other disadvantages are that the equipment requires a large amount of floor space for the number of tests accommodated. Also, the handling of covers and substrata appears to be more cumbersome than moving a lightweight tray with paper substrate (Justice 1972).
The Rodewald apparatus consists of a zinc box covered with glass in which the seeds are exposed to direct or diffuse light. The bottom of the apparatus contains water over which a layer of moist sand is placed on a tray. The seed bed consists of unglazed porcelain dishes placed in the moist sand, or the dishes may be placed directly in the water. The temperature of the water is controlled thermostatically and the sand is moistened through wicks reaching into the water bath. A sand substrate is not desirable for species requiring alternating temperatures because of its slow adjustment to a change in temperature.
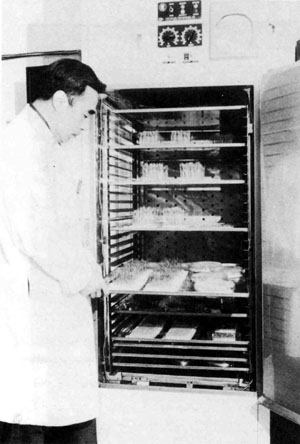
Germination cabinet. Another common type of apparatus is the closed chamber for germinating seeds in darkness, diffused light, or direct light. This type of germinator often consists of a double walled cabinet, suitably insulated against temperature changes by an air jacket or layer of insulating material. It is equipped with appropriate tray slides to accomodate the type of germination trays preferred by individual laboratories. The modern germination chamber has provision for both heating and cooling. Usually, water is chilled and passed between the walls of the chamber or through cooling pipes placed along the inner walls of the chamber. Either the air or a reservoir of water in the bottom of the chamber may be heated. In such cabinets the temperature can be regulated at any desired setting between approximately 8° C and 40° C (ISTA 1976).
Inexpensive germination cabinets are sometimes constructed locally. Gupta and Kumar (1977) describe the low cost germinators in use in the Seed Testing Laboratory in Dehra Dun, India. The outer wall of the cabinet is constructed of teak, the size 195 × 70 × 40 cm, and the electric controls include a thermostat, hot air blower, a separate air circulator and a time switch to control illumination. Glass wool is used for insulation between the inner and outer walls. Satisfactory performance is obtained at temperatures varying from room temperature up to 45° C (± 1° C).
A germination cabinet should meet as far as possible the following requirements (Oomen and Koppe 1969):
air humidity - as high as possible but preferably never lower than 90%, to prevent the seed substrate from drying up;
air temperature - adjustable between 10°C and 35°C, the temperature all over the working section of the cabinet over a number of days to be uniform in each of the temperature regimes, within plus or minus 1°C;
light - uniform illumination of the trays, intensity 750 to 1250 lux at the level of the seed;
air movement - as low as possible to prevent the seeds from drying up;
fresh air supply - small, of the order of one air change per hour, which should be sufficient to remove the carbon dioxide produced by the germinating seeds;
day and night cycling - a rapid initial temperature drop to be achieved in 30 minutes during the day to night change, reaching the ultimate night temperature in one hour, a similar requirement to hold for the night to day change;
condensation - not allowed.
However, when cabinets operate with alternating temperatures it is very difficult to maintain the high humidity and the substrates dry out; this necessitates frequent watering, which adversely affects the germination results and adds to the manhours spent on the test (Boeke et al. 1969).
There are many modifications of the germination cabinet and for detailed descriptions of some of them see Justice (1972) and Oomen and Koppe (1969).
Room germinator. When large numbers of tests are made, whole rooms may be used as germinators, with temperature, humidity and light controlled.
The room germinator is a modification of the cabinet. It is constructed on the same principle as the cabinet, but is large enough to permit workers to enter it and place the tests along either side of a central passageway. Usually, fans are required to prevent stratification of temperature and special equipment is necessary to maintain a high relative humidity.
Another modification is the combination room-cabinet germinator. The temperature of the entire room is kept as low as the lowest temperature required. Germination cabinets are placed in this room and heated, individually, by electricity to maintain the various temperatures required. Either constant or alternating temperatures may be obtained by this type of germinator.
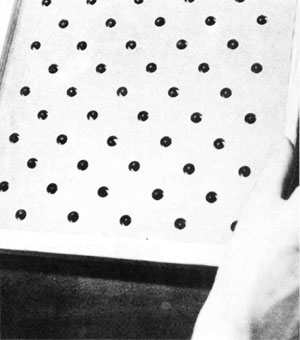 | 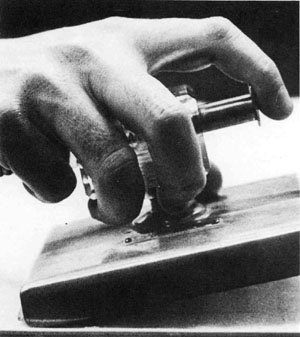 |
| 9.7 Counting board with seeds of Celtis laevigata. Seeds are spread on the top board to place one seed in each hole. The spring-held top board is then moved to the right until its holes line up with another set in the bottom board; the seeds then drop through. (USDA Forest Service) | 9.8 Counting head on a vacuum seed counter. A pump pulls a vacuum through the line and the hollow counting head that has 50 or 100 tiny holes on its bottom surface. When one seed per hole is attached, the vacuum can be released with the finger plunger to drop the seeds. (USDA Forest Service) |
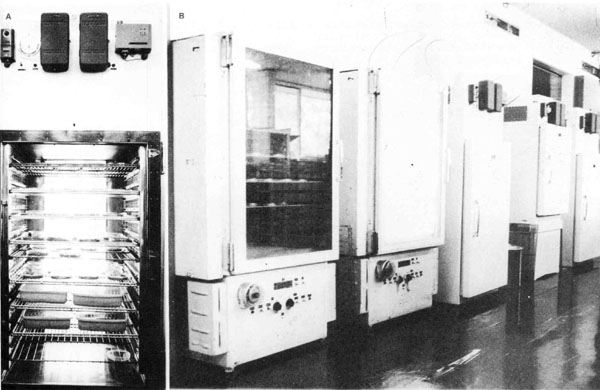
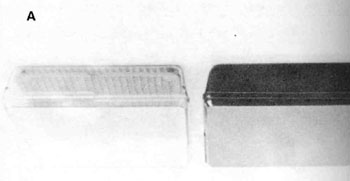
9.9 Seed germination equipment at the Division of Forest Research, CSIRO Canberra (A) Open seed germination cabinet (B) Group of cabinets. (Division of Forest Research, CSIRO Canberra)
 |  |
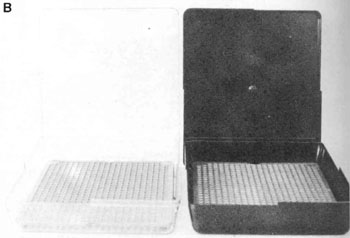 | |
| 9.10 Conviron G30 germinator, with over 95% relative humidity and programmable temperature and photoperiod within 24 hours, as used at Petawawa National Forestry Institute, Canada. (Canadian Forestry Service) | 9.11 Clear and black germination boxes developed for seed testing in Canada, shown closed (top) and open (bottom). (Canadian Forestry Service) |
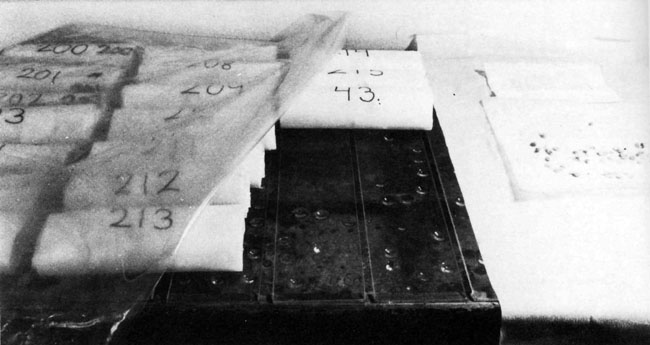
9.12 Copenhagen tank and rolled filter paper for germination tests. (DANIDA Forest Seed Centre)
Portable germination boxes. A simple and versatile germinator consists of a number of transparent plastic boxes with lids, which can be stacked one upon another. Robbins (1984) describes the ideal container as being (1) rectangular and stackable, for economony of space; (2) large enough for adequate spacing of at least one replicate of seeds (100, 50 or 25 seeds, depending on seed size); (3) sufficiently deep to allow for the required substrate depth and to permit development of the seedling for proper assessment; (4) provided with a wellfitting lid, to maintain a high moisture content of the substrate and surrounding air; (5) easy to sterilize by heat or chemical treatment; (6) transparent (at least the lid), to allow light if required for germination and subsequent development of the seedlings.
In Honduras the size of box used is 178 × 117 × 72 mm deep and each box contains one replicate of 100 pine seeds. This leaves a space of at least the width of one seed between each seed. For larger-seeded species there are fewer seeds per replicate box. Any of the common substrates described later in this chapter, e.g. filter paper, sand, may be used. By adding a suitable quantity of water to the substrate at the beginning of the test and then keeping the boxes covered with their lids at all times except during assessment and removal of seedlings, it is possible to maintain a high and constant moisture content in the substrate and the air inside the boxes, without the need for further additions of water or for control of humidity in the atmosphere outside the boxes. Where filter paper or blotting paper is used as the substrate, it can be kept permanently moist by placing it on a raised platform over a reservoir of water which is fed to the substrate by wicks. This arrangement resembles, in miniature, the Jacobsen tank. The boxes may be placed inside an incubator where temperature and light can be controlled in accordance with e.g. ISTA recommendations or, if no incubator is available, they can be stored in ambient room conditions of temperature and light. In either case the closed boxes should provide optimum humidity conditions for the germinating seeds.
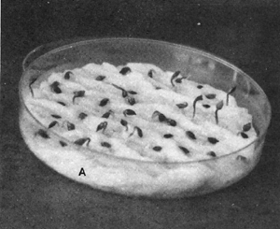
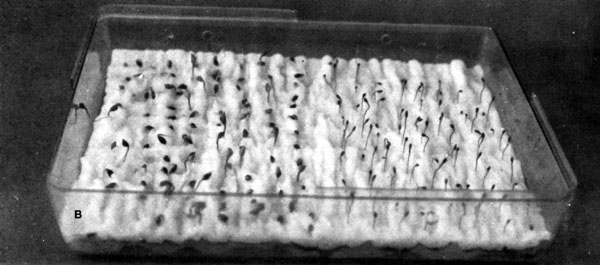
Researchers at the Petawawa National Forestry Institute in Canada have developed a germination box, moulded out of light, unbreakable and heat-resistant polycarbonate plastic, which is large enough to contain 4 replicates of 100 seeds each of pines or similarly sized seeds (Wang and Ackerman 1983). The box is 28 cm long × 24 cm wide. The base is 5 cm deep and the lid 1 cm deep, but the special universal locking mechanism makes it possible to fit two bases together; alternative combined depths of 6 and 10 cm are thus available for use according to the characteristics of the species under test. A perforated false bottom on eight legs 1 cm long supports the germination substrate and the space below can be used as a water reservoir if desired. The material is available in either clear or black plastic for germination in light or dark conditions; to ensure complete darkness it is necessary to seal the junction between base and lid with opaque tape. Four aeration holes on the side wall of the bottom component are optional in the clear plastic type.
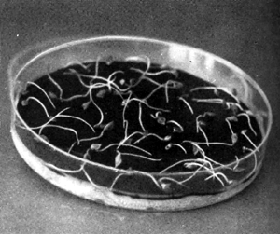
Tests of this germination box gave results closely comparable with those from the much smaller, and thus less convenient, petri dishes. It was found that loss of moisture over a four week period was least in boxes which had the water reservoir filled at the start of the test and which had no aeration holes. Both clear and black were equally good in this respect, but growth of mould was more severe in the (sealed) black than in the clear model. A substrate of blotting paper over Kimpak (cellulose paper) lost moisture more slowly than Kimpak alone.
Selection of a germinator. Most forest seed laboratories with a moderate through-put of samples use either the cabinet-type germinators or germination tables. A report by Boeke et al. (1969) recommends the exclusive use of cabinettype germinators for small seed testing laboratories. The advantages of using cabinets instead of germination tables of the Copenhagen type are a saving in space and, in well constructed cabinets, the more precise control of temperature and humidity (Oomen and Koppe 1969). It should be noted that a single-level Copenhagen tank requires five to eight times the floor space occupied by a cabinet of equal capacity (Boeke et al. 1969). Where research is being carried out on germination conditions, or where testing covers a wide variety of seeds, the flexibility provided by several cabinets operating at different temperatures and/or light conditions can be very advantageous.
For nurseries or small research institutes concerned with carrying out simple tests of germination without maintaining strict control of temperature and light, the flexibility, storability and cheapness of plastic germination boxes have much to recommend them. They can also be used in combination with incubators in which light and temperature are controlled.
The optimum conditions for different stages of germination and seedling growth are not identical and may even vary for different seeds within the same seed lot. The aim of much seed testing research has therefore been to determine a combination of conditions which will give the most regular, rapid and complete germination for the majority of the same species.
Substrate. Soil is rarely used as a substrate for germination tests because each sample will vary greatly in physical, chemical and biological properties. While the germination results might be more comparable with field conditions, the lack of reproducibility and difficulty in comparing tests of different seed lots render it unsuitable. Artificial media are much more easily standardized.
Most laboratory tests on small seeded species are made on paper. Other materials used include sand, granulated peat moss and expanded mica (Vermiculite and Terralite). The main requirements for the substrate (Justice 1972) are:
The choice of media on which the seeds are placed for germination depends on the equipment, the species, the working conditions and the experience of the operator. It is prescribed in the ISTA Rules for a number of forest trees (see Table 9.2, page 215).
Filter paper, heavy box paper, or any other absorbent paper may be linked with a filter paper or cotton wick dipped into water, or placed on top of a layer of sand or vermiculite. Cellulose paper is becoming more commonly used as a germination medium because it is easier to handle than sand, but still permits penetration of the radicle, thus providing for better evaluation of abnormal germination. Also moisture content does not tend to become stratified within the paper medium as it does with sand (Belcher 1974).
The best paper substrates are germination blotters, paper towelling, laboratory filter paper and creped cellulose paper wadding (Bonner 1974). Any paper substrates should be checked for presence of toxic chemicals. The 1976 ISTA rules give detailed specifications for paper and towels, including weight, bursting strength, capillary rise and acidity.
Seeds without a specific light requirement may be placed on top of paper or between folded paper. Folded paper increases the surface contact area between the seeds and the moisture supply. Large seeds may be rolled in paper towels which are then placed in an upright position; this allows the roots to grow downwards and avoids tangling of the roots (MacKay 1972). Rolled or folded paper packs may be kept moist without the necessity of a wick dipping into water. Rolled seeds may be stored on glass plates above, but not in contact with, a water bath and covered by a polythene sheet (Knudsen 1982). Any rolls which show signs of drying out may be sprinkled with water. Use of rolled paper is a very rapid and convenient method but may cause curling of the radicles. This is of no concern if the germinated seeds are to be discarded after testing. For operational germination of large quantities of seed, however, the slightly slower folded paper method is preferable. This is used with success as standard practice for Pinus and Eucalyptus spp. in Thailand (Sirikul 1975).
Sand is not suitable for very small seeds because they are difficult to locate, but it is widely used for larger seeds. Sand can be sterilized and fungi develop on it less freely than on paper. It also provides a good contact between the seed and moisture because the seeds can be pressed into the medium. A commonsense rule is to cover the seed with a thickness of sand not less than the length of the seed on its longest axis (Aldhous 1972). ISTA (1976) recommends a thickness of 1 – 2 cm according to seed size and prescribes that sand particle sizes should be between 0.05 and 0.8 mm and pH between 6.0 and 7.5.
Sand as a germination substrate is preferred for tree species that have a longer germinative period, for instance, Rosa spp., Pinus caribaea, P. elliottii, and P. palustris, or with larger seeds, for example, P. pinea and Quercus spp. (Magini, 1962). A sand-perlite medium permits leaching of the water which can be important when testing repellent-coated seed (Belcher 1967), but may be a disadvantage when testing seeds which are sensitive to drying.
Moisture and Aeration. The moisture level of the substrate has been suggested as one of the major causes of variation in seed research results (Everson and Isley 1951). The ISTA Rules specify that a sand substrate be moistened depending on its characteristics and the size of the seed to be tested and suggest that a moisture level of 50 – 60 % of the water-holding capacity of the sand is suitable for several groups of agricultural seeds. A paper substrate must not be so wet that a film of water forms around the seed. Belcher (1974), working with Pinus spp., concluded that most species have considerable tolerance to diverse moisture levels and the major variations in germination were due to dry conditions. He found some species to be sensitive to dry conditions and others to very wet conditions.
As a generalization, the substrate must be moist enough at all times to supply the necessary moisture, but excessive moisture will restrict aeration. All tests must be examined daily to ensure that the moisture content of the substrate is near optimum. The water should be reasonably free of impurities.
Temperature control. In laboratory seed testing the important temperature is that at the level of the seed. The temperature will vary for different species and appropriate values are listed for a large number of tree species in the International Rules for Seed Testing. Table 9.2, page 215 is an extract of selected species from the much more comprehensive ISTA table, with emphasis on tropical and sub-tropical species. In addition to temperature, it indicates prescribed substrates, light, counting periods and pretreatment.
Temperature is one of the most critical factors in the laboratory germination of seeds and must be regularly checked. When alternating temperatures are required the test is usually held at the low temperature for 16 hours and at the high temperature for 8 hours each day. Temperature of 20° and 30°C alternating are commonly prescribed for tree species. Although natural fluctuations between day and night temperatures are less in lowland moist tropical forests than in other forest types, alternating temperatures may still affect germination of tropical species. In one experiment of Terminalia ivorensis in Nigeria, alternating temperatures of 34° C and 24° C gave 93 % germination in 41 days compared with 27 % at a constant temperature of 30° C, both with continuous light (Okoro 1976).
Light. Light is required for germination in many tree seeds. Fluorescent light is as effective as natural daylight and is preferred in testing, because the wavelength and intensity can be standardized, within limits. Cool white fluorescent lamps are recommended because of their light quality and low heat emission: Light should be evenly distributed over the tests, with an intensity within the range 750 – 1250 lux. Seeds should be subjected to light for only part of the test period, 8 hours in every 24 hours is usual but a longer or shorter period may be beneficial to seeds of some species.
Cotrolling fungi in germination tests. Laboratory practices that will minimize the spread of fungi include proper spacing of seeds, control of temperature, removing decayed seeds, proper aeration, and keeping the substrate only just wet enough to permit germination. Sterilization of laboratory equipment and the periodic disinfection of germination cabinets and other apparatus will assist.
As a general rule, seed is not disinfected because seeds which decay are usually of poor quality. Magini (1962) states that a number of experiments carried out with different methods of disinfecting the seed just before or during germination have shown no reliable improvement in germination percentage. A small quantity of fungicide added to the water used to moisten paper rolls has, however, been found beneficial in testing conifer seeds in Denmark (Knudsen 1982). In Australia spraying of Karathane fungicide at a concentration of 0.8 g in one litre of distilled water has also proved effective when testing eucalypt seed on moist filter paper over vermiculite (Boland et al. 1980).
Conditions prescribed by CSIRO and ISTA for germination testing of selected tropical, sub-tropical and temperate species are tabulated in Tables 9.1, page 213 and 9.2, page 215 respectively.
Notes for table 9.1:
Temperature recommendations separated by a semi-colon indicate that the (constant) temperatures have been found satisfactory. Alternating temperatures are not necessary.
Unless otherwise specified, normal substrate used for testing eucalypts by Division of Forest Research, CSIRO, Canberra is moist filter paper over vermiculite in a petri dish. Where “vermiculite only” is recommended, the filter paper should be omitted.
A temperature shown in parenthesis e.g. (25) indicates that satisfactory results have been obtained with that temperature but a full range of temperatures has not been tested.
T a b l e 9.1
Data on Seed Viability and Recommendations for Testing of Selected Eucalyptus (extracted with some updating from Boland et al. 1980)
| Species | Mean No. of Viable Seeds per g of Seed and Chaff | Seed Testing Recommendations | Special Recommendations 2) | |||
| Weight of Replication | Temperature | First Count | Final Count | |||
| (g) | (°C)1) | (days) | (days) | |||
| E. brassiana | 340 | 0.15 | 25 | 7 | 14 | |
| E. camaldulensis | 670 | 0.10 | 30 | 5 | 10 | Light essential |
| E. citriodora | 110 | 0.50 | 25;30 | 5 | 14 | Vermiculite only |
| E. cloeziana | 130 | 0.40 | 25 | 7 | 28 | Vermiculite only |
| E. deglupta | 4,000 | 0.01 | 35 | 5 | 14 | Vermiculite only |
| E. globulus subsp. globulus | 75 | 0.70 | 25 | 5 | 14 | |
| E. grandis | 650 | 0.10 | 25 | 5 | 14 | |
| E. microtheca | 380 | 0.15 | 35 | 3 | 14 | Light essential, Vermiculite only or stratify 3 weeks, then 20°C |
| E. regnans | 180 | 0.30 | 15 | 10 | 21 | |
| E. saligna | 540 | 0.10 | 25 | 5 | 14 | |
| E. tereticornis | 600 | 0.10 | 25;30;35 | 5 | 14 | |
| E. urophylla | 460 | 0.10 | (25) 3) | 5 | 14 | |
T a b l e 9.2
Extracted from ISTA (1976) Table 5A. Germination Methods. Part II Tree Seeds. (incorporates amendments made by ISTA 1978)
This table indicates permissible substrates, temperatures, duration and additional directions, including recommended special treatments for dormant samples. For species in section 1, the methods in columns 2 – 6 are prescriptive and no others may be used.
Where two figures are shown under temperature, e.g. 20 – 30, this indicates daily alternation of temperatures. The lower temperature should be maintained for 16 hours and the higher for 8 hours, in each 24 hour period.
For species in section 2, other methods may be used provided that the method is indicated on the International Analysis Certificate.
For certain species indicated in column 7, duplicate tests (with and without prechilling) are necessary; the germination phase of these should run concurrently.
The less desirable methods are placed in brackets in the Table.
The abbreviations have the following meanings:
| TP | - | top of paper |
| BP | - | between paper (including rolled towels and pleated paper) |
| S | - | sand |
| TS | - | top of sand |
| L | - | light essential |
| TT | - | topographical tetrazolium test |
| 1) | - | reference to weighed replicates in Eucalyptus and other genera has been deleted by a 1981 ISTA amendment. A practicable and up-to-date guideline to testing eucalypts is contained in appendix 3 of Boland et al. 1980. Data from that appendix for a few of the more important species is reproduced in Table 9.1. |
| Species | Prescriptions for: | |||||||
| Substrata | Temperature (°C) | Light | First Count (days) | Final Count (days) | Additional directions including recommendations for breaking dormancy | |||
| 1 | 2 | 3 | 4 | 5 | 6 | 7 | ||
| SECTION 1 (Prescriptive) | ||||||||
| Acacia spp. | TP | 20–30(20) | L | 7 | 21 | (1) | Pierce seed, chio or file off fragment of testa at cotyledon end and soak 3 hrs. or | |
| (2) | (Soak seed 1 hr. in concentrated H2SO4, wash seed thoroughly in running water after acid treatment). | |||||||
| Ailanthus altissima | TP | 20–30 | - | 7 | 21 | Removal of pericarp after soaking for 24 hrs. may speed up germination. | ||
| 1) | Alnus spp. | TP | 20–30 | L | 7 | 21 | (May be tested also by using 4 weighed replicates of 0.10 to 0.25 gm each, according to species) | |
| Cedrela spp. | TP | 20–30 | L | 7 | 28 | |||
| Cryptomeria japonica | TP | 20–30 | L | 7 | 28 | |||
| Cupressus sempervirens | TP | 20 | L | 7 | 28 | |||
| 1) | Eucalyptus camaloulensis | TP | 30 | L | 3 | 14 | Use 4 weighed replicates of 0.10 gm each | |
| Liquidambar styraciflua | TP | 20–30 | L | 7 | 21 | Sensitive to drying in test | ||
| Nothofagus obliqus | TP | 20–30 | L | 7 | 28 | No prechill and prechill 28 days at 3–5 ° C. Double tests. | ||
| Pinus caribaea | TP | 20–30 | L | 7 | 21 | |||
| P. elliottii | TP | 22;20–30 | L | 7 | 28 | |||
| P. pinaster | TP | 20 | L | 7 | 35 | (1) | No prechill and prechill 28 days at 3–5 ° C. Light for no more than 16 hrs. per day. Double tests. | |
| (2) | (Use TT) | |||||||
| P. radiata | TP | 20 | L | 7 | 28 | |||
| P. taeda | TP | 22;20–30 | L | 7 | 28 | |||
| Quercus spp. | TS(S) | 20 | - | 7 | 28 | Soak seed for up to 48 hrs. and cut off 1/3 at scar end of seed and remove testa. | ||
| Robinia pseudoacacia | TP | 20–30 | L | 7 | 14 | (1) | Pierce seed or chip or file off fragment of testa at cotyledon end and soak 3 hrs. | |
| (2) | (Soak whole seed 1 hr. in concentrated H2SO4 for as long as necessary to pit surface of testa. Wash seed thoroughly in running water.) | |||||||
| SECTION 2 (Not prescriotive) | ||||||||
| Pinus kesiya | TP | 20–30 | L | 7 | 21 | |||
| P. merkusii | TP | 20–30 | L | 7 | 21 | |||
| P. oocarpa | TP | 20–30 | L | 7 | 21 | |||
| P. patula | TP | 20(20–30) | L | 7 | 21 | |||
| Tectona grandis | S | 30 | L | 14 | 28 | Soak in water and allow to dry for 3 days - repeat this 6 times. | ||
A seed is considered to have germinated after the emergence and development from the seed embryo of those essential structures which are indicative of the seed's capacity to produce a normal seedling under favourable conditions. Abnormal seedlings are not included in the germination count because they rarely survive to produce plants. The ISTA Rules (ISTA 1976) recognize four groups of abnormal seedlings: (a) damaged seedlings, (b) deformed seedlings, (c) decayed seedlings, (d) seedlings with unusual hypocotyl development. These groups and their characteristics are defined in detail in the ISTA Rules. In a laboratory test the majority of the normal seedlings are usually removed at the interim counts, but the assessment of many of the doubtful and abnormal seedlings must be left until the end of the test, to ensure that slower growing but otherwise normal seedlings are not incorrectly classified.
For many species the initial count is carried out one week after starting the test and assessments may be carried out at weekly intervals until the test is ended. More frequent assessment is needed if a more precise picture is needed of the speed of germination. At the end of the test period, all remaining ungerminated seeds should be cut and examined, and the number of fresh, firm and possibly viable seeds recorded (Bonner 1974). At the same time observations may be made on the condition of unsound ungerminated seeds e.g. an abnormally high incidence of insect - damaged or mechanically damaged seeds which would indicate the need for improvements in seed hygiene or seed processing methods. The record of the germination test commonly shows the percentage of germinated and the percentage of ungerminated but apparently sound seeds separately, e.g.
| Germination % | = | 82 % |
| Sound ungerminated seeds | = | 6 % |
| Viability % | = | 82 % + 6 % (= 88 %) |
It can be seen from Tables 9.1 and 9.2 that the duration of a test commonly lasts from two to five weeks, but this does not allow any period for pretreatment to overcome dormancy (see Chapter 8). Many species require no pretreatment and some types of seedcoat dormancy can be successfully treated in a matter of hours. But the prescribed pretreatment of Tectona takes 18 days and some prescribed prechilling treatments 3 – 9 months. When planning a testing programme it is necessary to take account of pretreatment as well as testing time. In extreme cases it may be necessary to replace the germination test by one of the indirect tests of viability described below.
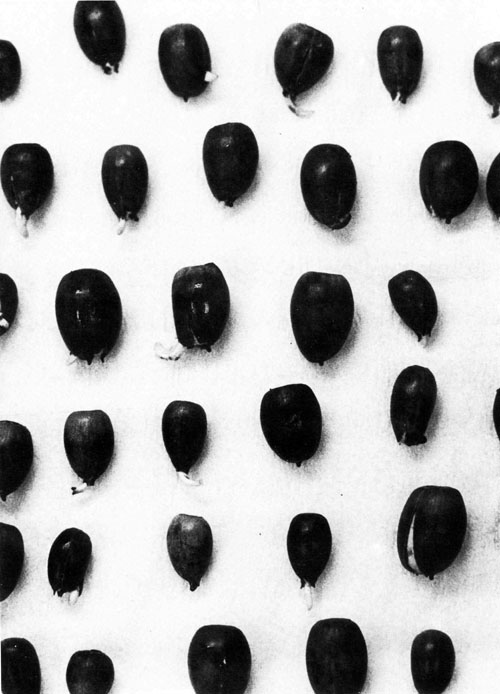
9.13 Acorns of Quercus alba germinating on Kimpak in USA. Note spacing between seeds. (USDA Forest Service)
 |  |
 | |
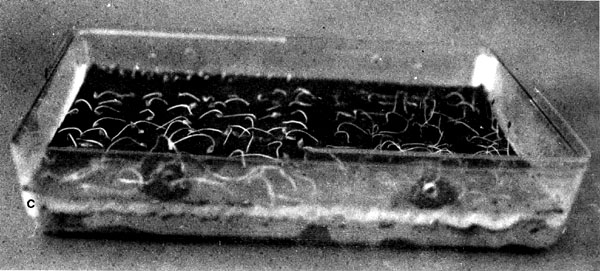 | |
| 9.14 Germination of Douglas-fir and lodgepole pine seeds on Kimpak (A left) and blotter/Kimpak (A right) in petridishes (A) and Canadian clear germination boxes (B-C). (Canadian Forestry Service) | |
Germination Energy has been defined in more than one way (Ford - Robertson 1971): (1) The percent, by number, of seeds in a given sample which germinate within a given period (defined as the energy period) e.g. in 7 or 14 days, under optimum or stated conditions or (2) The percent, by number, of seeds in a given sample which germinate up to the time of peak germination, generally taken as the highest number of germinations in a 24 hour period.
In both the above definitions the length of the energy period is considerably shorter than the full test period prescribed by ISTA. Germinative energy is a measure of the speed of germination and hence, it is assumed, of the vigour of the seed and of the seedling which it produces. The interest in germinative energy is based on a theory that only those seeds which germinate rapidly and vigorously under the favourable conditions of the laboratory are likely to be capable of producing vigorous seedlings in field conditions, where weak or delayed germination is often fatal (Aldhous 1972). Little experimental evidence has been published on this theory, but excessively delayed germinants must get eliminated automatically from the nursery, either because they are suppressed by older and more vigorous competitors or because, if transplanting has already been completed, they are not worth the trouble of a special supplementary transplanting. An example of calculating germination energy is given on pp. 234–236.
Another method of comparing germination energy of different seed lots is to record “Rate of Germination” i.e. the number of days required to attain 50% of germination capacity (Allen 1958). The shorter the period, the greater the germination energy. Yet another method is to evaluate the stage of development of germinated seeds and classify them into a number of development or vigour classes. For example Wang (1976) used seven classes for germinated normal seeds of Picea glauca, in addition to ungerminated and abnormally germinated seeds; they ranged from seedlings with healthy root, fully developed hypocotyl and seedcoat completely shed to seeds with seedcoat burst open but as yet no radicle emergence.
The concept of Germination Value, as defined by Czabator (1962), aims to combine in a single figure an expression of total germination at the end of the test period with an expression of germination energy or speed of germination. Total germination is expressed as (final) Mean Daily Germination (MDG), calculated as the cumulative percentage of full seed germination at the end of the test, divided by the number of days from sowing to the end of the test. Speed of germination is expressed as Peak Value, which is the maximum mean daily germination (cumulative percentage of full seed germination divided by number of days elapsed since sowing date) reached at any time during the period of the test. Germination Value (GV) can then be calculated from the formula.
GV = (final) MDG × PV
Germination Value, as an integrated measure of seed quality, has been used by several tropical seed workers e.g. for Terminalia ivorensis (Okoro 1976) and for Pinus kesiya (Costales and Veracion 1978).
An alternative method of calculating Germination Value has been proposed by Djavanshir and Pourbeik (1976), who found that it was more closely related to survival of plants in field nurseries than was Czabator's method, in the case of Pinus ponderosa and P. eldarica in Iran. The formula they proposed was:

where:
| GV | = | Germination value |
| GP | = | Germination percent at the end of the test |
| DGS | = | Daily germination speed, obtained by dividing the cumulative germination percent by the number of days since sowing |
| ∑DGS | = | The total obtained by adding every DGS figure obtained from the daily counts |
| N | = | The number of daily counts, starting from the date of first germination. |
The calculations required are somewhat lengthier than those of the Czabator method and, for many patterns of germination, the simpler method is likely to give sufficiently accurate comparisons between seed lots. Examples of calculating GV by both methods are given on pp. 236–238.
A good example of a suitable method for testing germination in the nursery is the procedure recommended for tropical pines in West Malaysia (Paul 1972):
“Take 400 pure seed and divide into 4 samples each of 100 seed. Take 4 wooden or plastic boxes (opaque flexible plastic sandwich boxes are very good) of dimensions 30 × 30 cm and of depth about 10 cm and fill them slightly overfull with sieved sand to the top of the sides. Wet the sand by applying 0.5 litres of water to each box. Level the sand across the top of each box and make drills at 2.5 cm intervals and of depth 6 mm (for P. oocarpa the drills should only be 3 mm deep). Sow the seed (100) at intervals of 2.5 cm and gently press them on to the sand in the drill. Cover to a depth of 6 mm (3 mm for P. oocarpa) with sand which has been passed through a Mesh No. 12 (12/64" or 4.76 mm) but retained on a Mesh No. 8 (Size 8/64" or 3.18 mm). Lightly water with a fine mist spray. Cover with transparent polythene sheeting of 0.2 mm thickness mounted on the upper side of a square tight-fitting wooden frame of 5 cm thickness. Within 24 hours condensation of moisture will appear on the inside of the polythene cover. If moisture disappears at any time during the ensuing 7 days then give a light mist spray and close lid once more. Germination will usually begin by the 7th day and the cover can be removed. Keep sand moist. A seed is recorded as having germinated when it has reached a height of 1 cm complete with seed coat enclosing the cotyledons. Record all germination from 7th to 28th day separately for each of the four boxes. Remove seedlings as soon as they are recorded plus any diseased ones which may not yet have reached 1 cm height as they may infect others.
On the 28th day after sowing sieve the top layer of sand in each box through a No. 12 mesh screen (mesh size 12/64" or 4.76 mm) and record the number of full seeds which have not yet germinated. (Use cut test.)”
The use of 4 replicates in a germination test enables the tester to measure the degree of variation in the sample. A simple method is to calculate the range of difference in germination % between the highest and the lowest of the sub-samples. The range can then be compared with the table published by ISTA (1976), reproduced here as Table 9.3, page 220 (it is applicable to replicates of equal numbers of seeds, not of equal weights). Provided that the actual range is less than the maximum in the table, the sample can be regarded as homogeneous and the average of the four replicates is accepted. If the actual range exceeds the maximum in the table, then a new sample must be drawn and tested. Common causes of such situations are non-homogeneity of seed and, in nursery tests, fungal or insect damage in one or more of the replicates (Paul 1972). Retesting is also necessary when an extremely high percentage of full, ungerminated seeds are left at the end of the test (Bonner 1974). In this case retesting should be done with a different pretreatment to try to overcome dormancy and improve total germination.
T a b l e 9.3
Maximum Tolerated Ranges Between Replicates
(extracted from Table 5 B, ISTA 1976)
This table indicates the maximum range (i.e. difference between highest and lowest) in germination percentage tolerable between replicates, allowing for random sampling variation only at 0.025 probability. To find the maximum tolerated range in any case calculate the average percentage, to the nearest whole number, of the four replicates: if necessary, form 100-seed replicates by combining the sub-replicates of 50 or 25 seeds which were closest together in the germinator. Locate the average in column 1 or 2 of the table and read off the maximum tolerated range opposite in column 3.
| Average percentage germination | Maximum range | Average percentage germination | Maximum range | |||
| 1 | 2 | 3 | 1 | 2 | 3 | |
| 99 | 2 | 5 | 87 to 88 | 13 to 14 | 13 | |
| 98 | 3 | 6 | 84 to 86 | 15 to 17 | 14 | |
| 97 | 4 | 7 | 81 to 83 | 18 to 20 | 15 | |
| 96 | 5 | 8 | 78 to 80 | 21 to 23 | 16 | |
| 95 | 6 | 9 | 73 to 77 | 24 to 28 | 17 | |
| 93 to 94 | 7 to 8 | 10 | 67 to 72 | 29 to 34 | 18 | |
| 91 to 92 | 9 to 10 | 11 | 56 to 66 | 35 to 45 | 19 | |
| 89 to 90 | 11 to 12 | 12 | 51 to 55 | 46 to 50 | 20 | |