ALL FRESHWATER PRAWN HATCHERIES are unique. No precise prototype hatchery would suit every local situation. This manual therefore does not attempt to provide a complete design but it does describe the various features and techniques used in them. This section of the manual is derived not only from the original manual but also draws heavily on recent reviews (Correia, Suwannatous and New 2000; Valenti and Daniels 2000). Two basic types of hatchery are described.
The first type is known as the flow-through system, which is effectively used in many parts of the world and evolved from the original facilities developed by Takuji Fujimura and his team at the Anuenue Fisheries Research Centre in Hawaii in the 1960s and 1970s. The variants of the flow-through system that exist (e.g. high-density culture, greenwater versus clearwater management, coastal versus inland hatcheries) are discussed later in this section.
Recirculation systems involving the use of biological filtration have been developed to conserve water and energy usage, reduce the demand for seawater or brine, and facilitate the establishment of inland hatcheries. They range from simple systems utilizable by small hatcheries to sophisticated systems used for research work and commercial hatcheries. The second type of hatchery described in this section uses a specific form of water recirculation and is known as the dynamic closed system6. In the rest of this section of the manual this will be referred to simply as the recirculation system. This is based on continuous circulation of the larval water through physical and biological filters to remove solid and nitrogenous wastes. This system can have individual biofilters for each larval tank or a common biofilter serving several larval tanks. The latter is naturally more risky because a failure in the system may affect a large number of larvae. However, the risk has to be balanced against the capital and maintenance costs of multiple filtration systems.
The general details (facilities and management) for flow-through and recirculation systems are similar. Where there are special requirements for recirculation systems, these are described under each sub-heading of the section.
FIGURE 14a
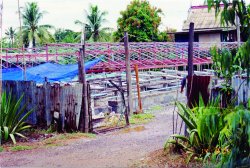
Small hatcheries can be very simply constructed (Peru)
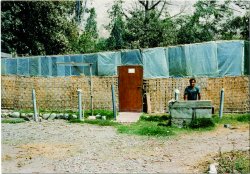
FIGURE 14b
Interior of a simply-constructed inland hatchery for freshwater prawns (Thailand)
SOURCE: OSCAR ORBEGOSO MONTALVA
SOURCE: HASSANAI KONGKEO
In tropical freshwater prawn hatcheries, special facilities for holding broodstock do not normally exist. However, they are necessary in areas of seasonal grow-out, where over-wintering of broodstock is essential. This is because you need to start the larval rearing cycle early, so that grow-out facilities can be stocked as soon as the climatic conditions are favourable. Broodstock facilities and management have already been discussed. The size of specific items of equipment depends on the number of postlarvae (PL) to be produced by each hatchery.
Hatcheries need a reliable power supply, because continuous operation of the aeration system is essential. Even where public power supplies are reliable, you need a back-up generator. You may wish to generate all your own power but a back-up facility is still essential. Power failure can quickly result in total stock mortality. You might think that your hatchery needs to be close to the nursery or grow-out pond locations where your product (postlarvae, referred to as PL) will be stocked. This is preferable but it is technically possible to transport PL for long distances, so it is not essential for technical reasons. Your water supplies - freshwater, seawater, brine, or made from artificial sea-salts - must have excellent quality, as described earlier in this manual. Site location for hatcheries operating recirculation systems is less dependent on the proximity of supplies of seawater or brine, because they minimize the quantities required. When artificial sea salts are used, only freshwater is needed on the site.
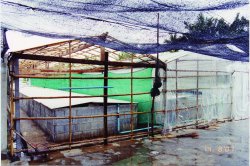
In tropical areas tanks in flow-through hatcheries can be situated in the open but you should provide, at the minimum, simple shading (palm fronds or a bamboo framework, for example) where there is a possibility of the water temperature rising too high. Water temperatures may also drop too low in tanks in the open air at certain times of the year for continuous operation. It is therefore better for you to house your tanks in a building, to make it easier for you to control temperature and light and to minimize the entry of insects and dust. The roof and walls do not need to be permanent. Locally available materials are the best to use. Successful hatchery buildings in tropical areas are often very simple structures, which are easy to extend or re-locate (Figures 14a and 14b). If the hatchery is successful and business
is good you can think of extending it and building something more permanent later (Figure 14c).
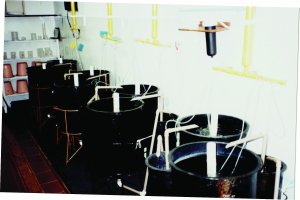
If you are building your hatchery in a temperate zone, a proper building becomes essential for temperature control and efficiency. No exact hatchery design is provided here, for the reasons explained earlier, but a general view of the interior of a flow-through hatchery is illustrated in Figure 15 and a simplified layout for this type of hatchery is shown in Figure 16. A diagram of a single-tank recirculation system is shown in Figure 17.
FIGURE 14c
Buildings are often rebuilt as the hatchery prospers but the structure remains simple (Thailand)
Tanks
The focus of every hatchery is the larval rearing tank. Many different types of containers can be used to grow freshwater prawn larvae, including circular flat-bottomed tanks (made from plastic or converted from large-bore drain pipes), circular conical-bottomed (sometimes called cylindrico-conical) plastic tanks, plastic-lined wooden tanks, rectangular concrete tanks, concrete-faced brick or block tanks and earthenware water jars (known in Thailand as klong pots see Annex 4, Figure 4). There are some advantages in having rectangular tanks. Circular tanks are acceptable, but once you increase the capacity of the hatchery you would need a lot of small tanks or a few very large ones. Large circular tanks are rather cumbersome to use. If you use a lot of small circular tanks you will waste a lot of space between them and you would need a lot of unnecessary pipe fittings, etc. The main advantage of rectangular tanks is that you can build them so that the width stays the same, whatever the volume, while the length increases as they get bigger. A 10 m3 rectangular tank is just as accessible for feeding, cleaning and larval inspection as a 1 m3 rectangular tank.
Suitable materials for tank construction vary from site to site. Copper and zinc (and their alloys), galvanized steel, bare concrete, and oil are toxic to larval freshwater prawns. These materials must be avoided when tanks are constructed and equipment, such as pipes, water and air pumps, etc. are bought. Rigid plastic, fibreglass or plastic-lined wooden tanks are ideal. The original Hawaiian freshwater prawn tanks were based on a fibreglass interior, with a reinforced layer of concrete shot-creted onto the outside for strength. Tanks can be made from good quality concrete or concrete-faced hollow-blocks which should be reinforced with vertical iron rods. Tanks based on concrete blocks, lined with a smooth concrete surface and coated with several layers of pure epoxy-resin to prevent harmful chemicals leaching out of the concrete, are very successful (Figure 18).
Some people report that concrete structures often crack and need to be re-coated with epoxy-resin (which is expensive) but this may be because of poor construction when they were first built. These tanks must be carefully constructed so that they do not leak. They must have a firm, well-compacted foundation (a 5 m3 tank, for example, supports 5 mt of water, plus its own weight). Concrete pouring or facing work must be continuous so that the concrete does not dry out by sections. Failure to do this will later result in cracks and leaks at the joints. Place your larval tanks high enough so that you can drain them by gravity when the turn-down drain is operated. Construct tile, faced block or concrete drainage canals to carry the drained larval rearing water away without undermining the foundations of the tanks. Another argument against concrete tanks is that they are permanent immovable structures. Plastic or fibreglass tanks can be purchased off-the-shelf and can be rearranged if you want to revise the layout of your hatchery. However, buying plastic tanks can be very expensive and many commercial freshwater prawn hatcheries stick to concrete-lined or concrete tanks.
FIGURE 15
Partially covered larval tanks, made from concrete blocks (Thailand)
SOURCE: HASSANAI KONGKEO
Whatever type of tanks you choose, you must ensure that they have a smooth surface and that all right-angled parts (where the side walls join and the bottom meets them) are rounded off (see Figure 18). This is essential to make efficient tank cleaning easier and to reduce the surface area available for the growth of algae, bacteria and protozoa. Smooth surfaces also decrease the tendency of larvae to concentrate in the corners of the tank. Circular tanks avoid this problem but some hatchery operators find that food distribution and tank cleaning operations are more difficult in circular than in rectangular tanks, because of the difficulty of moving between them in a limited space. Some hatchery operators prefer cylindrico-conical tanks because they find them easier to clean. Figure 19 shows an interior view of this type of tank. The difficulties which hatchery operators have in working around a lot of circular tanks can be reduced by building them in groups, as illustrated in Figure 20. There are obviously many possible alternative choices of tank construction and layout. You must make your own choices; this manual can only point out some of the advantages and disadvantages of each type. Whatever type of tanks you choose, it is essential that you age them when they are new by soaking them in several changes of brackishwater for several weeks. This allows soluble toxic materials to leach out.
Many hatchery managers believe that tanks with coloured (green, blue, black) interiors seem to give better results and there is some research evidence for this. You will note that the tanks shown in Figures 19 and 20 are painted black. Some speculate that the larvae can see their food more easily and are better distributed throughout each tank. However, not all successful hatchery operators agree. Some claim that larvae find their food mostly by contact, not sight, and that white tanks make it easier to clean and observe the larvae! The tanks shown in Figure 18 are painted light blue, which seems to be a compromise. Another operator has found that painting the bottom and the lower 30 cm of the tank sides beige and leaving the rest of the tank black provides the best colour contrast to Artemia and allows the larvae to feed more efficiently in indirect light. It is therefore not possible to make a firm recommendation on tank colour in this manual (further research may make a clear recommendation feasible in the future). Individual hatchery experience, based on ease of management, observations on the larvae, and (most important of all) success in producing healthy PL in the shortest time and with the best survival rate, is what governs the choice of colour at present.
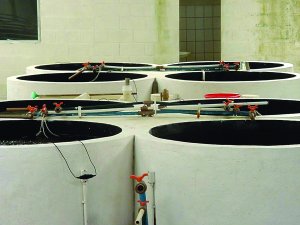
Individual tank size depends on the number of larvae you want to stock and on whether you find that operating a few larger tanks or a lot of small ones is most convenient. In recirculation systems, individual larval tank size generally varies from 1-8 m3 and the filters can either be shared (Figure 21) or individual (Figure 22). Tanks of between 2 and 5 m3 are typical in flow-through systems but some hatchery operators prefer larger tanks (e.g. 10 m3). Some hatcheries use a range of tank sizes, so that the larvae can be reared in high densities in small tanks at the beginning (which conserves water and food, and makes management easier) and moved to larger tanks later when they require more space. Other hatchery managers think that the apparent advantages of this style of management are outweighed by the larval damage and mortalities caused during tank transfers. For illustrating some management techniques and calculations of water requirements, etc., a standard tank water volume of 5 m3 has been used in this manual.
FIGURE 18
There can be a lot of wasted space around circular tanks but none is wasted between these rectangular larval tanks (Thailand)
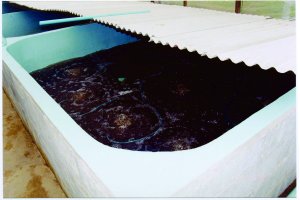
FIGURE 19
Inside of cylindrico-conical larval tank, showing the central standpipe used during water exchange (Brazil)

FIGURE 20
Some space can be saved by grouping tanks together but there is still some dead space between these cylindrico-conical hatchery tanks (Brazil)
Good tank drainage is essential. You have to remove water (during water exchange) and, at harvesting time, PL from your tanks. The interior draining system in a cylindrico-conical tank is clearly shown in Figure 19. If rectangular tanks are used it is essential to slope them slightly toward the drain end. Use a 2 inch (5 cm) turn-down drain for a 5 m3 tank. Larger tanks will need larger bore drainage pipes (e.g. 4 inch 10 cm for a 10 m3 tank). Smaller tanks can use smaller pipes for drainage but it is important not to make the drainpipes too small or water exchange will take too long. These pipes must be covered with a filter sock inside the tanks made of nylon screen (Figure 23) to prevent the loss of animals during water exchange operations. They can be arranged so that they drain into a central channel, as shown in Figure 24. You will need to use a mesh size of 150-250 µm at first, because the larvae are so small. However, this mesh size drains slowly and you must increase it as the animals grow. By the time you have PL in the tanks you can use a mesh size of 1 000-1 200 µm. The filter sock is removed during harvesting operations.
You will also need other types of tanks besides larval tanks. For example, tanks for hatching live feed organisms (e.g. Artemia) are required. Mixing tanks are also needed for preparing the brackishwater to be used in the hatchery, as well as storage tanks for seawater or brine and freshwater (Figure 25). Building mixing and storage tanks high enough so that the water for tanks can be distributed by gravity would seem ideal. However, the cost of constructing raised tanks is so high that pumping is normally used for this purpose, as shown in Figure 25. Your hatchery should have a total storage, holding and mixing capacity of at least twice the total volume of its larval rearing tanks (e.g. four 25 m3 or two 50 m3 tanks for every ten 5 m3 larval rearing tanks). This capacity is necessary to allow for adequate water storage, treatment and mixing time for the production of 12 ppt brackishwater. You will also need to provide tanks for holding PL before sale or stocking in nursery or grow-out facilities. The type, size, and shape of materials used in the construction of water storage and supply systems, as well as for postlarval holding tanks, vary according to the site and scale of operations, like the larval tanks. Some tropical hatcheries find that a convenient size for PL holding tanks is 25 or 50 m3 but your choice will depend on the number of larval tanks you operate per production cycle.
FIGURE 21
The water in these larval tanks recirculates through a shared filter (Brazil)
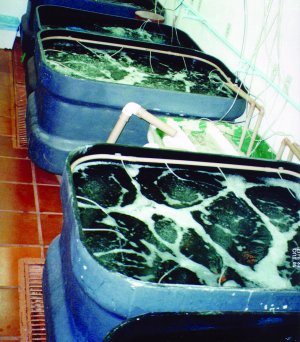
FIGURE 22
These larval rearing tanks have individual recirculation systems (Brazil)
Air supply
A vigorous supply of air is essential in all your tanks (larval, Artemia rearing, mixing, storage), to keep the dissolved oxygen (DO2) levels high (>5 ppm). The relationship between temperature, salinity and dissolved oxygen saturation levels is shown in Table 7. In the larval tanks, aeration also keeps the larvae in close contact with their food. Some hatcheries distribute air through several rigid 0.5-1.0 inch (1.25-2.5 cm) diameter PVC pipes (1.25 cm pipes work best in circular tanks) with holes cut into them at 0.3-0.5 m intervals with a 1/32 inch drill. Others use weighted flexible plastic tubing laid on the bottom of the tank, with holes punctured in them. However, the use of good-quality air stones is preferable because the holes in pipes and flexible tubing easily become blocked. In addition, pipes or tubing on the tank bottom hide detritus, providing conditions favourable for the growth of fungi and protozoa, and making tank cleaning extremely difficult. Airstones are therefore recommended; punctured pipes or plastic piping within the larval tanks are not.
Make sure that the flow of air in one tank is not affected by the number of other tanks in operation or by the operation of valves in an adjacent tank. You can do this by having a large bore 2 or 3 inch (5 cm or 7.5 cm) ring main distribution system (Figure 26) with smaller 0.5 inch (1.25 cm) or 1.0 inch (2.5 cm) pipes supplying each tank, each controlled by an individual valve (Figure 27). The blower should be sized to provide more air than needed (see below) and excess air can be voided through a valve on the ring main, which can be adjusted according to the day-to-day requirements of the hatchery.
The aeration system is a vital part of the hatchery, so it is important that you protect it from damage. The distribution system can be buried for protection against accidental damage by placing it under 4 inches (10 cm) of medium gravel or sand, whether the hatchery is indoors or out-of-doors. Covering any type of hatchery pipe work with concrete is not recommended. An alternative, which is probably preferable, is to suspend the aeration system from the hatchery roof and to drop individual supplies to each tank (see Figure 38). Within larval tanks, air needs to be well distributed, so that it not only keeps the oxygen level in the whole tank high but also keeps the larvae close to their food. Distribute the air within your larval tanks by air stones (roughly placed at one per m2 of tank bottom. Internal aeration in tanks used in recirculation systems, in addition to maintaining dissolved oxygen levels high, must be placed so that it generates water circulation from the centre of the tank to the sides and from the top to the bottom. If this is not done, it will cause dead spots in the tank, where larvae and feed drop out and are trapped near the bottom, and solid wastes will not be removed for treatment in the filters. Failure to tackle this topic will result in an excessive build-up of bacteria, causing water quality and disease problems.
An oil-free blower (Figure 28) is better than an air compressor for hatcheries, because it gives high volume, low pressure, uncontaminated air. The high pressure provided by an air compressor is not normally needed, except for flushing filters in recirculation systems. Approximately 0.3 CFM (0.55m3/hr) of air for each cubic metre of water should be available. A 200 CFM (5.66 m3/min) Roots-type or similar blower is sufficient to supply air for a hatchery capable of producing 20 million larvae/year. You must keep a spare blower and motor in working order at all times. You should rotate the use of the blowers regularly. Do not always operate one and hope that the other one will work when you need it in an emergency. You should also check that both blowers are in working order once per day. Your spare blower must be permanently plumbed and wired in so that it can be switched into the system immediately if a failure of the other blower should occur. Two forms of back-up (against pump failure and power failure) are illustrated in Figure 28. A pressure drop sensor can be built into the air distribution system, which will switch the emergency blower on automatically if the main one fails but this is uncommon in most freshwater prawn hatcheries, which rely on vigilant workers (during the night as well as the day) and power failure alarm systems for safety.
FIGURE 25
Tanks for storing hypersaline water and freshwater, and for mixing purposes at an inland hatchery in Thailand; note the roof and side covers for excluding aerial pollution and controlling temperature
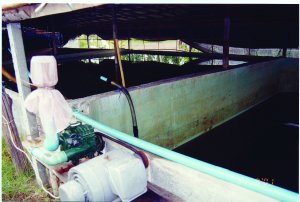
SOURCE: HASSANAI KONGKEO
TABLE 7
Relationship between temperature, salinity and dissolved oxygen saturation levels (in ppm)
SALINITY | |||||
TEMPERATURE (°C) |
FRESHWATER |
7.5 PPT |
11.1 PPT |
14.7 PPT |
36.4 PPT |
20 |
9.1 |
8.7 |
8.5 |
8.3 |
7.4 |
22 |
8.8 |
8.4 |
8.2 |
8.0 |
7.1 |
24 |
8.4 |
8.1 |
7.9 |
7.7 |
6.9 |
26 |
8.1 |
7.8 |
7.6 |
7.5 |
6.6 |
27 |
8.0 |
7.6 |
7.5 |
7.3 |
6.5 |
28 |
7.8 |
7.5 |
7.4 |
7.2 |
6.4 |
29 |
7.7 |
7.4 |
7.2 |
7.1 |
6.3 |
|
30 |
7.6 |
7.3 |
7.1 |
7.0 |
6.2 |
SOURCE: DERIVED FROM SPOTTE (1970) USING KNUDSENS FORMULA FOR CONVERTING CHLORINITY TO SALINITY
Water distribution
Water distribution systems within hatcheries vary widely. Many hatcheries are built with elaborate and permanent distribution systems providing an individual supply of piped seawater, freshwater and brackishwater to every tank, as shown in Figure 27. An example of a water distribution layout for a flow-through hatchery is shown in Figure 29. In some commercial hatcheries these cease to be used after a while; there is a tendency for water quality to deteriorate because it may have lain stagnant in the pipes for some time. Such sophisticated water distribution systems can be replaced by flexible tubing and submersible pumps. Submersible pumps are easy to use if the hatchery is compact, but if you use them without care it may result in contamination between untreated and treated water supplies, and possible disease transfer between one rearing tank and another.
The individual tank water inlets can be arranged so that they can be turned away from the tank and water can be flushed to waste before it is directed into the tank. This prevents water from entering the larval rearing tanks that may be stagnant or very warm because it may have come from pipes exposed to sunlight. Another way of ensuring that this cannot happen is to fix a short length of flexible hose to each water inlet and always allow the water to flush to waste for a minute or two before letting it flow into the tank.
The choice of pump size depends on the scale and design of each specific hatchery. As noted earlier, specific hatchery design is not a part of this manual. In sizing, pumps should be chosen which will fill the appropriate tank at the maximum rate required, not the average rate. There is nothing more annoying than a slow-filling tank due to pump under-sizing. Copper and zinc are toxic to freshwater prawns but there should be no problem in the use of pumps containing alloys of these two metals (which are often chosen, particularly for seawater pumping, because of their corrosion resistance) where the water passes through the pump only once. Pumps which are submerged in water (submersible pumps), or which form part of recirculation systems, must have those parts in contact with water made of an inert material, such as plastic. Air lift pumps (see Figures 13a and 13b) are also extremely useful for recirculating water or for transfer of water from one tank to another. In all cases, pump sizes should be standardized as far as possible to minimize the number of standby pumps necessary. Make sure that you can replace an out-of-order pump simply and quickly and keep adequate spares in working order on site at all times. Maintaining equipment such as pumps, blowers and generators in good general working condition is critically important. These items should have a weekly functional check.
In recirculation systems, proper water flow rates and good circulation is essential for adequate waste removal. All equipment must be capable of supporting the maximum water flow rate needed during the larval cycle. Ideally, the total water volume in the larval rearing tanks should circulate through the filter an average of at least 10 times per day (1 000%) but pump sizing should be based on the maximum flow demand. When the larval stocking rate is high, the water may need to be passed through the filter at a turnover rate of 70 to 100% per hour. Thus a 5 m3 larval culture system would require a system capable of providing a water flow of 5 m3/hour. This can best be done through the use of airlift pumps (see Figures 13a and 13b). All pumps, filters and disinfection systems must be sized to provide this maximum flow rate. Useful information on pumps and pumping for aquaculture is given in Wheaton (1977).
FIGURE 27
Close-up of taps for
brackishwater, freshwater and air supplies to larval tanks (Brazil)
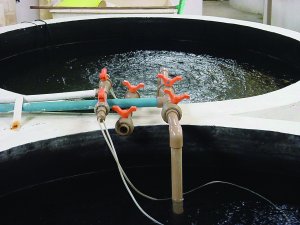
FIGURE 28
Power supplies are
not always reliable. Loss of aeration can quickly cause devastation in a
hatchery. This hatchery has not only installed two electrically-driven blowers
(one as a back-up) but has also provided a petrol engine so that the drive belts
can be rapidly changed if the power fails (Thailand)
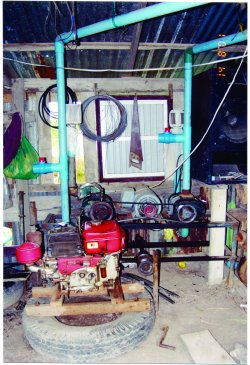
SOURCE: HASSANAI KONGKEO
Water discharge
You should take care to see that water discharged from your hatchery does not contaminate the incoming sources of hatchery freshwater and seawater. This is particularly important where surface sources of water are utilized. In a coastal hatchery using surface seawater, tidal and current characteristics should be taken into account in determining the locations of the intake in relation to the farm effluent discharge. Where surface freshwater is taken from a river the farm effluent should be discharged well below the water intake point. Do not discharge water containing chemicals, such as heavy loads of chlorine for equipment disinfection, into open waters.
Light
The greenwater larval rearing system, which has generally fallen out of favour in commercial hatcheries in the past decade, obviously required light. The phytoplankton bloom in those systems provided shade for the larvae and helped to maintain good water quality. Nowadays, almost all freshwater prawn hatcheries operate a clearwater system. You should not expose larvae to direct sunlight, which appears to be harmful. It is therefore recommended that 90% of the surface of clearwater flow-through tanks kept outdoors should be covered. The material used to cover the tank can be whatever is locally and cheaply available, provided it does not disintegrate when exposed to sunlight, heavy rain or strong winds. This prevents the growth of phytoplankton and reduces the incidence of what Takuji Fujimura referred to as skin cancer.
Some outdoor backyard hatcheries completely cover their hatchery tanks with black tarpaulin to prevent the spray generated by the aeration in neighbouring tanks transferring disease organisms. Most hatchery managers insist that some light, especially natural light, is essential for good larval survival; they therefore provide transparent roofs to their hatcheries but partially cover their tanks with asbestos or plastic sheeting to keep light to a minimum (see Figure 18). Natural light can be replaced by artificial sources (tungsten or special blue-black fluorescent tubes) which contain the near-blue (non-toxic) ultraviolet wavelength. Successful rearing has been reported at light intensities varying between 250 and 6 500 lux. However, a level of 250-800 lux is recommended for commercial hatcheries. Natural light is preferable but you can use artificial light to increase the intensity on cloudy days and to extend the day length. Excessive growth of algae tends to foul the biofilters in recirculation systems and you should shade these filters, while providing indirect light to the culture tanks themselves.
Filters
Two types of filtration equipment are used in hatcheries, physical and biological. Physical filters remove the solid wastes, mainly faeces, uneaten feed and bacterial debris. Biological filters, sometimes called biofilters, are essential components of recirculation systems for freshwater prawn hatcheries. They remove the ammonia excreted by the larvae and live feeds, as well as that formed by the decomposition of organic matter. In these filters, ammonia is converted first to nitrites and then to nitrates. Some physical filtration occurs within biofilters. Solid wastes are also removed during daily tank siphoning.
Physical filters include sand filters, drum screen filters, and expanded media filters (e.g. bead filters). They can be either up-flowing (Figure 30) or down-flowing but need to be easy to clean and should be designed to minimize water losses in the system. Sand or bead filters may be adequate for freshwater prawn hatcheries. However, drum screen filters do not clog so much and have an automatic backwash. In sand filters a particle size of 850 µm is recommended. The volume of these filters needs to be calculated so that they can cope with the volume and flow rate of the specific recirculation system you propose to run. Physical filters are typically placed in the system before the UV units (if used) and the biofilters, for maximum efficiency. They need to be flushed on a regular basis (at least once a day) to prevent them becoming blocked up with organic material and becoming potential sources of pathogenic bacteria. Sand filters can be backwashed with freshwater and air to save on brackishwater (this is especially important when artificial seawater is used). If water is going to be passed through UV units, substantial particle reduction is required to reduce the amount of suspended matter, thus improving the efficiency of this form of water treatment. UV treatment is uncommon in freshwater prawn hatcheries but future research may demonstrate whether its use would be advantageous.
Biological filters are essential in recirculation systems (Figure 31). There are several types of these filters (Figure 32). Submerged biofilters are efficient, simple, and cheap. The type that is horizontally divided into chambers (as shown in Figure 31) seems to be the most efficient. Biofilters require aeration to maintain enough dissolved oxygen to supply the nitrifying bacteria. It is recommended that the biofilters in a recirculation hatchery for freshwater prawns should have a volume equivalent to about 10% (range 4-20%) of the total tank volume. Crushed oyster shell, dolomite [CaMg(CO3)2], or coral (5 mm particles) is suggested as the filter medium (this provides the surface area where the nitrifying bacteria live). There is a tendency for the water in recirculation systems to become acidic (the pH value falls) but calcareous media contain an inexhaustible source of buffer material (carbonate and bicarbonate ions), which slowly dissolves into the water. However, plastic filter media, which have no buffering capacity, are often used in biological filters. This is because they are easy to handle and are supplied in shapes and particle sizes which mazimize the surface area available to the nitrifying bacteria. Recirculation systems using plastic media may eventually need buffering by the addition of sodium bicarbonate (NaHCO3) or sodium carbonate (Na2CO3) to the water to maintain its pH at 7.0-8.5. Using a calcareous filter media avoids this problem. Placing the filter medium in plastic or nylon bags makes handling easier. It has been estimated that a system rearing 2 million larvae would require about 500 kg of crushed coral within the biofilters once the larvae reach a maximum biomass. This can be modified according to the specific scale of hatchery operations.
Biofilters need to be activated before use. This means an initial bacterial inoculum needs to be added to the larval rearing system to reduce start-up time; the bacteria will then multiply to cope with the nitrogenous load in the water of the system. The bacterial inoculum can come from another operational filter or from a separate pre-conditioning tank, which is run at the same temperature and salinity as the larval culture tank. Further details on biofilter activation, derived from Valenti and Daniels (2000) are given in Box 5.
The filtration technology used in marine fish and shrimp hatcheries is generally more sophisticated than the methods described above. The application of these techniques to freshwater prawn hatcheries may prove beneficial in future. Detailed information on these systems is available in Van Wyk et al. (1999) and Moretti et al. (2002).
Miscellaneous equipment
Many items of small equipment are essential in every hatchery. These include, for example, buckets, epoxy-resin paint, weighing scales, fibreglass repair kits, nets, tools, nylon and cloth mesh, brushes, flexible tubing, postlarval transport equipment (bags, tanks, portable air supply, etc.) spares for electrical equipment, disease prevention drugs and chemicals, spares for PVC pipe work and valves, kitchen equipment for feed preparation, refrigerator, stereoscopic microscope (with a magnification range of 40 times), refractometer (for measuring salinity), pH meter, heaters, beakers, glass jars, various chemicals, etc. All equipment needs to be suitable for use in seawater and free from potential contamination from the leaching of metals such as copper, brass, or zinc.
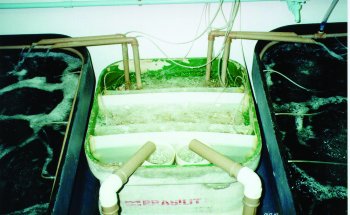
FIGURE 31
Close-up of a
biological filter shared between two larval tanks in Brazil, showing the water
entering the mechanical filters (foreground), from where it passes through the
biological filter and exits back to the two tanks by means of simple airlift
pumps
|
ACTIVATION IS A step-wise procedure that may begin with an inoculation, using water or media from an existing system, or can start from scratch. Initially, add 10% of the total ammonia that you expect to be generated in your larval system to the water containing the substrate material in the form of ammonium chloride (NH4Cl) or another inorganic source. When this amount is consumed by the bacteria (as evidenced by the reduction in total ammonia in water samples), add the same amount of ammonia again. Repeat the process until the bacteria are able to convert all the ammonia into nitrate within a 24 hour period. Then add double the initial amount of ammonia and repeat the process. Keep adding ammonia, monitoring the removal of ammonia and doubling the amount of ammonia added until your biofilter can cope, within a 24 hour period, with the maximum amount of ammonia expected to be generated when there are larvae in the tanks. Once that maximum bacterial load is achieved, the production cycle can begin. The bacterial population on the media needs to be maintained at the maximum level of ammonia and nitrite consumption. Addition of media to the biofilter should coincide with the increase of NH3-N produced by an increase in the larval biomass. Beginning 3 days post-stocking, increasing amounts of activated media must be added daily to the biofilter tank. The bacterial population provided through daily addition of media should always be sufficient to remove all ammonia and nitrite. When the larval cycle is complete, remove all the biofilter media, thoroughly rinse it, and either store it dry or return it to the pre-conditioning tank to re-establish and maintain the bacterial colony. Alternatively, the substrate can be chlorinated to kill all bacteria, de-chlorinated, and then re-seeded with stock bacteria from another pre-conditioning tank. |
Each cycle of operations in a freshwater prawn hatchery takes up to 40 days, including the time necessary to prepare for the next cycle. Careful attention to all aspects of hatchery management is essential to achieve success (the production of the maximum number of healthy postlarvae at the cheapest cost).
SOURCE: Emanuela DAntoni, derived from New and Valenti (2000)
Water needs to be treated before it can be used in the hatchery. Usually, it is necessary to pass incoming water through some form of physical (gravel/sand bed) filter (see Figure 30). If the incoming water is not filtered, or is still turbid, it may be necessary to allow the solids to settle in one tank before transferring it to another tank for treatment. Mix the seawater or brine with freshwater to form 12 ppt brackishwater (see Table 4). Then treat the water as in Box 6.
Water drawn from underground sources may not need to be settled However, the removal of protozoa and bacteria by chlorination, as indicated in Box 6, is still essential. Other forms of water treatment may be helpful. Some hatcheries filter the brackishwater before use through 5 µm filters but most commercial hatcheries omit this step. Some add 10 ppm of the chelating agent EDTA to larval rearing water to improve performance. Others use water which has a potentially unsuitable iron content (see Box 1).
|
BOX 6 ALLOW IT TO STAND so that any sediments will settle. It is essential to remove as much of the suspended solids as possible, otherwise the chlorination that follows may be partially or totally ineffective Chlorinate the brackishwater with 5 ppm of active chlorine7. Allow the water to stand for one day. Remove the residual chlorine by vigorous aeration for 6 hours before use (note: sodium thiosulphate can be used to remove the residual chlorine more quickly but its use is not recommended because it also may prove toxic to larvae. Vigorous aeration for 6 hours is adequate). |
Water quality remains important, not only in the incoming supply but also within the hatchery itself. Monitor the water in your larval tanks frequently to see that its quality is being maintained (Box 7). Simple field kits can be purchased to check the parameters listed in Box 7 but they are not specified in this manual because they are standard water quality items. For small flow-through hatcheries it is not practical to install facilities for the other types of analytical work, especially where they involve the analysis of seawater or brackishwater. Samples of water for the analysis of other parameters, such as hardness, metals, pesticide residues, etc., should be sent to governments, universities or private laboratories who have the facilities and staff to deal with them. Further reading on water quality and analysis is available in Boyd (1979).
FIGURE 34b
Good tank hygiene is
essential for hatchery success (Hawaii)
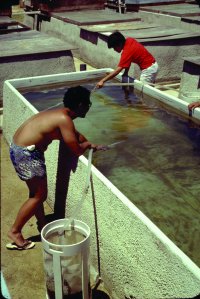
SOURCE: Spencer Malecha
If you are using a recirculation system, adjust the salinity and temperature to 5-7 ppt and 28 to 31°C, allowing the system to stabilize before stocking. This salinity allows larvae to be stocked directly from the hatching tank without acclimation. The salinity in the culture tank should then be increased to 12 ppt. Neither artificial brackishwater nor freshwater should be added through the biofilter tank once the biofilter substrate has been added. Its bacteria are sensitive to sudden changes in temperature and salinity. New water should be disinfected and filtered prior to introduction into the system. The use of ultraviolet light (UV) to treat the water in recirculation systems has been recorded in experimental hatcheries for M. rosenbergii but is not regarded as being essential for commercial hatcheries.
The pH of the water used in recirculation systems does not usually vary much during the larval cycle but occasionally, especially if the biofilter medium is artificial (non-calcareous), periodical buffering with sodium bicarbonate (NaHCO3) or sodium carbonate (Na2CO3) may be necessary, as noted earlier. Temperature should be kept steady, not only for the sake of the larvae but also because the biofilters do not operate efficiently if it fluctuates. The biofilters should maintain levels of unionized ammonia, nitrites and nitrates at acceptable levels.
Hatching and stocking larvae
Captive broodstocks are not normally maintained in tropical zones where a ready supply of berried females is available from the wild or from grow-out farms, even though there may be advantages in doing so, as discussed earlier in this manual. Whether the berried females are obtained from a captive broodstock or from the wild, you should hold them in slightly brackishwater (~5 ppt) at 25-30°C and preferably at pH 7.0-7.2 until the eggs hatch. Slight salinity results in better egg hatchability and recent research (Law, Wong and Abol-Munafi 2001) indicates that careful control of pH markedly enhances the hatching rate (hatchability). Temperatures below 25°C promote fungal growth on the eggs. Temperatures below the optimum also cause some eggs to drop and increase the time for egg development. Temperatures above 30°C encourage the development of protozoa and other undesirable micro-organisms. Light does not seem to affect egg hatchability, although direct sunlight should be avoided. There is no need for you to feed females when they are only being held for a few days simply for larval collection.
You can hatch your larvae in a special broodstock holding system (see Figure 12) and then transfer them to larval rearing tanks in 12 ppt water. In hatcheries operating recirculation systems, newly hatched larvae (Stage I) are often harvested from the broodstock holding tank using a collecting device. If you are operating a simple flow-through hatchery you can place females with brown to grey eggs directly into the larval tanks. Then, remove the females with a coarse dip-net after their eggs hatch. Some hatcheries put the females into coarse-meshed cages within the larval tanks, which makes them easier to remove after their eggs have hatched. When females are put into the larval rearing tank the water level should be about 30 cm and, as noted above, the salinity should be about 5 ppt with a pH of 7.0-7.2. After you have removed the females, raise the water level to the normal level (~70-90 cm) and adjust the salinity to the normal larval rearing level (12 ppt). Egg hatching, which occurs predominantly at night, can be observed by the presence of larvae in the tank and the absence of eggs on the underside of the abdomens of the females. Use a white board (Figure 33) to make it easier to observe larvae.
The rate at which you stock your larval tanks depends on whether you are going to rear them to metamorphosis in the same tank or if you intend to adjust the larval density by dilution or by transfer to other tank(s). Some hatcheries prefer to maintain their larvae in the same tank from stocking until the harvest of PL. The advantage of this is that the larvae are not subjected to handling. Handling brings with it the dangers of damage to the larvae and physical losses during the transfer operation. Other hatcheries prefer to stock the larvae much more densely at first and then to give them more space to grow by adding more water to the original tank (dilution rearing), or transferring all or some of the animals to other tanks later (two-stage rearing). The advantage of this alternative technique is that it reduces the quantity of water needed for the batch and permits more efficient feeding (the larvae are closer to the feed) during the early larval stages. A compromise between these two systems is possible. Three alternative stocking strategies are therefore suggested in Box 8.
You must select berried females
that are all in the same stage of ripeness. This ensures that your larval
tank will contain larvae of the same age (within 1-3 days) thus reducing
cannibalism and making a proper feeding schedule applicable. You can obtain the
initial stocking rates shown in Box 8 by estimating the number of larvae during
transfer from the broodstock system (if you have one). Alternatively, if you are
placing berried females directly into the larval rearing tanks, you
can make some assumptions. About 1 000 larvae are produced
from each 1g of berried female weight. Berried females of 10-12 cm (rostrum to
telson) normally carry about 10 000 - 30 000 eggs. However, many eggs are lost
through physical damage and cannibalism by the adult females during their
transport from rearing ponds or capture fisheries, and some fail to hatch.
Therefore, for example assuming that 50% of the original egg clutch is lost,
five berried females of this size should be enough to provide a 1 m3 larval tank
with about 50 larvae/L. It is important for you to check your actual stocking
density and monitor the number of larvae you have during the rearing period, as
discussed in the next sub-section of the manual.
Counting larvae
Gross mortality during the larval rearing cycle is easily visible; counting the live animals is not necessary to see this. However, it is important for you to estimate the number of larvae you have in your tanks, both at the time of stocking and during the rearing period. This enables you to estimate survival rates, adjust the larval density, control your feeding schedule, and compare the performance of different batches.
You cannot count the number of larvae unless they are evenly distributed in the tank. Thoroughly mix the water in the tank by hand, and take at least 10 samples of a known volume of water (e.g. in 30 ml beakers, or glass pipettes with the ends cut off to give a wider diameter at the tip). Count the number of larvae in each sample. Multiply the average number of larvae/ml by the total volume of water (in ml) in the collection tank. Thus, for example, if the average number of larvae you see in a series of 30 ml beaker samples is 10, the estimated number you have in your tank is 10 ÷ 30 x 1 000 = 333 larvae/L. It is possible that automatic counting devices may be applied to freshwater prawn hatcheries in the future but few hatcheries are currently large enough to warrant the investment required.
Good larval water quality
The exact larval rearing salinity is not as critical as many early hatchery operators used to think. However, you are recommended to keep the larval cycle salinity for M. rosenbergii at 12 ppt [Note: different salinity levels apply to other Macrobrachium spp.]. Slight variations in salinity are not detrimental but you must avoid making sudden changes. These could occur, for example, if you used full strength seawater or freshwater instead of brackishwater by mistake. The simplest way to check salinity is by means of a hand-held refractometer.
The optimum temperature range for M. rosenbergii is 28-31°C. Below 24-26°C the larvae will not grow well and the time taken for them to reach metamorphosis will be longer. This affects hatchery economics enormously. Temperatures over 33°C generally cause high mortalities. Excessively high temperatures may occur when the water level is kept too low (for example, to conserve water use), especially if the tanks are outdoors and not well shaded. Gradual variation in temperature within the optimal range (such as occurs naturally between night and day or cloud and sunshine, for example) is acceptable, though it should be minimized as far as possible. Sudden changes in temperature, even as small as 1.0°C, shock the larvae and cause mortalities. It is therefore essential to have an adequate stock of prepared 12 ppt water for exchange purposes, maintained under the same environmental conditions as the larval tanks, available at all times. Do not suddenly change the larval water with water that has been in a tank standing in bright sunlight!
Dissolved oxygen levels in larval rearing water should be maintained as close as possible to saturation (Table 7). You will need to turn the aeration system off for short periods (e.g. for observation of the larvae). Double-check that you have turned the air on again immediately after any tank operation in which you have turned it off. One of the major causes of larval mortality is operator error on this point. In practice, if the procedures for water changing, tank cleaning and feeding laid down in this manual are adhered to, and there is no failure in the hatchery air distribution system, no problems should be experienced with low oxygen levels. It is not essential to measure dissolved oxygen levels in the larval rearing water, though it would be preferable to do so if a portable meter is available. This would give you a warning, before the larvae get stressed, that you need to change the water.
Keeping water quality good
The amount of organic materials, especially suspended solids, should be minimized to prevent the proliferation of heterogeneous bacteria, reduce biological oxygen demand, and prevent stress to the broodstock and larvae. Clean the tanks by siphoning excess food and waste as often as needed. Many invisible changes in the chemical water quality of larval-rearing water occur. These are due mainly to the metabolic wastes produced by the larvae themselves (and by live feeds) and by the degradation of excess food. Some of these changes can be extremely harmful to larvae. The most serious are increases in the non-ionized8 form of ammonia (NH3), which is especially evident at high pH and temperature, and in nitrite. It is beyond the scope of this manual to deal with water chemistry but those who wish to study this matter should consult the review by Valenti and Daniels (2000), which also contains references to other publications on this topic.
If you are running a hatchery based on the flow-through clearwater system, there is no substitute for frequent water exchange. Recommended procedures to maintain good larval water quality in flow-through systems are given in Box 9. Further recommendations on system hygiene are made later in this manual.
Special considerations for recirculation systems
Routine care is even more essential in recirculation than in flow-through hatcheries, especially when the filtration system is new. Despite this, those familiar with recirculation systems claim that the amount of labour required is not greater than in flow-through systems. Following the suggestions of Valenti and Daniels (2000), a routine maintenance schedule for recirculation systems is suggested in Box 10. Further recommendations on system hygiene are made later in this manual.
A detailed description of a recirculation freshwater prawn hatchery is provided in Daniels, DAbramo and Parseval (1992) and Fuller, Kelly and Smith (1992). Further reading is provided in Valenti and Daniels (2000). A simple recirculation system is described in Chowdhury, Bhattacharjee and Angell (1993).
A wide variety of feeds are employed by different hatcheries, including the nauplii of brine shrimp (Artemia spp.), a freshwater cladoceran (Moina spp.), fish eggs, squid flesh, frozen adult Artemia, flaked adult Artemia, fish flesh, egg custard, worms and commercial feeds. This freshwater prawn manual describes only one feeding regime in detail, which has been found to be effective. However, many alternative feeding systems exist and the readers of this manual may wish to experiment with locally available feeds. Those who wish to consider the use of alternative live foods are recommended to obtain another FAO manual (Lavens and Sorgeloos, 1996), which includes sections on the culture and use of rotifers (e.g. Brachionus plicatilis) and cladocerans (e.g. Moina spp.), as well as Artemia, in aquaculture hatcheries. Useful information on live food production is also contained in another FAO publication (Moretti, Pedini Fernandez-Criado, Cittolin and Guidastri, 1999), which describes the use of rotifers and Artemia in marine finfish hatcheries.
Two feeds are used in the feeding system described in this manual, namely brine shrimp nauplii (Artemia nauplii, referred to subsequently as BSN) and prepared egg custard feed (hereafter called EC). Methods for preparing these feeds before use are given in Annex 4 (BSN) and Annex 5 (EC). BSN are small crustacean nauplii hatched from cysts which can be bought in vacuum packed bags and cans. An example of a feeding schedule is given in Table 8.
Most freshwater prawn larvae do not feed on the first day (hatching day). However, you are recommended to provide some BSN in the late afternoon of the first day because some larvae begin to eat early. From day 2 until day 4, feed BSN five times per day, with the last and main feed in the evening. After that, you can gradually reduce the number of BSN feeds per day until, by day 10, you are only giving BSN at the evening feeding time. The evening meal should be given as late as possible (18.00-19.00). The amount of BSN you give at each feeding time depends on your visual examination of the larval water. Freshwater prawn larvae do not actively search for food, which is why BSN (which swim actively in the same part of the water column as the larvae) are such a valuable feed type. The ideal is therefore to have BSN always present in the tanks in sufficient numbers for the larvae to bump against. The amount of BSN required at any one time depends primarily on the tank volume, not on the number of larvae present, although the latter of course controls the rate at which BSN are consumed. This concept is clearly illustrated in Box 11.
TABLE
8
Hatchery feeding schedule
|
LARVAL AGE (DAYS) |
LIVE FEED (BSN) |
PREPARED FEED (EC) |
|
|
NUMBER OF DAYTIME FEEDS (0700-15.00) |
ADDITIONAL LATE AFTERNOON FEED |
NUMBER OF MEALS BETWEEN 0700-15.00(NO LATE AFTERNOON FEED) |
|
1 |
None |
Yes |
None |
|
2 |
4 |
Yes |
None |
|
3 |
4 |
Yes |
1 |
|
4 |
4 |
Yes |
2-3 |
|
5 |
3 |
Yes |
4 |
|
6 |
3 |
Yes |
5 |
|
7 |
2 |
Yes |
5 |
|
8 |
2 |
Yes |
5 |
|
9 |
1 |
Yes |
5 |
|
10-PL |
None |
Yes |
5 |
NOTE: BSN = BRINE SHRIMP NAUPLII; EC = EGG CUSTARD BASED DIET. THE QUANTITIES TO BE FED ARE DISCUSSED IN THE RELEVANT SECTION OF THE MANUAL.
As a guide, there should be about 3-6 BSN/ml directly after feeding, depending on the age of the prawn larvae, and 1 BSN/ml left in the water just before the next BSN feeding time. If there is more than 1 BSN/ml at the latter time then you have been overfeeding or the larvae are not feeding well. If there is less than 1 BSN/ml, you should add more this time than last time. A density of 3-6 BSN/ml in a tank with 5 m3 of water means that 15 to 30 million BSN have to be added. The quantity of brine shrimp cysts (eggs) necessary to produce 1 million BSN depends on the source and quality of brine shrimp cysts used and the preparative treatment they are given; it is usually stated on label of the cans. As a rough guide, however, you can assume that 75 to 150 g of Artemia cysts will be required to produce the 15 to 30 million BSN required for the daily feeding of a 5 m3 larval tank initially stocked with 50 larvae/L and expected to provide about 25 PL/L. Normally one larval cycle in this size of tank will consume 1.25-2.5 kg of brine shrimp eggs.
By day three, you can start feeding tiny quantities of EC, gradually increasing the feeding frequency to five times per day, spread out evenly throughout the day. Give the last feed of EC about 15.00. Do not give EC for the final late afternoon feeding because the quantity necessary to supply the requirement throughout the night in one feeding would foul the water; use BSN only. From day 5 you are starting to reduce the frequency of feeding BSN and by day 6 you should be feeding EC about 5 times per day. Continue feeding at this frequency throughout the rest of the larval cycle. After day 10, you need only give BSN at the evening feeding, to ensure the presence of food during the night. By this time you should be using very much greater quantities of EC at each feeding time.
TABLE
9
Alternative hatchery feeding schedule
LARVAL STAGE |
TIME | ||||
|
07:00 |
10:00 |
11:00 |
13:00 |
16:00 | |
|
I to IV |
BSN |
- |
BSN |
- |
BSN |
|
V |
BSN |
- |
ID/EC |
- |
BSN |
|
VI until PL |
ID/EC |
ID/EC |
- |
ID/EC |
BSN |
NOTE: BSN = BRINE SHRIMP NAUPLII; ID = INERT DIET; EC = EGG CUSTARD BASED DIET. THE INERT FEED USED IN THIS FEEDING REGIME WAS LANSY MB (INVE AQUACULTURE NV., B-9080 LOCHRISTI, BELGIUM). THE MANUFACTURERS CLAIM THAT ITS USE ENABLES 40% OF THE BSN AND 70% OF THE EC TO BE REPLACED. LANSY MB IS THE FIRST STEP IN THE DEVELOPMENT OF A COMPLETE ARTEMIA REPLACEMENT DIET.
SOURCE: DERIVED FROM CORREIA, SUWANNATOUS AND NEW (2000)
The exact quantity of food to be given at each meal cannot be prescribed because it depends on the utilization of the feed by the larvae. You must judge this visually. The quantity of EC feed consumed will increase as the larvae grow. The basic rule is that each larva should be seen to be carrying a particle of EC immediately after every EC feeding. Use EC particles of about 0.3 mm in size up to larval day ten; from then until metamorphosis use 0.3-1.0 mm particles. The particles of EC must be kept close to the larvae; this is an additional reason for ensuring vigorous aeration in larval tanks. Underfeeding will lead to starvation, cannibalism and slow growth; overfeeding (especially if large quantities of EC are obvious before the next feeding time commences) will cause water pollution. Pollution through overfeeding is obvious through the presence of EC particles before the next feeding or if there is a lot of foam or scum on the water surface. Should water pollution occur by error, the water must be immediately exchanged, as explained earlier in this manual. As a very approximate example, you should expect to use about 7.5 kg of EC for every larval cycle in a 5 m3 tank initially stocked with 50 larvae/L. Initial quantities of EC at day five for this size of tank and stocking density would be about 25 g/tank at each feed and will rise to around 100 g/tank/feed.
An alternative feeding regime is presented in Table 9. In this system, the BSN and EC feeds are supplemented with a commercially available inert feed. The use of supplemental feed not only tends to reduce feeding costs but is thought to compensate for nutritional deficiencies in Artemia nauplii. However, the nutritional quality of the Artemia can be increased by enrichment (Annex 4).
The general recommendations in this section of the manual apply also to recirculation systems but all hatcheries have their own feeding regime variations. For example, some hatcheries that use recirculation systems turn off the water flow system during feeding to avoid BSN leaving the tank. Others use small-mesh screens (90 to 150 µm) to avoid losses of BSN in the biofilter.
Good hygiene
Good hygiene is essential for hatchery success. Ideally, you should not use the same equipment for more than one tank. Thus each tank would have its own dedicated nets, siphon tubes, spare filters, etc. This is time and money consuming and rarely practised. However, some much more important guidelines must be followed.
Water should never be transferred from one larval tank to another. Submersible pumps, which are often used for water transfer in hatcheries, should never be placed in the larval tanks because they are a potential source of disease transfer. Always drain your larval tanks by gravity or siphon and only use submersible pumps in water storage or mixing tanks. Disinfect all mobile equipment (buckets, siphoning tubes, nets, beakers, pipettes, etc.) on a daily basis. Dip them in a 500 ppm active chlorine solution9, rinsing them very thoroughly with water and storing them dry. Between larval rearing cycles, routinely disinfect the larval tanks. Failure to do this usually results in massive blooms of organisms, such as Zoothamnium, Epistylis, hydroids, etc., which are harmful to the larvae. Disinfection does not eradicate these organisms but does effectively control their growth. Scrape your tanks between larval cycles, fill them with a 500 ppm active chlorine solution for one day, rinse them very thoroughly with water, dry them in sunlight for one day, and rinse them thoroughly again before use.
Good hygiene and management standards are even more essential in recirculation than in flow-through hatcheries. Mistakes lead to larval mortalities. Before use, immerse all new tanks, filter containers and filter media, and every other piece of hatchery equipment in running freshwater for one or two weeks to eliminate potentially toxic substances. Then clean and flush the system with filtered freshwater prior to filling it with brackishwater. After filling the system with brackishwater, disinfect it by adding 5 ppm of available chlorine (see Box 6) a few days prior to stocking. Run the whole system normally, including the filter, providing aeration; this should remove all the residual chlorine in a few days. It is possible to do this more quickly by using sodium thiosulphate but this is not recommended, because of the problems noted earlier in this manual. Ozonisation or UV light can be employed to avoid the use of either chlorine or thiosulphate but, of course, these add to the capital costs and have not yet been noted in commercial freshwater prawn hatcheries. Some additional recommendations for hygiene in recirculation systems are given in Box 12.
General management problems
Most hatchery problems are caused by poor management. The commonest cause of larval loss is not mortalities due to poor water quality or disease, but physical losses due to simple operator error during tank cleaning and siphoning, water exchange, etc. Poor internal (i.e. within the hatchery) water quality is usually caused by poor management, for example: inadequate water exchange, poor daily observation of the larvae, overfeeding, total failure of the aeration equipment due to poor maintenance of the blower or emergency power supplies, or individual tank aerators being blocked or left turned off. Losses also occur because late-stage larvae (close to metamorphosis) jump quite a lot and some get stranded above the water line. Some hatcheries cut out a strip of mosquito screen and stick it to the inside of the tank with epoxy-resin in the region of the water surface level. Since the water level varies it is suggested that the strip of mosquito netting should be about 12 cm wide. This helps to prevent larvae becoming stranded.
TABLE 10
The major diseases known
to affect freshwater prawns, and their exterior symptoms
VIRUS DISEASES |
BACTERIAL AND RICKETTSIAL DISEASES |
FUNGAL DISEASES |
|
Macrobrachium hepatopancreatic parvo-like virus (MHPV): none; not associated with significant morbidity or mortality. |
Black spot (sometimes called brown spot or shell disease): one or many melanized lesions on the cuticle; often caused by opportunistic bacteria which enter following physical damage; problem may disappear at the following moult but sometimes develops into deep spreading lesions; reduces marketable value of harvested prawns |
Lagenidium infection: affects larvae: an extensive mycelial network can be seen through the exoskeleton; can decimate hatchery populations within 24 hours. |
|
Macrobrachium muscle virus (MMV): muscle tissues become opaque, followed by necrosis; occurs within 10 days of stocking PL and may cause up to 50% mortality. |
Appendage necrosis: larval appendages become necrotic and melanized; affected larvae do not eat and may become bluish in colour; may be associated with a heavy surface burden of the filamentous bacterium Leucothrix. |
Infections by Fusarium and Saprolegnia: cause necrosis and melanization; follow physical damage. |
|
White spot syndrome baculovirus (WSBV): targets the cuticular epidermis, stomach, gills and hepatopancreas; important disease in marine shrimp; Macrobrachium is known to be a carrier but it is not yet certain whether WSBV causes mortalities in freshwater prawns. |
Internal infections: caused by a variety of Gram negative bacteria such as Vibrio spp. and Aeromonas spp.; feeding discontinues; discolouration of the body (usually pale and white) occurs; animals listless; infections by luminous vibrios are usually serious. |
Yeast infections: muscles appear yellowish, bluish or grey; causes heavy mortalities in grow-out ponds; particularly prevalent when temperatures are lower than optimal and organic matter is allowed to accumulate and eutrophication occurs. |
|
Nodavirus (MRNV): opaque whitish appearance of the abdomen, followed by severe mortalities. |
Bacterial infection caused by Enterococcus: necrosis in muscles and hepatopancreas; begins in the head portion and proceeds to the tail; animal appears opaque; exacerbated in high temperature (33-34°C) and high pH (8.8-9.5) conditions. Rickettsial disease: larvae become white throughout their bodies and generally inactive before death; infected populations experience significant mortalities |
NOTE: THIS TABLE DESCRIBES THE EXTERIOR SYMPTOMS AND THOSE THAT CAN BE SEEN BY SIMPLE MICROSCOPIC EXAMINATION. DISEASES DETECTABLE BY OTHER TYPES OF INVESTIGATIONS ARE MENTIONED IN THE ORIGINAL REVIEW (JOHNSON AND BUENO, 2000)
TABLE 11
Prevention and
treatment* of freshwater prawn diseases
DISEASE |
PREVENTION AND TREATMENTS* REPORTED IN THE LITERATURE ON PRAWN DISEASES |
|
Macrobrachium hepatopancreatic parvo-like virus (MHPV) |
Obtain and maintain disease-free stock; good management. No treatment reported. |
|
Macrobrachium muscle virus (MMV) |
Obtain and maintain disease-free stock; good management. No treatment reported. |
|
White spot syndrome baculovirus (WSBV) |
Obtain and maintain disease-free stock; good management. No treatment reported. |
|
Nodavirus (MRNV) |
Obtain and maintain disease-free stock; good management. No treatment reported. |
|
Black spot (sometimes called brown spot or shell disease) |
Good management, especially maintaining good water quality and avoiding physical damage by handling (by transfer, sampling) or by other prawns (may be caused by over-stocking, poor feeding, etc.). Treatment by immersion in 10 ppm oxolinic acid for 1 hour, or 2 ppm nifurpirinol for 96 hours reported. |
|
Appendage necrosis |
Good management, especially maintaining good water quality and avoiding physical damage by handling (by transfer, sampling) or by other prawns (may be caused by over-stocking, poor feeding, etc.). Treatment by 0.65-1.0 ppm erythromycin or 2 ppm of a penicillin-streptomycin mixture, or 1.5 ppm chloramphenicol reported. |
|
Internal infections |
Good management, especially good filtration and/or treatment of incoming hatchery water. Treatment by 2 ppm chloramphenicol combined with 2 ppm furazolidone for 5-7 days reported. |
|
Bacterial infection caused by Enterococcus |
Good management, especially by avoiding constructing farms in areas where (or operating farms at times when) temperature and pH are too high. No treatment reported. |
|
Rickettsial disease |
Obtain and maintain disease-free stock; good management; treatment of tanks and equipment with lime (CaO) before stocking. Treatment by application of 10 ppm oxytetracycline combined with 10 ppm furazolidone reported. |
|
Lagenidium infection |
Good management. Treatment by maintaining 10-100 ppb trifluralin in hatchery tanks, or treatment with 20 ppm of Merthiolate® has been reported. |
|
Infections by Fusarium and Saprolegnia |
Good management, especially maintaining good water quality and avoiding physical damage by handling (by transfer, sampling) or by other prawns (may be caused by over-stocking, poor feeding, etc.). No treatment reported. |
|
Yeast infections |
Good management, especially the avoidance of lower than optimal water temperatures and the accumulation of organic matter and eutrophication; use better water exchange, aeration and circulation and lower feeding rates. No treatment reported. |
* ALTHOUGH THESE TREATMENTS HAVE BEEN REPORTED IN THE SCIENTIFIC LITERATURE, THEY ARE NOT RECOMMENDED IN THIS MANUAL. IF SEVERE INFECTIONS OCCUR, POPULATIONS SHOULD BE DESTROYED AND SYSTEMS DISINFECTED AND DRIED OUT BEFORE RE-USE.
SOURCE: JOHNSON AND BUENO (2000)
It cannot be over-stressed that while this manual attempts to lay down guidelines for a particular method of freshwater prawn culture, successful hatchery operation is a blend between factory discipline and husbandry. The most important thing to remember is that if you do not pay close attention to your animals, your hatchery will fail. You and your staff must always closely observe the behaviour of your larvae and the condition of your tanks.
Problems of disease and predation
Several diseases affect freshwater prawn larvae. These are summarized within Table 10. Some preventative measures are listed in Table 11. More information is provided in Johnson and Bueno (2000). If you see problems which may be caused by disease you should seek the advice of local aquatic animal health specialists (where available) and microbiologists for identification and treatment purposes. Some brief notes are provided in Box 13.
Some hatcheries use formalin (200-250 ppm daily dip for 30 min) as an effective remedy for protozoal and hydrozoan infections and fungal diseases. Where the treatment period is short it is best to apply it when the tank water level is very low (10-15 cm) so that it can be rapidly flushed with new 12 ppt water after treatment. The flushing process should continue for one hour. Aeration must continue during treatment as normal. Formalin can also be used at a lower level of 25-30 ppm for a longer period, followed by a water change after 24 hours. Mortalities from hydroid infestation can also be reduced by transferring healthy larvae to newly disinfected tanks every 5-10 days. Malachite green (0.2 ppm daily dip for 30 min) has also been used for treatment. However, you are recommended not to use this substance because it may be toxic to hatchery workers; its use is banned in some countries. Similarly, the use of copper sulphate (previously suggested as a 0.4 ppm dip for 6 hours) is not now recommended. Antibiotics are sometimes used to control filamentous bacteria (Leucothrix spp.).
Some hatcheries use lime (CaO) as a prophylactic between larval cycles. Others apply antibiotics and/or sulpha drugs as prophylactics but this practice is definitely not recommended in this manual, partly because their use in aquaculture may become banned in future and partly because of the danger of inducing the development of resistant disease strains. The use of these and other treatments for disease problems is described in Johnson and Bueno (2000).
As noted earlier in this section, severe disease problems very frequently begin because of basic management failure. Such failures will be minimized if you follow the recommendations in this manual. However, diseases will still sometimes occur. You are recommended to totally discard any seriously infected batch, to drain the tanks, and to disinfect all the hatchery equipment. Do not waste time on treating a serious infection. Cut your losses, try to find out the basic cause of the problem, eliminate it, and start a new larval batch.
An important disease in M. rosenbergii hatcheries, whose exact cause is unknown, is referred to as the mid-cycle disease (MCD). As its names indicates, it is most noticeable in the middle of the larval rearing period (days 15-22 when the larvae are at stage VI-VII), when heavy daily mortalities may occur. Mortalities may even start to become obvious as early as day 10. The disease is recognisable by the larvae becoming bluish-grey and swimming slowly in a spiralling pattern, as well as by a reduced rate of consumption of Artemia and poor growth rate. You can reduce the incidence of this disease by cleaning, disinfecting and drying out hatchery equipment between cycles and taking special care in general hygiene throughout the larval cycle. If there is a severe outbreak of this disease, a full clean-up of the hatchery should be considered. This would mean killing all the larvae and thoroughly disinfecting the whole hatchery installation, so it is not a decision to be taken lightly.
Another disease which has mainly been noted to affect larvae is known sometimes as the exuvia entrapment disease (EED) or as the moult-death syndrome (MDS) or as the metamorphosis moult mortality syndrome. The characteristic of this disease is that the larvae get trapped in the old exoskeleton (exuvia) during moulting. It is mostly noticed towards the end of the larval rearing cycle, especially at the moult which occurs when stage XI metamorphoses into the PL stage. The mortality rate at this point can be very high. The cause of EED is not known; it may have multiple causes. It may imply that the diet is nutritionally inadequate and requires enrichment. Difficulties in shedding the old exoskeleton during moulting have also been observed in juvenile and adult prawns. The moulting process is stressful and may be difficult for weakened animals, and it is at this time that hidden problems become noticeable.
Many hatchery operators judge when to make changes in the feeding regime, for example, by the number of days that have elapsed since the larvae were stocked. This is satisfactory if a larval batch is performing well and you are basing your management on previous experience. You can judge the progress of your larvae more accurately by stereoscopic microscopic examination. You should do this on a daily basis until the first PL appear in the tank. A key to the various larval stages is provided in Annex 1.
You will very quickly become able to gauge whether your larvae are feeding and growing well by crude visual examination, using a white sight board (Figure 33) and observing the behaviour of the larvae. Healthy larvae swarm at the surface of the water (especially in the first 10 days) when the aeration is turned off, feed actively, have a red-brownish pigmentation, and are not observed to cannibalize. Unhealthy larvae accumulate at the bottom of the tank and are often bluish in colour. Food consumption drops and, if the problem is already severe, you will see dead larvae. Healthy larvae swim tail first, head down and ventral side up. Metamorphosis to PL is characterized by a radical change in behaviour and appearance; for the first time the animals resemble miniature adult prawns and, instead of swimming freely in the water, many crawl or cling to the tank surfaces.
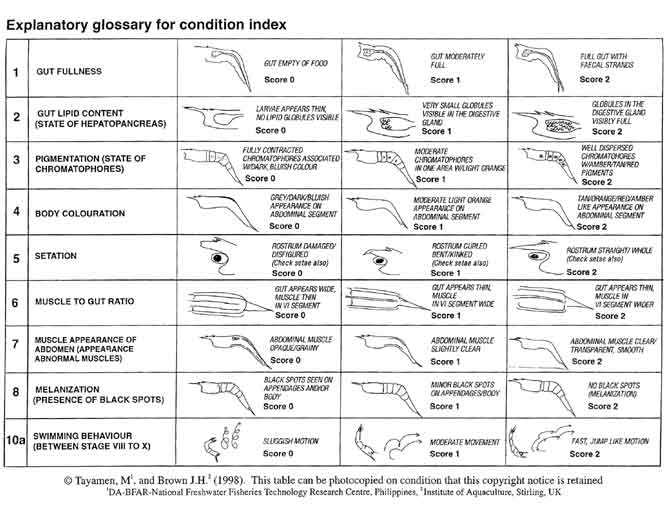
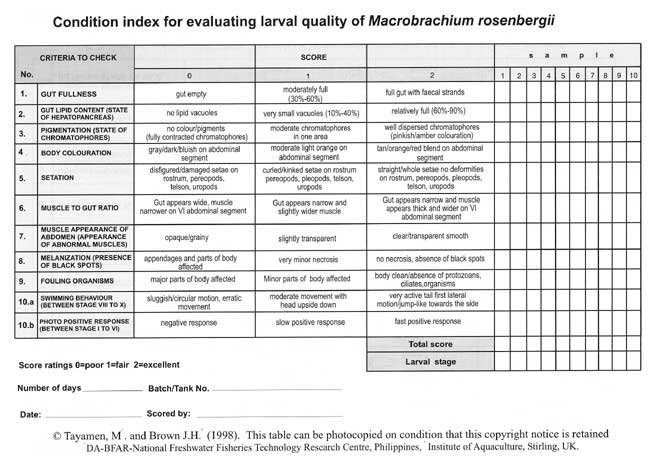
The performance of freshwater prawns during the grow-out phase depends on the history of the PL or juveniles stocked. It is therefore important, if your hatchery is to establish and maintain a good reputation for high-quality PL, to monitor the condition of your animals. A new method to score the condition of M. rosenbergii larvae was developed by Tayamen & Brown (1999). This is based upon microscopic examination, followed by scoring on a condition index using a numerical scale. Larvae scoring high on this system have been demonstrated to show better growth and survival in various Southeast Asian hatcheries. The scoring system is illustrated in Figure 36a and a larval quality record sheet in Figure 36b.
Although survival rates of up to 80% between stage I and metamorphosis to PL have been claimed by some hatcheries, 40-60% is more normal in practice. The time taken for a larval batch to metamorphose varies according to feeding and environmental conditions, particularly temperature. In a healthy, well-fed batch, which is maintained within the optimum temperature range, you should expect to see the first few PL between days 16-20 after stocking. Most of the larvae should have metamorphosed into PL by days 25-32 at the recommended water temperature of 28-31°C. Some hatchery operators wait for the last few larvae to metamorphose before harvesting but it is not usually economic to maintain any batch longer than 32-35 days (by which time 90-95% metamorphosis should have occurred). You are therefore recommended to terminate each larval batch after day 35, at the latest. This releases your equipment so that you can prepare for the next larval batch. Some hatchery operators transfer the remaining larvae from the original batch to another smaller tank to wait for them to metamorphose but this is not recommended.
Many modifications of the clearwater system exist. As stated earlier, no two hatcheries are alike. Some operators claim higher productivity for sophisticated alternative clearwater systems but they are more difficult to operate and they are therefore not detailed in this manual. The sections of the manual provided above have a general application to all clearwater freshwater prawn hatcheries, whether flow-through or recirculation.
A more common alternative to the clearwater system for flow-through hatcheries is known as the greenwater system. In the original type of greenwater system, which was developed in Hawaii, a mixed phytoplankton culture in which Chlorella spp. was dominant was maintained in separate tanks. Its cell density was about 750 000-1 500 000 cells/ml. A fertilizer solution in tap water was added to the tanks at least once per week to maintain the culture. This solution provided a mixture of 4 parts of urea to 1 part of NPK (15:15:15) garden fertilizer, applied at the rate of 185 g per 10 m3 tank. Tilapia (Sarotherodon mossambicus) were held in the tanks at the rate of about 1 per 400 L to graze on and control filamentous algae. Copper sulphate, at the rate of 0.6 ppm was added to the greenwater tanks once per week to control rotifers. The tilapia also helped to fertilize the culture. The sodium salt of EDTA (ethylene diaminetetraacetic acid) was also sometimes included in the greenwater culture at 10 ppm as a chelator. The greenwater was prepared at the same salinity as the larval rearing water (Note: greenwater does not thrive at more than 12 ppt salinity) and was used as replacement water during exchange procedures instead of plain brackishwater. The greenwater culture was never used for larvae if the culture was more than three days old. Part had to be discarded or used for filling larval tanks and the rest diluted regularly to avoid phytoplankton crashes (with the ensuing problems with low dissolved oxygen) occurring in the larval tanks.
Various local variations on the original greenwater system have been used since the Hawaiian system was created, particularly in Malaysia and Mauritius. Elsewhere, however, this technique has had limited success. Although the greenwater system may have some advantages (for example, it is claimed to act as a buffer against ammonia build up) it is difficult to manage successfully and adds more complications to the hatchery process. For this reason, most commercial freshwater prawn hatcheries now use clearwater systems of management, whether they are flow-through or recirculation. The greenwater system is not recommended in this manual.
New postlarvae (PL) are about 7-8 mm long. Although PL can withstand the physiological shock of sudden transfer from 12 ppt water into freshwater, it is not recommended to harvest them from the larval tanks and transfer them directly into holding tanks containing freshwater. The animals are best acclimatized to freshwater in the larval tank. Once the majority of larvae have metamorphosed (at least by day 32-35), reduce the water level in flow-through system tanks to about 35 cm by using the turn-down drain. Then gradually flush the tank with freshwater over a period of 12 hours. Always continue to provide aeration during this process. The PL can then be harvested and transferred, or the larval tanks refilled to 70 cm with freshwater and the animals temporarily held in them. If the latter is done, the PL should only remain in the larval tanks for a few more days, with frequent water exchange, before transfer to a larger holding tank. If you do not transfer them quickly enough, the biomass will become too high, and water quality deterioration and cannibalism will occur.
The best way to harvest PL from the larval tanks is to reduce the water level and then remove them in dip nets. Some hatchery operators use larval concentration systems which are similar to the larval siphon filtering device shown in Figure 35. However, this causes more stress than dip-netting and is therefore not recommended. During the harvesting process, cover most of the tank and allow the PL to concentrate in the illuminated area. The last few remaining PL can be obtained by removing the tank filter sock and flushing them to the exterior by lowering the turn-down drain and catching them in a net. Take care that animals do not become stranded, or dissolved oxygen levels fall too low, during these procedures. Estimate the number of PL for stock record purposes for every cycle (Annex 6). Quickly transfer your PL in any suitable container to holding tanks that contain pre-aerated freshwater. These temporary transport containers (e.g. buckets) should not be overcrowded with PL. Postlarvae should not be left too long in them or oxygen depletion will occur. However, no aeration or special packing is necessary unless the holding tanks are on another site.
Most flow-through hatchery operators harvest their postlarvae only once, at the end of the production cycle. Others, especially in research and recirculation hatcheries, prefer to make several harvests of PL before each cycle is terminated. If intermediate harvesting is practised, the first is made when about 25-30% of the larvae have metamorphosed. This usually occurs around day 23-28 after stocking. Then, two or three subsequent harvests are made at three-day intervals until the final harvest. The method is described by Valenti and Daniels (2000) but is not recorded here because a single, complete harvest is recommended for commercial freshwater prawn hatcheries in this manual.
6 The alternative recirculation design is known as the static-closed system and is basically similar to the flow-through system except that the water removed from the system during water exchange is transferred to a separate physical and biological filtering unit for treatment, which also involves chlorination and chemical dechlorination, before being returned to the larval rearing tanks. This tends to increase larval stress and mortality and is not recommended in this manual.
7Both dry and liquid sources of chlorine vary considerably in their chlorine content from product to product and from batch to batch. It is best to determine the level of chlorine in each batch before use, to ensure that you are actually using the quantity of chlorine that you think you are adding. The methods for determining the level of chlorine in commercial bleaching powder or liquid bleach are contained in Annex 4, Table 6.
8Ionised ammonia is referred to as NH4+
9 Both dry and liquid sources of chlorine vary considerably in their chlorine content from product to product and from batch to batch. It is best to determine the level of chlorine in each batch before use, to ensure that you are actually using the quantity of chlorine that you think you are adding. The methods for determining the level of chlorine in commercial bleaching powder or liquid bleach are contained in Annex 4, Table 6. The method for making a 200 ppm active chlorine solution is given in Annex 4, Table 3; to make a 500 ppm active chlorine disinfecting solution, use 2.5 times the quantity of liquid bleach or bleaching powder calculated from that table.