![]()
![]()
![]()
In western Kenya, the average pond size is 180 m2, although more progressive farmers have ponds of 300 to 500 m2. The objective is to develop a simple, inexpensive, economical system which yields between 500 and 2 000 Clarias fingerlings per cycle. This number is sufficient to stock one or more ponds at a density of 2 to 3 Clarias /m2.
Trials were carried out between January and September 1995. The majority of the work was done at Kibos Fry Production Centre located 10 km inland from the eastern shore of Lake Victoria. The farm is at an altitude of 1 220 m and located 6 km south of the equator. Water temperatures vary between 22 and 28 C. Day light is an almost constant 13 hours. When the system was largely defined at Kibos, other trials were undertaken at Alupe Fry Centre near the Uganda Border (35' N. Alt 1 480 m) and Rongo Fry Centre (45' S, Alt 1 420).
Technology development is a process of combining as much information as possible from various sources and then proceeding through trial and error. Different approaches and materials were tried. Initial trials were largely unsuccessful but results improved with experience, and further refinements in both reproduction and larval rearing will undoubtedly prove beneficial. The paper attempts to describe in sufficient detail the mistakes and failures as well as the successes to avoid unnecessary problems elsewhere.
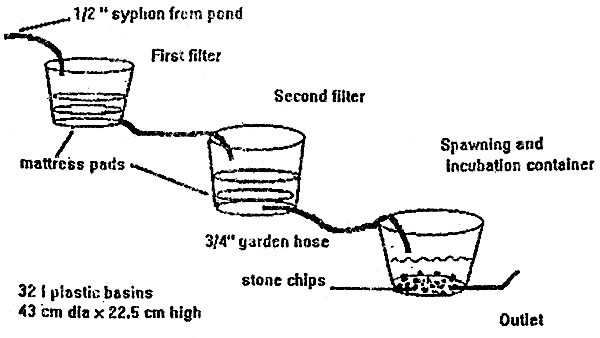
The simplified hatchery system adapted uses water syphoned from a pond, 2 filters, and a spawning and incubation container (see Figure 1, following page), A detailed description of each component as well as the reasons behind the choice of materials used in this system are given below.
2.1.1 Water
The principal requirement for successful incubation and hatching of fish eggs is oxygenated, silt-free water at the correct temperature. Clarias eggs will develop and hatch between 19 and 30 C (Bruton, 1979). Siltation is a major problem. The adhesive coating on the eggs accumulates suspended soil and they are easily mothered. A rain storm leading to muddy water entering an incubation container will kill the eggs (Janssen, pers.comm.; de Graaf, pers.comm.).
Figure 1
Simple hatchery for spawning Clarias gariepinus
A variety of waters sources can be appropriate for incubation of fish eggs, yet there can be some problems that are not easily identified by a rural farmer. Spring water used directly may contain little or no dissolved oxygen, and may have elements or compounds (dissolved iron, various gasses under pressure) that are toxic to fish. Water from swamps may be de-oxygenated and contain hydrogen sulfide from decomposing organic matter. Small streams are susceptible to sudden siltation and level fluctuation from rain storms. At the higher altitudes in Kenya, water temperature can fail substantially overnight,
Water from an existing fish pond has certain advantages, not the least being that the small scale fish farmer already has this facility. There is a higher heat retention capacity from the standing water which reduces temperature fluctuations overnight. Siltation is fairly low as the pond acts as a sediment trap. A constant water volume and permanent structures allow the use of syphons and stable placement of the spawning facilities. On the other hand, pond water will contain lots of algae, fish wastes, high concentrations of bacteria, and relatively higher amounts of natural fish pathogens such as parasites and fungus. The challenge then is to find a method of using pond water for incubation of Clarias eggs that gives consistently good results.
Trials were undertaken by syphoning water from 300 m2 fish ponds at the 3 fry centres. Pond water depth varied from 40 to 100 cm. All ponds held fish at varying densities (tilapia fingerlings, larger tilapia, polyculture with tilapia and Clarias, etc.), The fish in the ponds were fed throughout the trials.
2.1.2 Syphons
Syphons were made from ordinary flexible PVC garden hose, 1/2" and 3/4" (interior dia). Syphons were fixed in the pond by tying them to a wooden stake then driving the stake into the pond bottom about 50 cm away from the bank so that the water drawn was at least 20 cm below the pond surface and 10 cm above the pond bottom. It is important to extend the length of the syphon hose to allow for a large loop below the filter container before the syphon enters the filter. In many situations, the level of the pond water and the level of the top of the filter are fairly close, and raising the lower end of the syphon even a few cm can introduce air and stop the syphon. A6m length is usually adequate. The end of the hose is then secured into place on top of the fitter medium by tying it to the side of the container.
2.1.3 Filtration systems
The key to the success of using pond water is filtration. Once the female is injected and placed in the spawning/incubation container, clean water is needed for a period of 4 to 5 days (depending on temperature). Initial trials held in 1994 showed that if unfiltered pond water was used, the accumulation of algae, debris, and silt on the eggs and newly hatched larvae almost certainly led to poor results. Two filtration systems were tried.
2.1.3.1 Sand filters
The most obvious choice is a sand filter, and the project carried out, over 3 months, a series of 13 trials using such filters. These were made using a 210 l empty oil drum split lengthwise to increase the available surface area. The split drum was reinforced by welding a flat, mild steel {20 × 4 mm) frame over the cut surfaces. Legs and additional reinforcing were done on the outside of the drum to increase stability. The drums require painting as iron rust is toxic to the fish (Brooks pers.comm.). The entire drum was painted first with red oxide anti-rust paint, however this too proved toxic to the fish eggs, and a second coat of black enamel paint was then added. The filter was assembled as follows. Beginning from the bottom of the cut drum, a 5 cm layer of stone chips, 2 layers of plastic mosquito mesh, and 25 to 30 cm of thoroughly washed sand (dia < 0.5 mm) were placed in a drum, A hole pierced in the bottom of the drum led off the filtered water to the spawning and incubation container, The results obtained from the sand filters were not encouraging (see below) and a second filtration method was then adopted.
2.1.3.2 Foam mattress filters
Foam mattress pads are very common throughout Africa. They are inexpensive and widely available in Western Kenya. A 5 cm thick mattress pad was cut into rough circles with a knife to fit tightly into a 32 l capacity round plastic wash basin (43 cm dia × 22.5 cm depth). The foam mattress pads were rinsed thoroughly in water and left in the sun for at least 24 hours before use to allow any soluble or volatile chemicals used in manufacture to escape. This is very important; the volatile chemicals used in the mattress manufacture are toxic to fish. Two round sections were placed in each container. Initially 1 filter container was used, this was not sufficient in all cases to obtain clean water for the 4 or 5 days necessary, To insure success, a second identical container with an additional 2 pieces of mattress pad was added to the system so that even in the case of very heavy loads of suspended matter in the water, the final result was was sufficiently clean. Some daily maintenance is necessary. At the beginning and end of each day, the filters in the 2 basins are taken out one by one, rinsed thoroughly, and replaced.
Each plastic filter container was pierced at the side on the bottom edge, and a 3/4" dia garden hose was pushed through the hole so to reach the bottom centre. A tight fit was made by using a round file to cut the hole, but some leakage still occurred. To strengthen the joint and stop leakage, small pieces of old nylon fish net soaked in PVC glue were wrapped around the joint for reinforcement. The garden hose was cut to a length of 2 m and led to either the other filter container or the spawning and incubation container. Leaving a 2 m length of hose allows much greater flexibility in placing the containers and getting the proper levels for unrestricted water flow,
The last part of the system is a container in which the fish spawn and the eggs incubate and hatch. The basic requirements are that the container is sturdy enough to hold the necessary volume of water and fish, the breeders can't jump out, and there must be some substrate for the eggs to adhere to. The container should be easily cleaned and sterilized.
Initial trials used oil drums cut in half (either lengthwise or in the round) and painted with black enamel paint (Brooks, pers.comm.), The half-drums were reinforced with mild steel and equipped with handles and other reinforcement. Both proved to be acceptable. After introducing the foam mattress filtration system, the spawning and incubation container was changed to use the same 32 i plastic basin as the filters. They were cheaper and lighter in weight.
The water entered the spawning and incubation container by gravity from the second filter, splashing onto the surface. A 1 m length of 3/4" dia garden hose was glued into a hole pierced at the bottom edge of the container as an outlet, the end of the hose only extended a few centimeters into the basin and was slightly raised from the bottom by placing a stone chip under the end. The joint was reinforced again with small pieces of nylon fish net soaked in PVC glue, This hose was then raised or lowered to adjust the water level in the container, When the adult breeders were in the container, the water depth was maintained at 15 to 20 cm. After spawning, the water level was lowered to about 3 cm to just cover the spawning substrate (see below)
One major problem with semi-artificial spawning is the injury done to the fish (Janssen, 1989). The male becomes excited with the release of pheromones and constantly attacks the female until she spawns. The female can die from the injuries. Injury and female death were common throughout the series of experiments, and efforts were made to improve this towards the end of the trials. The spawning and incubation container were modified by adding a barrier into the container to separate the female from the male, yet allow the free circulation of eggs and sperm when spawning occurs, A piece of strong, knotted, nylon net (18 ply) with a 2.5 cm (knot to knot) square mesh was fixed with PVC glue at the bottom and sides of the of the container to separate it into 2 equal parts.
All spawning and incubation containers were covered with either dark blue or dark green 1 mm mesh material (nylon or polyester) wrapped over the top and attached with strips of tyre inner tube. Papyrus reed mats were placed on top and weighted with rocks. This kept sunlight off the eggs and larvae, prohibited the adult fish from jumping out, and worked as an emergency filter for the larvae should any blockage of the normal drain, the small hose pipe, occur,
Clarias eggs are naturally adhesive. If there is no proper substrate present, such as with a smooth plastic container or painted oil drum, soon after spawning the eggs will congeal into a large mass and most if not all will die. If spawned on a proper substrate, the eggs are well separated and disbursed. Several materials were tried including polyester and nylon cotton fabric, old sisal feed sacks, and the roots of floating water plants (de Graaff et al, in press). We found that a single layer of stone chips, approx 2 cm dia, was the best. The eggs adhered evenly to the chips throughout the container, Water flow was not unduly inhibited. It was easy to inspect the eggs and roughly determine the percent fertility by simply lifting a few stones from the container and examining them. The stones are easily cleaned and sterilized.
Perhaps most importantly, upon hatching the larvae hide under the stones and do not swim around to the extent that occurs when the substrate is smooth and there are no hiding places. The use of a stone chip substrate eliminates the need for an outlet filter, which can easily clog and inhibit water circulation thus killing the small fish. The larvae hide under the rocks and only a negligible number of larvae escape through the outlet. Those few that do can be captured easily by placing a small piece of fine mesh material, 20 × 50 cm, at the end of the outlet hose where the water spills. It is most important, however, to transfer the larvae to the pond between 12 and 24 hours after hatching. Beyond this, they will all begin swimming throughout the water volume searching for food and substantial losses can occur through the drain,
All C. gariepinus used in the experiments were pond-raised fish at least 1 year old, Methods for selection were those described by Viveen et al, 1985. Females were chosen on the basis of a swollen abdomen where eggs could be extruded by applying moderate lateral pressure. Males were chosen by similar size. Under the prevalent climatic conditions of western Kenya, Clarias will spawn the year around.
One pituitary gland from a male or female Clarias of approximately the same weight was extracted immediately before injecting the female, crushed with a mortar and pestle, and mixed into a suspension with 1 ml of a 9 % table salt solution, The female was injected intramuscularly (Viveen et al, 1985). The time of injection until the time of ovulation is temperature dependant. Injections were done the previous afternoon between 13 h to 15 h and were timed so that spawning occurred between 04 and 06 h the next morning when it is still dark and there is little human activity that might disturb the fish. The actual time of spawning was not determined.
One of the constraints of semi-artificial spawning is that often only partial release of ovulated eggs occurs (Janssen, 1989). A series of experiments were conducted where 2 females were injected at the same time and placed with 2 males in the same spawning container. In theory, the increased level of pheromones and stimulation of another ovulating female should increase the overall release of eggs. These results then were compared with containers using only 1 breeding couple.
A series of 6 ponds of 10 m2 of water surface area were built with dimensions of 1 m × 10 m × 30 cm deep. This configuration gives a very high ratio of pond dike to pond surface (2.2:1) and allows complete coverage with a single width of nylon net. The edges of the net were tightly staked to the dike using short lengths of galvanized wire bent into the shape of an inverted U or nailed onto wooden planks surrounding the pond. Small sticks transverse the pond to support the net out of the water. A 7th pond was built measuring 4.15 m × 12 m × 30 cm for a surface area of 50 m2. also completely covered with net This pond was located near a termite mound. Within days the insects destroyed the nylon net in contact with the soil. Subsequently a diluted insecticide powder (Dylox, 2.5 % active ingredient) was spread in a surrounding trench before sealing the net to the dike. This insecticide is well tolerated by fish.
The day the female was injected, the 10 m2 ponds were prepared by evenly spreading 2 level wheelbarrows (approximately 40 kg wet weight) of composted chicken litter on the bottom. The 50 m2 pond received 5 wheelbarrows (100 kg). The ponds were then sealed with the net and filled to a depth of 20 to 30 cm. To insure that a good crop of zooplankton was available, at least 100 l of green water from a functioning fish pond was added to each pond, Ponds were filled 2 days before stocking.
2.5.1 Stocking of larval ponds
The larvae were counted within 24 hours of hatching. At this stage, the yolk sack is 2/3 absorbed and the fish are able to swim about but prefer to hide under the stones, All work was done in the shade to prevent exposure to direct sunlight. The stone chips were removed. The water in the spawning container was re oxygenated every few minutes by pouring in fresh water. Water mixed with larvae was collected with a 500 ml glass beaker. Larvae were counted individually as the water in the glass was slowly poured into another plastic bucket. When the necessary number had been reached, each pond was stocked by pouring the bucket along the length of the pond. If necessary, other larvae of the same age from other spawnings were added to reach the desired stocking density,
Individually counting several thousand larvae takes hours and causes stress. This was done for all of the semi-artificial spawning trials, but only when stocking the first 3 pond trials. It was then considered that sufficient data had been accumulated with semi-artificial spawning. Emphasis was then put on the pond rearing of the larvae, Subsequently, to save time and to have a better control over the pond trials, larvae were obtained through artificial reproduction and stripping 1 or 2 females. All the larvae from a particular spawn were concentrated into a 51 volume. The water and larvae were gently swirled to make a homogeneous mix, and 5 samples of 200 ml were taken and counted. The mean value of these samples was used to estimate the number of larvae / 200 ml. Using the same measure and the mean value, it was then possible to stock all the ponds the same day with the same density. This saved a lot of time.
The ponds were stocked at densities varying from 100 to 500 larvae/m2 to get an initial idea of the possible range of stocking densities in such small ponds, The expected yield from a single spawning using semi-artificial methods is between 3 000 and 5 000 larvae (see below). Two separate ponds should be stocked with each spawn to lower the risks to the small scale farmer. Most pond trials used a stocking density of 230 to 240 larvae /m2, which closely corresponds to the higher yield of expected larvae divided into 2 ponds of 10 m2 each.
2.5.2 Feeding of larval Clarias
A feed composed of 60 % rice bran, 20 % cotton seed cake, and 20 % . fish meal was processed by a hammer mill with a 2 mm screen. The feed was broadcast on the surface of each pond at a rate of 200 g per day, beginning the day after the fish were stocked. After the first 3 trials, it was obvious that the fish were not fully utilizing the feed and much of it was rotting on the pond bottom. For the remainder of the trials, ponds were only given 50 g/day of the same feed sieved through a 1 mm mesh.
2.5.3 Sampling and harvest of fingering ponds
Fish remained in the ponds for 14 to 28 days at which time the ponds were emptied and the fish and tadpoles (if any) were individually counted. The fish were then transferred to another pond (1 300 m2) for on-rearing.
The scales used day to day at Kibos were only accurate to 0,1 g. Mean weight of the harvested fish was determined by a sample 20 fish from each trial. The fish were held for 30 seconds in a fine mesh strainer and then weighed together. The mean weight was then estimated by division. With larvae and very small fish, individual weight can vary considerably if the stomach is full or not and if the fish are wet, moist, or dry when weighed, To verify these estimated mean weights, a weight - length relationship was made from a sample of 30 Clarias of between 8 and 28 mm total length, measured to the nearest mm, dried on absorbant paper for 30 seconds, and weighed on an electronic scale accurate to 0.1 mg. The weight/length relationship (r2 = 0.83; P <,01) is expressed by the formula: Log weight (in mg) - 2,688 log total length (in mm) - 1.228. This formula is accurate for larval and fingerling sizes from 5 mm (22 mg) to 40 mm (5 930 mg). At harvest, the small fish varied by only a few millimeters, and it was possible to verify the mean weight using this correlation.
![]()
![]()
![]()