CHAPTER 6
ROAD CONSTRUCTION TECHNIQUES
6.1 Road Construction Techniques
6.1.1 Construction Staking
Prior to the construction activity the design information has to be moved from the plan to the ground. This is accomplished by staking. Slope stakes are an effective way to insure compliance with the design standards and to keep soil disturbance to an absolute minimum. Various staking methods can be employed. (Dietz et al., 1984; Pearce, 1960) The method discussed here is but one example.
Stakes, marking various road design points, are typically obliterated during the clearing and grubbing phase. In order to relocate the stakes (centerline, slope stakes) it is helpful to establish reference points outside the clearing limits. Reference points should be set at least 3 to 5 meters behind the uphill clearing limits. On the average, reference points (or RP's) should be set at least every 70 to 100 meters. Typically, reference points are placed at points where the center line alignment can be easily re-established, such as points of curvature. Figure 102 shows the necessary stakes and stake notation needed by the equipment operator to construct a road.
Stakes are used by the equipment operator in locating where to begin cutting. If the selected starting point is too high, considerably more material has to be cut in order to construct the proper subgrade (Figure 103). For example, if the cut results in a 20 percent wider subgrade, approximately 50 percent more volume has to be excavated. (See Section 3.2.2.) If the cut is placed too low, an overstepped cut slope or extra side casting may result, both of which are undesirable.
Starting the cut at the proper point becomes more important as the side slope increases. As a rule, slope stakes should be set when sideslopes exceed 40 to 45 percent depending on the sensitivity of the area and the operator's experience.
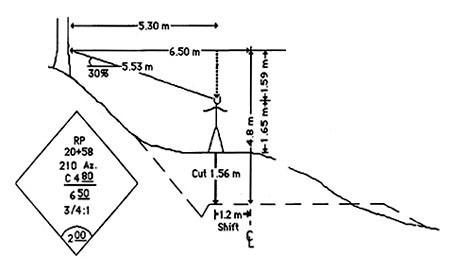
The use of RP's (Reference Points) or slope stakes for proper excavation is shown in Figure 104. Here, the engineer stands on the preliminary centerline of the construction grade and sights for the RP. A slope reading of 30 percent and a slope distance of 5.53 m is recorded. Converting the slope distance of 5.53 m to a horizontal distance of 5.30 m and to a vertical distance of 1.59 m allows the engineer to determine how much the "present" or preliminary centerline has to be shifted to conform with the design centerline. The RP tag requires 6.50 m horizontal distance to centerline with a vertical drop of 4.80 m. From that information, it can be seen that an additional 1.56 m [4.80 - (1.59 + 1.65) = 1.56] has to be cut and the present location has to be shifted by 1.2 m (6.50 - 5.30 = 1.20). Height of instrument or eye-level is assumed to be 1.65 m.
Figure 102. Road cross section showing possible construction information.
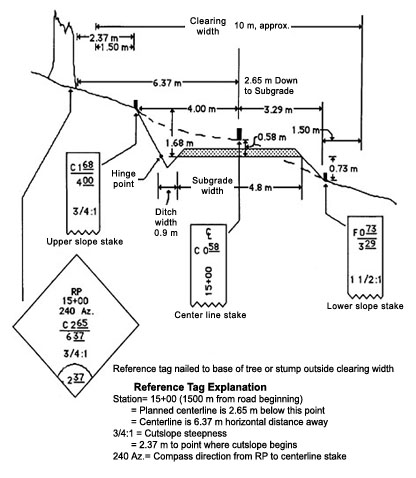
Figure 103. The effect of improperly starting the cut as marked by the slope stake. Starting the cut too high results in excess excavation and side cast. Starting the cut too low leaves an overstepped cut bank.
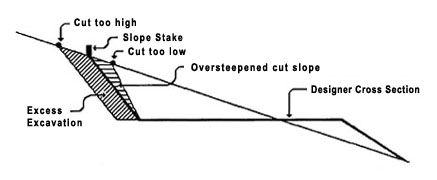
Figure 104. Construction grade check. Engineer stands on center of construction grade and sights to RP tag. Measured distance and slope allow for determination of additional cut.
6.1.2. Clearing and Grubbing of the Road Construction Area
Preparing the road right-of-way or construction area is referred to as clearing and grubbing. During the clearing phase, trees are felled. Grubbing refers to the clearing and removal of stumps and organic debris. Trees should be felled and cleared a minimum of 1 to 3 m from the top of the cut or toe of the fill (Figure 105). The logs can be decked outside the construction area (Figure 105, B to E) or skidded away.
Figure 105. Clearing limits in relation to road bed widths. Significant quantities of organic materials are removed between B and E. Stumps are removed between B and D. Stumps may be left between D and E. Organic debris and removed stumps are placed in windrows at F to serve as filter strips (see Section 6.3.1).
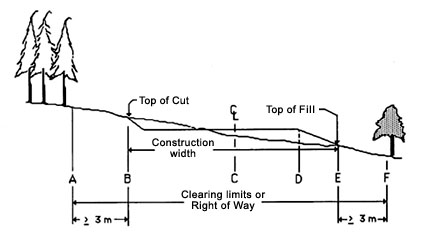
This additional width between construction width and forest edge ensures that space is available to deposit organic debris outside the road construction width and that there is no overlap between forest edge and construction area.
A good construction practice to follow is to remove stumps that are within the construction width (Figure 105, B to E). Trees should be felled to leave a stump 0.8 to 1.2 m high. This helps bulldozers in stump removal by providing added leverage.
Organic overburden or topsoil typically has to be removed over the full construction width (Figure 105, B to D). This is especially true where organic layers are deep or considerable sidecast embankment or fills are planned. Organic material will decompose and result in uneven settlement and potential sidecast failure. Organic material should be deposited at the lower edge of the road (Figure 105, E to F). This material can serve as a sediment filter strip and catch wall (see Section 6.3.1), however care should be taken that this material is not incorporated into the base of the fill. Past road failures show that fill slope failures have been much more frequent than cut slope failures (70 percent and 30 percent, respectively). In most cases, poorly constructed fills over organic side cast debris was the reason for the failures.
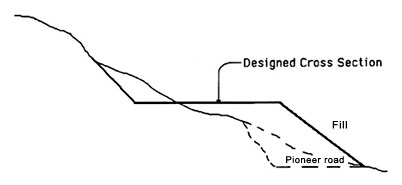
During the grubbing phase, or preparation phase, a pioneer road is often constructed to facilitate equipment access, logging equipment movement, and delivery of construction materials, such as culverts. This is often the case when construction activities are under way at several locations. If pioneer roads are constructed, they are often built at the top of the construction width and are usually nothing more than a bull dozer trail. When considerable side hill fill construction is planned, however, the dozer trail should be located at the toe or base of the proposed fill. The trail will serve as a bench and provide a catch for the fill to hold on (Figure 106).
Figure 106. Pioneer road location at bottom of proposed fill provides a bench for holding fill material of completed road.
6.2 General Equipment Considerations
The method and equipment used in road construction is an important economic and design factor in road location and subsequent design. A road to be built by an operator whose only equipment is a bulldozer requires a different design than a road to be built by a contractor equipped with hydraulic excavator, scrapers, and bulldozer. Table 38 lists common road construction equipment and their suitability for the different phases of road construction. A bulldozer can be used in all phases of road construction from excavation and drainage installation to final grading. The front end loader performs well in soft material. Front end log loaders can be fitted with a bucket extending their usefulness under the correct conditions.
6.2.1 Bulldozer in Road Construction
Probably the most common piece of equipment in forest road construction is the bulldozer equipped with straight or U-type blades. These are probably the most economical pieces of equipment when material has to be moved a short distance. The economic haul or push distance for a bulldozer with a straight blade is from 17 to 90 meters depending on grade. The road design should attempt to keep the mass balance points within these constraints.
The road design should consider the following points when bulldozers are to be used for road construction.
1. Roads should be full benched. Earth is side cast and then wasted rather than used to build up side cast fills.
2. Earth is moved down-grade with the aid of gravity, not up-grade.
3. Fill material is borrowed rather than pushed or hauled farther than the economic limit of the bulldozer.
4. Rock outcrops should be bypassed. Unless substantial rock blasting is specified requiring drilling and blasting equipment, solid rock faces should be avoided (This, however, is primarily a road locator's responsibility.)
Table 38. Road construction equipment characteristics. (from OSU Extension Service, 1983).
|
Criteria |
Bulldozer |
Front end |
Hydraulic excavator |
Dump trucks |
Farm |
|
Excavation mode (level of control of excavated materials) |
Digs and pushes; adequate control (depends on blade type) |
Minor digging of soft material; lifts & carries; good control |
Digs, swings, & deposits; excellent control; can avoid mixing materials long-distance material movement; excellent control |
Scrapers can load themselves; 'top down' subgrade excavation; used for small quantities |
Minor digging and carrying; good control because it handles |
|
Operating distance for materials movement |
91 m; pushing downhill preferred |
91 m on good traction surfaces |
23 m (limited to swing distance) |
No limit except by economics; trucks must be loaded |
31 m (approximately) |
|
Suitability for fill construction |
Adequate |
Good |
Limited to smaller fills |
Good for larger fills |
Not suitable |
|
Clearing and grubbing (capacity to handle logs and debris |
Good |
Adequate |
Excellent |
Not suitable |
Handles only small materials |
|
Ability to install drainage features |
Adequate |
Digging |
Excellent |
Not suitable |
Adequate for small tasks |
|
Operating cost per hour |
Moderate, depending on machine size |
Relatively low |
Moderate to high, but productivity |
Very high |
Low |
|
Special limitations or advantages |
Widely available; can match size to job; can do all required with good operator |
Cannot dig hard material; may be traction limited |
Good for roads on steep hillsides; can do all required except spread rock for rock surfacing |
Limited to moving material long distances; can haul rock, rip rap, etc. |
Very dependent on site conditions and operator |
When using bulldozers, the practice of balancing cut and fill sections should be used only when:
- sideslopes do not exceed 45 to 55 percent
- proper compaction equipment is available such as a "grid roller" or vibrating or tamping roller
- fills have a sufficient width to allow passage of either compaction equipment or construction equipment, such as dump trucks.
Adequate compaction cannot be achieved with bulldozers alone. The degree of compaction exerted by a piece of equipment is directly related to its compactive energy or ground pressure. Effective ground pressure is calculated as the weight of the vehicle divided by the total ground contact area, or the area of tires or tracks in contact with the surface. Bulldozers are a low-ground pressure machine and therefore are unsuitable for this process. Ground pressure of a 149 kW (200 hp), 23 tonne bulldozer (Cat D7G, for example) is 0.7 bar (10.2 lb / in2). By comparison, a loaded dump truck (3 axles, 10 m3 box capacity) generates a ground pressure of 5 to 6 bar (72.5 to 87.1 lb / in2).
Comparative production rates for various size bulldozers are shown in Figure 107. One should note that production curves are based on:
1. 100 % efficiency (60 minutes/hour),
2. power shift machine with 0.05 minute fixed time,
3. machine cuts for 15 m then drifts blade load to dump over a high wall,
4. soil density of 1,370 kg/m3 (85.6 Ib/ft3) loose or 1790 kg/ m3 (111.9
Ib/ft3) bank,
5. coefficient of traction > 0.5, and
6. hydraulic controlled blades are used.
Figure 107. Maximum production rates for different bulldozers equipped with straight blade in relation to haul distance. (from Caterpillar Handbook, 1984).
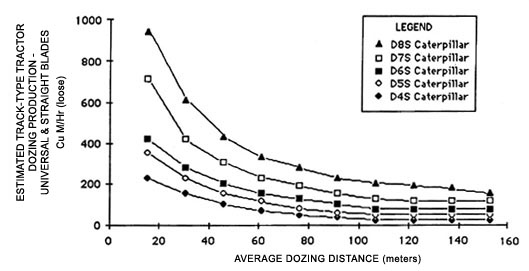
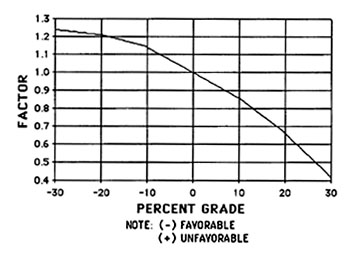
The graph provides the uncorrected, maximum production. In order to adjust to various conditions which affect production, correction factors are given in Table 39. Adjustment factors for grade (pushing uphill or downhill) are given in Figure 108.
Table 39. Job condition correction factors for estimating bulldozer earth moving production rates. Values are for track-type tractor equipped straight (S) blade. (Caterpillar Handbook, 1984)
|
TRACK TYPE TRACTOR |
WHEEL TYPE TRACTOR |
|
|
OPERATOR |
||
|
Excellent |
1.00 |
1.00 |
|
Average |
0.75 |
0.60 |
|
Poor |
0.60 |
0.50 |
|
MATERIAL |
||
|
Loose stockpile |
1.20
|
1.20
|
|
Hart to cut; frozen-- |
||
|
with tilt cylinder |
0.80 |
0.75 |
|
without tilt cylinder |
0.70 |
- |
|
cable controlled blade |
0.60 |
- |
|
Hard to drift; "dead" (dry, non-cohesive material) or very sticky material |
0.80 |
0.80 |
|
SLOT DOZING |
0.60 - 0.80 |
- |
|
SIDE BY SIDE DOZING |
1.15 - 1.25 |
1.15 - 1.25 |
|
VISIBILITY -- |
||
|
Dust, rain, snow, fog, darkness |
0.80 |
0.70 |
|
JOB EFFICIENCY -- |
||
|
50 min/hr |
0.84 |
0.84 |
|
40 min/hr |
0.67 |
0.67 |
|
DIRECT DRIVE TRANSMISSION |
||
|
(0.1 min. fixed time) |
0.80 |
- |
|
BULLDOZER* |
||
|
Angling (A) blade |
0.50 - 0.75 |
- |
|
Cushioned (C) blade |
0.50 - 0.75 |
0.50 - 0.75 |
|
D5 narrow gauge |
0.90 |
- |
|
Light material U-blade (coal) |
1.20 |
1.20 |
|
* Note: Angling blades and cushion blades are not considered production dozing tools. Depending on job conditions, the A-blade and C-blade will average 50-75% of straight blade production. |
Figure 108. Adjustment factors for bulldozer production rates in relation to grade. (Caterpillar Performance Handbook, 1984).
EXAMPLE:
Determine the average hourly production of a 200 hp bulldozer (D7) equipped with a straight blade and tilt cylinder. The soil is a hard packed clay, the grade is 15 percent favorable, and a slot dozing technique is used. The average haul or push distance is 30 m. The soil weight is estimated at 1,200 kg/m3 loose, with a load factor of 0.769 (30 % swell). An inexperienced operated is used. Job efficiency is 50 min/hour.
The uncorrected maximum production is 430 m3 loose/hour (from Figure 107) bulldozer curve D7S. Applicable correction factors are:
|
Job efficiency (50 min/hr) |
0.84 |
|
Poor operator |
0.60 |
|
Hard to cut soil |
0.80 |
|
Slot dozing technique |
1.20 |
|
Weight correction |
0.87 |
Production = Maximum Production * Correction Factor
= (430 m3 loose/hr) (0.84) (0.60) (0.80) (1.20) (0.87) = 181 m3 loose/hour
Production (bank m3) = (181 m3 loose/hr) (0.769) = 139 bank m3/hr
Production rates for bulldozers are also influenced by grade and side slopes. Percent change in haul distance with respect to changes in grade are shown in Table 40. As side slope increases, production rate decreases. Typical production rates for a medium sized bulldozer in the 12 to 16 tonne range (for example, Cat D6) are shown in Table 41.
Table 40. Approximate economical haul limit for a 185 hp bulldozer in relation to grade. (Production rates achieved are expressed in percent of production on a 10 percent favorable grade with 30 m haul). (Pearce, 1978).
|
Haul distance |
Grade (%) |
||||||
|
-10 |
-5 |
0 |
+5 |
+10 |
+15 |
+20 |
|
|
percent |
|||||||
|
15 |
54 |
72 |
90 |
126 |
161 |
198 |
234 |
|
23 |
43 |
||||||
|
30 |
44 |
56 |
76 |
100 |
122 |
144 |
|
|
37 |
47 |
||||||
|
45 |
54 |
70 |
86 |
102 |
|||
|
60 |
42 |
54 |
65 |
77 |
|||
|
75 |
43 |
52 |
62 |
||||
|
90 |
43 |
51 |
|||||
|
105 |
43 |
||||||
Bulldozers, to summarize, are an efficient and economical piece of equipment for road construction where roads can be full benched and excavated material can be side cast and wasted. It should be noted, however, that side cast material is not compacted. Typically, this type of construction equipment should only be used when: (1) side slopes are not too steep (ideally less than 50 percent), (2) adequate filter strips are provided along the toe of the fill, together with a barrier (natural or artificial) to catch side cast material, and (3) erosion is not considered to be a significant factor either as a result of soil type, precipitation regime, or both. Under these circumstances, bulldozers can be used on slopes steeper than 50 percent. If sideslopes exceed 60 percent, end hauling and/or use of a hydraulic excavator is highly recommended. Side cast wasting from bulldozer construction represents a continuous source for raveling, erosion, and mass failures. On steep slopes, bulldozers should only be used in combination with special construction techniques (trench excavation, see Section 6.3.1).
Table 41. Average production rates for a medium sized bulldozer (12 - 16 tonnes) constructing a 6 to 7 m wide subgrade.
|
Sideslope (%) |
0 - 40 |
40 - 60 |
> 60 |
|
Production rate in meters/hour |
12 - 18 |
8 - 14 |
6 - 9 |
6.2.2 Hydraulic Excavator in Road Construction
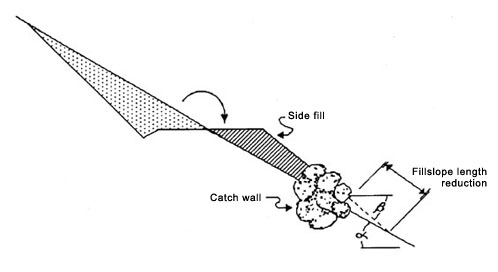
The hydraulic excavator is a relatively new technology in forest road construction. This machine basically operates by digging, swinging and depositing material. Since the material is placed, as opposed to pushed and/or sidecast, excellent control is achieved in the placement of the excavated soil. This feature becomes more important as the side slope increases. Fill slope lengths can be shortened through the possibility of constructing a catch wall of boulders along the toe of the fill. This feature is particularly important when side slopes increase to over 40 percent.
Mass balance along the centerline is limited to the reach of the excavator, typically about 15 to 20 meters. However, because of excellent placement control, construction of a balanced cross section can be achieved with considerably less excavation. Raveling disturbance and erosion is reduced as well because of lesser excavation and little or no downhill drifting of embankment material (Figure 109).
Figure 109. Fillslope length reduction by means of catch wall at toe of fill. (See also Figure 55).
Production rates for hydraulic excavators are given in Table 42. Production rates are shown for three different side slope classes. The values given are for a medium sized excavator with a 100 kW power rating (e.g., CAT 225, Liebherr 922).
Table 42. Production rates for hydraulic excavators in relation to side slopes, constructing a 6 to 7 m wide subgrade.
|
Side slope |
Production rate |
|
0 - 40 |
12 - 16 |
|
40 - 60 |
10 - 13 |
|
> 60 |
8 - 10 |
The excavator production rate approaches the dozer production rate as side slope increases. There are now indications that excavator production rates are higher than dozer production rates on slopes steeper than 50 percent. This difference will increase with increased rock in the excavated material. The bucket of the excavator is much more effective at ripping than the dozer blade. Excavators are also more effective at ditching and installing culverts.
6.3 Subgrade Construction
6.3.1 Subgrade Excavation with Bulldozer
Proper construction equipment and techniques are critically important for minimizing erosion from roads during and after the construction. There are clear indications that approximately 80 percent of the total accumulated erosion over the life of the road occurs within the first year after construction. Of that, most of it is directly linked to the construction phase.
In order to keep erosion during the construction phase to an absolute minimum, four elements must be considered.
1. Keep construction time (exposure of unprotected surfaces) as short as possible.
2. Plan construction activities for the dry season. Construction activities during heavy or extended rainfall should be halted.
3. Install drainage facilities right away. Once started, drainage installation should continue until completed.
4. Construct filter strips or windrows at the toe of fill slopes to catch earth stumps and sheet erosion (see Section 6.3.5).
The formation or construction of the subgrade begins after the clearing and grubbing (stump removal) phase. Three basic construction techniques are commonly used: side cast fills and/or wasting, full bench construction with end haul, and balanced road sections with excavation incorporated into layered fills (Figure 110).
Side cast and wasting traditionally has been the most common construction method. It also has been responsible for the highest erosion rates and making large areas unproductive. In this method, most if not the full road width is placed in undisturbed soil (Figure 110). Excavated material is side cast and wasted, rather than incorporated into the road prism. The advantage is uniform subgrade and soil strength. It is unlikely that the travelled road width will be involved in fill failures. An obvious disadvantage is the potential for erosion of loose, unconsolidated side cast material.
Side cast construction is the preferred construction method for bulldozers. The bulldozer starts the cut at the top of the cutslope, and excavates and side casts material until the required road width is achieved (Figure 111). It is important that the cut be started exactly at the "top of cut" construction stake (point B, Figure 105) and the cutting proceed with the required cut slope ratio (see Section 6.1.4). Depending on the type of blade (S - or U - blade) the bulldozer can push or drift excess or excavated material up to 100 meters in front of the blade along the road section to deposit it in a stable place.
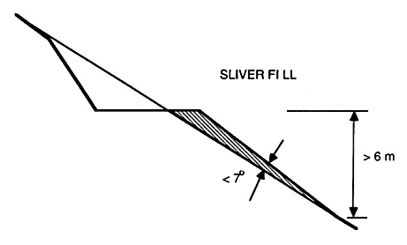
As the side slope becomes steeper, less and less of the side cast material is incorporated into the side fill. Bull dozer equipment has very little placement control especially on steeper side slopes where "sliver-fills" often result (Figure 112). These fills perform marginally, at best, and "full benching" with side cast and wasting of excavated material is preferred by many road builders. The result is a stable road surface but with a very unstable waste material fill.
Figure 110. Three basic road prism construction methods.
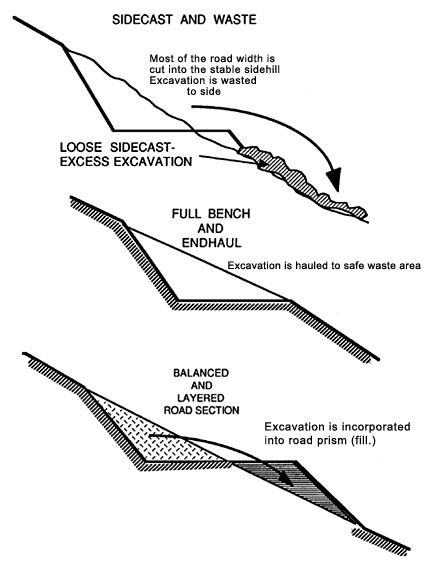
Figure 111. Road construction with a bulldozer. The machine starts at the top and in successive passes excavates down to the required grade. Excavated material is side cast and may form part of the roadway.
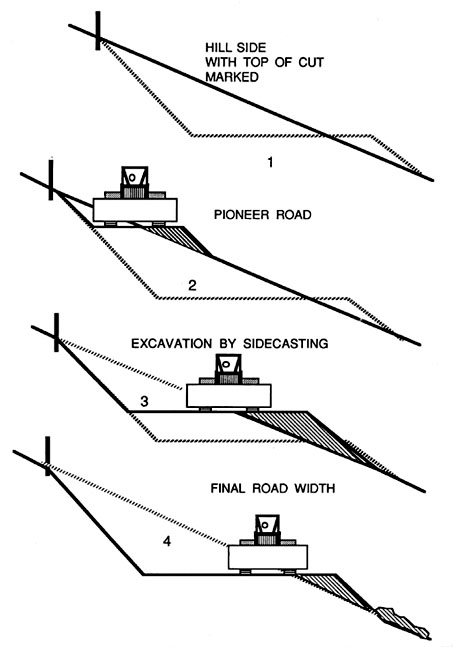
Figure 112. Sliver fills created on steep side slopes where ground slope and fill slope angles differ by less than 7º and fill slope height greater than 6.0 meters are inherently unstable.
Side cast or wasted material cannot remain stable on side slopes exceeding 60 to 70 percent. Under such conditions excavated material has to be end hauled to a safe disposal area. This requires dump trucks and excavators or shovels for loading and hauling.
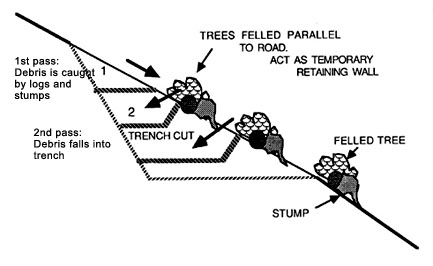
Unwanted side cast may result from dozer excavation on steep side slopes because of lack of placement control. In order to contain side cast loss within the construction width of a full bench road the so-called "trench-method" has been successfully used in the Pacific Northwest (Nagygyor, 1984). In this method the right-of-way timber is felled parallel to the road center line. Trees and stumps are not removed. They will act as a temporary retaining wall for loose, excavated material (Figure 113). A pioneer road is built at the top of the cut by drifting material against and on top of the felled trees. Initial excavation and side cast loss can therefore be kept to a minimum. When rock is encountered, dirt drifted against or on top of trees will form a temporary bridge to allow passage of construction equipment.
Actual excavation is started about 10 to 12 meters from the loader by cutting a blade-wide trench and drifting the material towards it. Loose material which escapes during this process is caught by the felled trees and slash. As the cut gets deeper material will fall inside the trench from both sides (Figure 113). Debris, stumps, tops and branches are pushed and loaded together with the excavated material, if it is not placed in designated fills. Otherwise it can be separated out at this point.
Figure 113. Trench-excavation to minimize sidehill loss of excavation material. Debris and material falls into trench in front of the dozer blade. Felled trees and stumps are left to act as temporary retaining walls until removed during final excavation.
6.3.2 Fill Construction
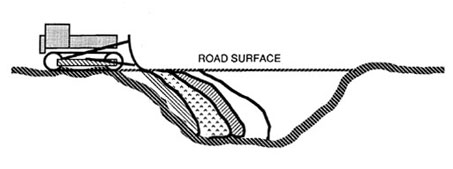
Fill construction is required to cross draws, creeks, flats or swampy areas and when excess excavation has taken place. Road fills support traffic and therefore must withstand considerable abuse. Only mineral soil, free of organic debris such as stumps, tree tops and humus should be used. Fills should be constructed and built up in layers (Figure 114). Each layer, or lift, should be spread and then compacted. Lift height before compaction depends on the compaction equipment being used. Typically lift height should be about 30 cm and should not exceed 50 cm. A bulldozer is not a good machine for compacting fills because of their low ground pressure characteristics. Fills across draws or creeks are especially critical since they may act as dams if the culvert should plug up. It is considered poor practice to build fills by end dumping instead of layering and compacting (Figure 115).
Figure 114. Fills are constructed by layering and compacting each layer. Lift height should not exceed 50 cm. Compaction should be done with proper compaction equipment and not a bulldozer (from OSU Ext. Service 1983).
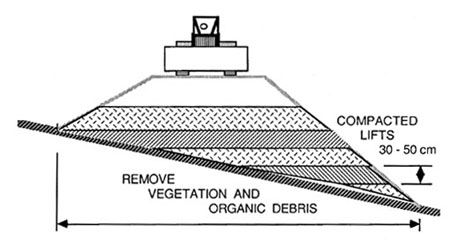
Figure 115. Fills which are part of the roadway should not be constructed by end dumping. (from OSU Ext. Service, 1983).
6.3.3 Compaction
Proper compaction techniques result in significant cost reduction and reductions in erosion. Erosion potential is directly proportional to the excavation volume especially if it is side cast in unconsolidated and loose fills. Conventional side cast techniques where most of the road surface is excavated into a stable hill side results in approximately 25 to 35 percent more excavated material when compared to "balanced" road design and construction where the excavation is incorporated into the road prism. In the former case, most if not all of the excavated Material is wasted as loose side cast material readily available for erosion. In the latter case, it has been incorporated into the fill, properly compacted, and presumably unavailable for erosion.
The key to a stable, balanced road design is proper compaction of fill material. Haber and Koch (1982) quantified costs for erosion and compaction for several types of sediment control treatments on roads in southwest Idaho. This study represents an excellent example of applying uniform criteria to examine differences between standard and non-standard construction techniques.
Costs were initially determined for each activity using two methods: (1) local (Boise) labor and equipment rates, taxes, insurance, and servicing (repair and maintenance) including 10 percent profit and risk margin, and (2) Regional Equipment Blue Book Guidebook which include margins for profit and risk, fuel, oil, lubrication, repairs, maintenance, insurance, and incidental expenses. After actual costs for each activity were calculated, average cost per unit and average crew cost was determined based on design quantities. A comparison was then made between actual costs for "non-standard" treatments and actual costs of standard treatments.
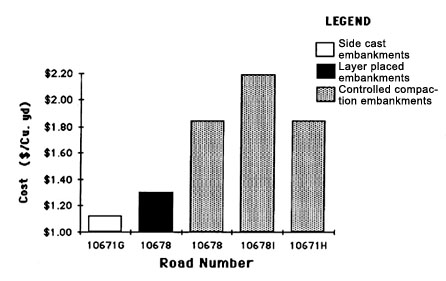
Average observed production rates for all activities were calculated for use in predicting time and costs associated with "non-standard" construction techniques. Figure 116 illustrates an example of their results in determining the cost of three different methods of embankment placement. These methods are: (1) side cast embankments with no compactive effort, (2) layer placed (less than 30 cm (12 in) thick) embankments in which each layer is leveled and smoothed before each subsequent layer is placed (some compaction is obtained during the leveling process as the bulldozer passes over the material), and (3) controlled compaction in which embankments are placed in layers (less than 20 cm (8 in) thick) followed by compaction with water and vibratory roller to achieve relative density of 95 percent.
As expected, side cast embankment construction per volume costs the least and controlled compaction the most. (Road 106781 was shorter and only a small quantity of earth was moved resulting in a higher unit cost.) Total cost, however, for a road expressed in cost per unit length may be very similar for side cast embankment and layered placement considering the fact that total excavation volume may be up to 35 percent less for the latter case. As mentioned before, most of this excavated material is now consolidated rather than loose. Combined with proper fill slope surface treatment and filter windrows very little erosion can be expected.
It is worth noting that production rates of manual labor for excavation work are generally 3.8 to 4 m3 (5 yd.3) of dirt during eight hours of work (Sheng, 1977). However, these rates will vary widely depending on terrain, soil, environmental, and psychological conditions of the work crew.
Figure 116. Excavation cost comparison for three different embankment construction techniques ( 1 cu.yd. = 0.9 m3). (after Haber and Koch, 1983).
6.3.4 Subgrade Construction with Excavator
Excavators are becoming more and more common in road construction. Because of their excellent placement control of excavated material, they are ideal machines for construction under difficult conditions. The backhoe or excavator should be the preferred machine on steep side slopes. The construction sequence differs from the bulldozer approach and is explained below.
The excavator works from a platform or pioneer road at the lower end of the finished road.
1st pass: Pioneering of log and stump removal accomplished in the fist pass. Just enough overburden is moved to provide a stable working platform (Figure 117). Logs are piled at the lower side of the clearing limit.
2nd pass: After completion of the first pass the operator begins retracing its path. During this pass unsuitable material is stripped and placed below the toe of the fill (Figure 118).
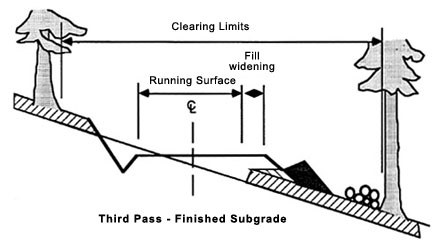
3rd pass: During the third pass, now working forward again, the exposed mineral soil is dug up for the embankment construction. At the same time a ditch is prepared and the cut slope smoothed and rounded. The portion of pioneer road or platform which consist of organic debris is outside the load bearing road surface fill (Figure 119).
On steep side slopes the excavator is able to place large boulders at the toe of the fill (in a ditch line) and place excavated material against it (Figure 55 and 109). Total excavation and exposed surface area can be kept to a minimum.
Figure 117. First pass with excavator, clearing logs and stumps from construction site. Working platform or pioneer road just outside of planned road surface width.
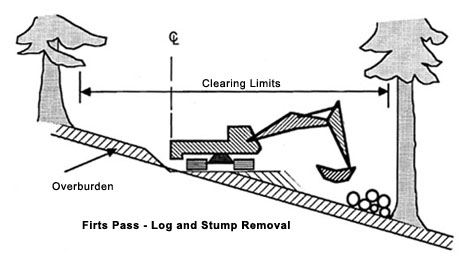
Figure 118. Second pass with excavator, removing or stripping overburden or unsuitable material and placing it below pioneer road.
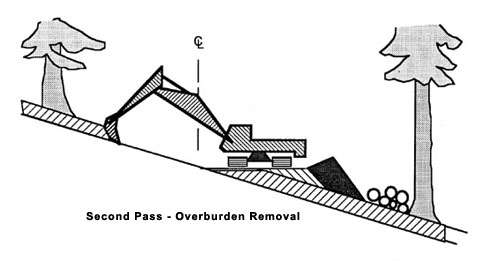
Figure 119. Third pass, finishing subgrade and embankment fill over pioneer road. Road side ditch is finished at the same time.
6.3.5 Filter Windrow Construction
Erosion from newly built fill slopes can effectively be trapped through filter strips or windrows made of slash and placed at the toe of the fills. This measure is particularly important and effective where the road crosses a draw or creek. The effect of such filter strips on soil loss from new fill slopes is shown in Table 43. Fill erosion from newly built slopes can be reduced by more than 95 percent over a 3 year period (Cook and King ,1983). This time period is sufficient in most cases to allow for other measures such as surface seeding, mulching, or wattling to become established.
Table 43. Fill slope erosion volume for windrowed and nonwindrowed slopes during a 3 year period following construction (Cook and King, 1983).
|
Slope Class* |
Filter Windrow (no windrow) |
Unprotected |
|
m3 / 1000 m |
||
|
1 |
0.30 |
33.29 |
|
2 |
0.65 |
64.30 |
|
*class 1: vertical fill height < 3 meter |
|
class 2: vertical fill height 3 to 6 meter |
Construction of filter strips:
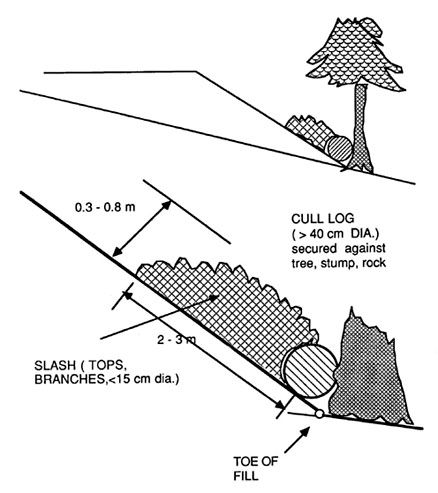
1. Suitable material from the clearing and pioneering activity should be stockpiled at designated areas either above or below the clearing limits. Slash should consist of tops, limbs and branches, not to exceed 15 cm in diameter and 3,5 m in length. Stumps and root wads are not suitable material and should be excluded.
2. Windrows are constructed by placing a cull log (reasonably sound) on the fill slope immediately above and parallel to the toe of the fill (Figure 120) for the fill material to catch against. The log should be approximately 40 cm in diameter and should be firmly anchored against undisturbed stumps, rocks or trees.
3. Slash should be placed on the fill above the cull log. The resulting windrow should be compacted, for example, by tamping it with the bucket of an excavator. It is important that part of the slash be embedded in the top 15 cm of the fill. Filter strips are built during subgrade construction in order to maximize their effectiveness. Care should be taken so as not to block drainage structures (outlets ) or stream channels.
Figure 120. Typical filter windrow dimensions built of slash and placed on the fill slope immediately above the toe. The windrow should be compressed and the bottom part embedded 15 cm in the fill slope. (after Cook and King, 1983).
LITERATURE CITED
Caterpillar. 1984. Caterpillar Performance Handbook, No. 14. Peoria, Illinois.
Cook, M.J. and J.G. King,1983. Construction cost and erosion control effectiveness of filter windrows on fill slopes. USDA Forest Service, Research Note INT-335, November 1983.
Dietz, P., W. Knigge and H. Loeffler. 1984. Walderschliessung. Verlag Paul Parey, Hamburg and Berlin, Germany.
Haber, D. and T. Koch. 1983. Costs of erosion control construction measures used on a forest road in the Silver Creek watershed in Idaho. U.S. Forest Service, Region 1 and University of Idaho, Moscow, Idaho.
Nagygyor, S.A. 1984. Construction of environmentally sound forest roads in the Pacific Northwest. In (ed Corcoran and Gill) C.O.F.E./U.F.R.O. Proceedings, University of Maine, Orono, and University of New Brunswick, Fredericton, April 1984, p.143 - 147.
Oregon State University. 1983. Road construction on woodland properties. Or. St. Univ. Ext. Cir. 1135. Corvallis, Oregon. 24 p.
Pearce, J. K. 1960. Forest Engineering Handbook. US Dept. of Interior. Bureau of Land Management. 220 p.