Techniques for graft-transmission in citrus
Of prime importance in grafting techniques is a good-quality budding knife. New knives must be sharpened using a medium-grit carborundum stone so that every trace of the original V-shaped tip on the cutting edge of the new blade is removed. When the cutting edge is observed with a magnifying glass, a smooth transition from the back of the blade to the very edge should be seen. The blade should be razor-sharp. The test for a well-sharpened blade is the ability to make a single, smooth slicing cut into the budstick and detach the bud or blind bud clear of the budstick without tearing the tissue as the cut is completed. The knife should be periodically resharpened with a fine-grit oilstone using oil, and honed on a leather strap. It is well to observe a number of professional or skilled budders to study their techniques and practice under their tutelage.
"Bud" graft inoculation
Figure 127 shows the three types of "bud" used for graft-transmission. The tissue illustrated at the top is a bud containing an eye. This is always used for propagation purposes but may be used for inoculation. The centre "bud" is called a blind bud i.e. a "bud" without an eye. It is cut from the portion of the stem between the buds and is used primarily for inoculation purposes.
Budsticks are collected from the field tree to be indexed and should be placed in a plastic bag, cooled in an ice chest and refrigerated at the laboratory until used. The bud or blind bud is sliced or cut from a stem or budstick. Using a well-sharpened knife, a slice is made into the stem using a continuous slicing motion. The bud should be cut free of the stem with one smooth slicing stroke. A T-cut is then made into the stem of the receptor or index plant to be inoculated. The upper portion of the bark at the top of the T-cut is opened and the bud or blind bud inserted (similar to the illustration in Figure 130). The blind bud is an excellent inoculum tissue and is preferred since it is easier to excise from a budstick and has the advantage of not having an eye, thus avoiding growth of the inoculum bud after the wrapping is removed. It is inserted in the same manner as the bud with an eye.
The third type of bud is the chip bud (Figure 127, lower). Chip buds are used when the bark of the receptor host does not slip or open up to accept a bud or blind bud. This bud is cut from the inoculum stem by first making a cut at right angles into the inoculum stem about 1-2 mm deep, and then making a slicing cut toward the initial cut to free the bud. Similar matching cuts are made into the receptor stem, and the two pieces are matched and fitted together and then wrapped. Chip buds may be cut with or without an eye.
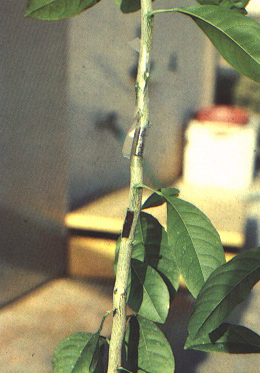
After insertion, the inoculum "buds" are secured to the stem by wrapping with either rubber or plastic tape as shown in Figure 128. The tape should be kept stretched and the bud should be tightly wrapped. If a bud with an eye is used for propagation, avoid covering the eye with the wrapping tape so that the bud can grow. If, however, a bud with an eye is used only for inoculation, the eye should be covered and the bud wrapped completely with the wrapping tape.
Two bud-inoculations are generally sufficient for transmission. After two to three weeks, the wrapping tape is removed by cutting the tape with a knife or razor-blade and the bud is examined to see if it is alive (survival recording). If both grafts are found dead, the same plant should be reinoculated with buds or chip buds, or another test plant inoculated. If only one graft is dead, and there are sufficient replicated test plants, reinoculation is unnecessary.
When cutting tapes for removal, ensure that the knife blade is disinfected by dipping it into a 1 percent sodium hypochlorite solution.
Leaf-piece graft
• A rectangular piece approximately 3-4 mm wide and 2-3
cm long is cut from a young immature leaf as shown in Figure 129.
• The cut piece is inserted into a T-cut in the receptor
stem exactly as is done for buds. The point of a knife is used to
push the leaf into the T-cut as shown in Figure 130. It is
important that the bark separate readily or be
"slipping" to permit easy entry of the leaf piece into
the T-cut. Two leaf-graft inoculations per plant are recommended.
• The inserted leaf piece is then wrapped in the same manner
as with buds shown in Figure 128.
• The wrapping tapes may be cut two or three weeks after
inoculation. The grafts are then examined for survival, and if
both inoculum grafts are dead the plant can be reinoculated (if
the bark is slipping) or a new plant inoculated.
After some time, the leaf piece of a successful graft can be seen
to expand and grow inside the T-cut as illustrated in Figure 131.
Leaf disc graft
• A paper hole-punch is used to cut a disc from the
midrib section of a leaf of the inoculum source, as shown in
Figure 132. The leaf should be moderately mature or mature. Very
young leaves should not be used since it is difficult to punch
out discs and manipulate them, and the punched discs do not match
up well with holes in the receptor leaf. The punched feat discs
are placed on a piece of slightly moistened tissue paper during
the inoculation procedure. A number of inoculum leaf discs may be
cut at one time, and at least five discs are recommended for
inoculation of each plant. The cut leaf discs should be placed on
the moist paper with the top leaf surface facing up.
• A hole is punched in each of five leaves of the index or
receptor test plant using the hole-punch as shown in Figure 132.
Receptor leaves should also be moderately mature or mature, but
not too young.
• A piece of adhesive tape, slightly longer than the width
of the leaf, is placed on the bottom of each of the receptor
leaves and pressed lightly into place.
• The cut discs, resting face upward on the moist tissue
paper, are retrieved with a dissecting needle and carefully
inserted into the hole previously made in the receptor leaf, as
shown in Figure 133. The midribs should be as well aligned as
possible. Similarly, the disc should be carefully matched to the
hole. The adhesive tape at the bottom of the leaf will hold the
leaf disc in place while necessary adjustments are made.
• Another piece of adhesive tape of similar length is then
placed above the leaf and firmly pressed into place. The
completed graft is shown in Figure 134.
• After one to two weeks, a determination can be made for
graft survival. Dead leaf grafts will turn brown, and
reinoculation is necessary if three or more of the five grafts
are dead.
Caution. The brand of adhesive tape selected is extremely important. Some brands are toxic to the leaf. Scotch 600-brand is non-toxic. Whichever local brand is selected, it should be examined for toxicity by making some test grafts on a number of leaves. The tape should not be left in a warm greenhouse but kept refrigerated. Warm temperatures have been shown to induce chemical changes in the tape ingredients and induce toxicity.
Bark graft
• Rectangular pieces of bark are cut from the trunk of
the tree to be tested or indexed. This should be done only during
the months when the bark is readily slipping. The cut bark pieces
are placed in a plastic vial, as illustrated in Figure 135. The
vial should be designed to permit some breathing. The vials
containing the bark samples should be placed in an ice chest
immediately after sampling and later transferred to a
refrigerator at the laboratory. Tests have shown that bark
collected in this manner and refrigerated at +5-6°C remained
viable for as long as one month.
• The bark pieces are removed from the vial, placed on a
moist paper towel and cut into rectangular segments 3-4 mm by
about 20 mm. The cambium face of the bark should always be kept
in contact with the moist tissue paper (Figure 136).
• An "I" cut is made in the stem of the receptor
or index test plant, and the bark is teased open slightly. The
inoculum bark piece is then placed between the flaps of the open
"I" cut and is held in place by the bark flaps (Figure
137, bottom).
• At least two bark grafts are made per index plant, and the
inoculum is then tightly wrapped with rubber or polythene budding
tape in the same manner as for bud grafts (Figure 128 and centre
graft in Figure 137).
• After two to three weeks, the tape is removed by cutting
it free with a disinfected knife or razor-blade, and the inoculum
observed for survival. At this time, the survival or vitality of
the bark tissue can be tested by gently slicing into the graft
tissue just underneath the outer bark using a razor-blade or
knife. Dead or dying tissue will be brown, shrivelled and
sometimes loose; vital tissue will be green, yellow or white.
Side grafting
• Inoculum stem pieces approximately 8-15 cm long are cut
from the test source tree or plant to be indexed and are matched,
diameter for diameter, with the indicator test plant.
• Wedge cuts are sliced on both sides at the end of the stem
piece giving the appearance of a long tapered "V". The
cutting knife should be razor-sharp, and some skill and practice
are needed to make the cuts very flat, smooth and straight.
• A slicing cut is then made into the receptor indicator
plant using a knife or razor-blade. The depth of the cut should
be about the same as the length of the wedge cut on the inoculum
stem piece.
• Using a clipper, the inoculum piece is trimmed to about
3-4 cm long, as seen in Figure 138, and inserted into the stem.
Some slicing and trimming may be necessary but, with practice,
well-fitting grafts can be made repeatedly.
• The joined tissue is tightly wrapped with budding tape. At
least two side grafts per test plant should be done (as
illustrated in Figure 26 in the section on stubborn).
• The bottom end of a polythene bag is cut to convert the
bag into a sleeve. This is then placed over the plant, and
secured at the top and bottom with plant ties (Figure 138, left).
It is important that some leaves be left on the stem near the
graft to provide moisture within the bag. The cut end of the
inoculum stem pieces need not be coated with protective tar.
Research tests with thousands of grafts, with and without
protective tar, indicate no benefit from this practice.
• After 10 days, the bottom of the polythene sleeve is
opened to permit some air into the bag. At 15-20 days, the
polythene sleeve is removed and grafts are examined for survival.
• The plant is then topped or cut back about 25-30 cm above
the soil surface, but above the side grafts, and a single shoot
is permitted to grow (as illustrated in Figure 26 in the section
on stubborn).
Many thousands of side grafts have been made at the Riverside laboratory using this procedure, with a survival rate of over 95 percent. Whenever the graft inoculum died, the reason was found in a deficiency factor in the budwood rather than in human error. Certain mandarin budwood (i.e. Dancy) collected during the spring months gave a high rate of graft failure. However, most tissues of the major citrus cultivars were found to be highly graft-compatible.
A modified side graft can be made by inserting a small twig into a larger receptor stem and using a modified T-bud procedure, thereby reducing the importance of matching diameters of inoculum and receptor host. This is done by cutting the end of the twig at a sharp angle producing a long, elliptical surface area. This is then inserted into a T-cut made in the larger receptor plant.
REFERENCES
Baker, K.F., ed.1957. The UC system for producing healthy container-grown plants. Calif. Agric. Exp. Sta. Extension Service Manual 23. Reprinted1985 by Surrey Beatty and Sons, Chipping Norton, NSW 2170, Australia.
Klotz, L.J., deWolfe, T.A., Roistacher, C.N., Nauer, E.M. & Carpenter, J.B.1960. Heat treatment to destroy fungi in infected seeds and seedlings of Citrus.Plant Dis.Rep.,4(11): 858-861.
Nauer, E.M. & Carson, T.1985. Packaging citrus seed for long-term storage. Citrograph, 70(10): 229-230.
Nauer, E.M., Holmes, R.C. & Boswell, S.B.1980. Close spacing in the greenhouse inhibits lime seedling growth. HortSci.,15 (5): 591 -592. Nauer, E.M., Roistacher, C.N. & Labanauskas, C.K.1967. Effects of mix composition, fertilization, and pH on citrus grown in UC-type potting mixtures under greenhouse conditions. Hilgardia, 38(15): 557-567.
Nauer, E.M., Roistacher, C.N. & Labanauskas, C.K.1968. Growing citrus in modified UC potting mixtures. Calif. Citrogr., 53: 456, 458, 460-461.
Roistacher, C.N.1963. Effect of light on symptom expression of concave gum virus in certain mandarins. Plant Dis. Rep., 47(10): 914-915.
Roistacher, C.N. & Baker, K.F. 1954. Disinfesting action of wood preservatives on plant containers. Phytopathol., 44: 65-69.
Roistacher, C.N. & Nauer, E.M.1985. Effect of supplemental light on citrus seedlings in winter. Citrograph, 70(8): 181 - 182,196.
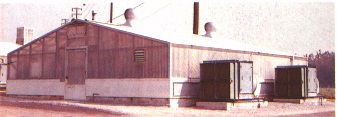
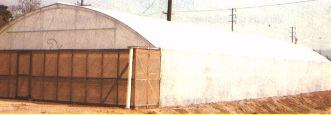
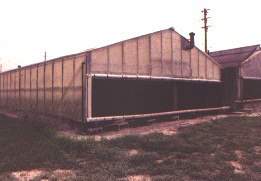
FIGURE.106 Three designs for the layout of plant laboratory greenhouses
a) A six-room design; each room an individual cubicle with a
central walkway
b) A three-room design with a central walkway
c) Three separate small greenhouses with individual temperature
control for cool, moderate and warm temperatures
FIGURE 128 During wrapping, the plastic tape should be kept stretched to secure a tight wrap
FIGURE 136 The bark piece is trimmed on moist tissue paper with the cambium face downward