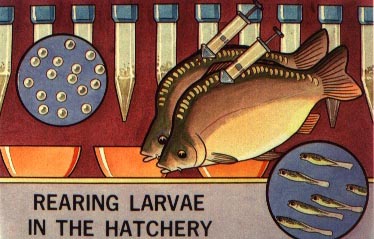
Rearing larvae in the hatchery
90. REARING LARVAE IN THE HATCHERY
The hatching of the carp eggs occurs outside the incubation jars. The larvae are reared in larger jars until they develop into early fry, which feed on exogenous food.
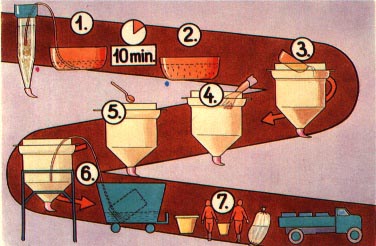
91. This is a summary of the last phase of the rearing in the hatchery building.
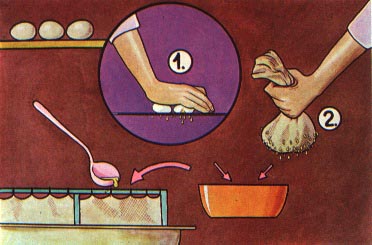
(1) The eggs are transferred from the incubation jars to shallow bowls (2) where hatching takes place. (3) The young larvae are then put in large rearing jars. Larval rearing lasts for 3-4 days, after which (6) the just-feeding fry are removed from the jars and (7) transported to outside ponds.
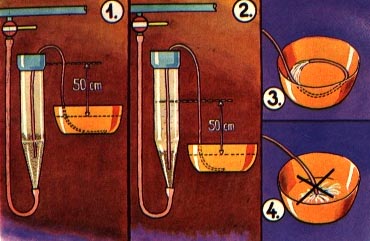
The eggs are slowly siphoned into a plastic bowl, care being taken not to damage them. (1) The head between the water in the jar and the water in the bowl should never exceed 50 cm, keeping the bowl relatively high at first and (2) lowering it gradually as the jar empties. (3) The eggs should be transferred gently directly to the bottom of the bowl (4) to avoid dropping them from any distance.
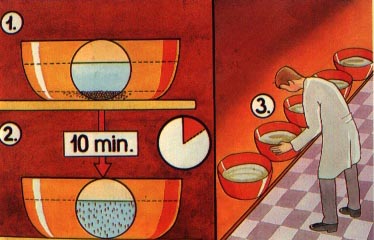
(3) Care should be taken to monitor this process very closely: it is the reduction in the dissolved oxygen content of the standing water which stimulates the embryos to swim free from the eggs, but a too pronounced lack of oxygen may become fatal to them.
Do not wait more than 10 minutes!
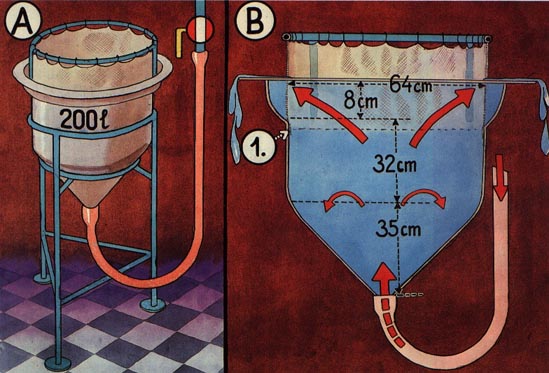
94. Larval rearing takes place in large jars which operate on the same principle as the Zug jars.
(A) In the present case, 200-litre jars standing on an
individual tripod are used.
(B) The water flow (12-15 l/min is vertical, from the lower
funnel part of the jar to the enlarged upper part.
At the top of the jar a light frame supports a filtering
ring of 0. 2mm mesh netting.
(1) The lower part of this netting is glued to the jar wall,
about 10 cm below the water surface.
In practice, this is equivalent to the egg content of 5 incubation jars (7-litre type).
A few litres of water are taken from the rearing jar and added to the bowl containing the newly hatched larvae, which helps to equilibrate any small difference in temperature. There should never be more than a 0.5-1° C difference.
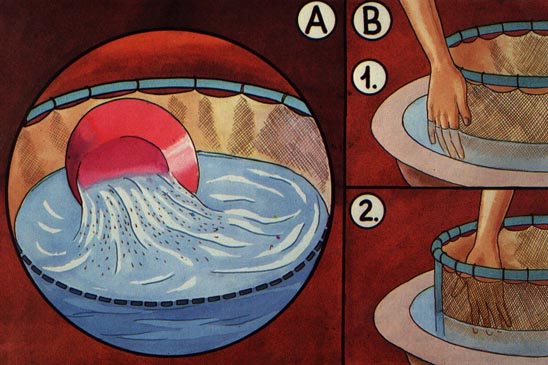
(B) Especially at the beginning of the larval rearing, the
empty egg shells accumulate on the inside surface of the
filtering net, reducing the water outflow. The top
netting ring should therefore be cleaned regularly.
(1) The outside of the netting should be cleaned first, which
will simultaneously release the attached larvae. (2). Only then
should the inside of the netting be cleaned' and pieces of the
egg shells forced through it.
These operations should be repeated as often as necessary.
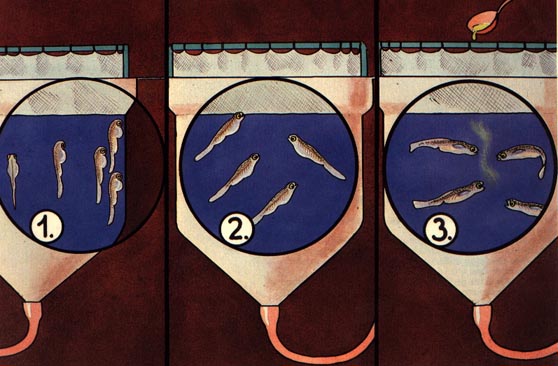
(1) For about 1.5 days the newly hatched larvae attach
themselves vertically along the wall surface.
(2) During the next 1.5 days the freely swimming larvae first
move vertically through the water, up and down, then they
gradually assume a more horizontal position, reaching to the
water surface to fill their air bladder; (3)
once this is filled and functional, the larvae swim horizontally;
they have developed their digestive tract and they are able to
eat exogenous food (3). Rather than "larvae" they are
now called "early fry".
When they have reached this stage, which requires from 60 to 70 degree-days from hatching, the young fish should be transferred to outside ponds as soon as possible.
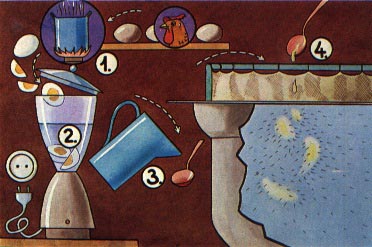
97. (1) The first exogenous food of early fry consists of hardboiled eggs (1).
(2) Three hard-boiled eggs are finely ground and mixed with
0.5 I water, using for example an electric mixer.
(3) Every 2-3 hours, 5-6 tablespoons of this mixture (4) are
poured into each rearing jar for feeding the early fry.
As this kind of food does not contain all the elements required to nourish the young fish adequately, it must not be continued for more than a short time, 1.5 days at most.
It is necessary for the early fry to eat a rich complete food as soon as possible.
(1) A sieve or (2) a cloth bag can be used, for example under water. But in each case it is important that the size of the mesh does not exceed 0.2 mm.
99. The early fry are very delicate and they should never be kept out of water.
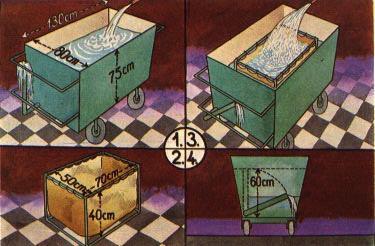
(1) A mobile fibreglass tank is the most convenient means of
transport, similar to that used for the handling of the breeders
inside the hatchery.
(2) A fine-mesh container is placed in the tank.
(3) This container consists of a light metal frame inside which
is hung a fine-mesh (0.2 mm) rectangular bag.
(4) The water of the storage tank is regulated to the desired
level by inclining the mobile external outlet pipe.
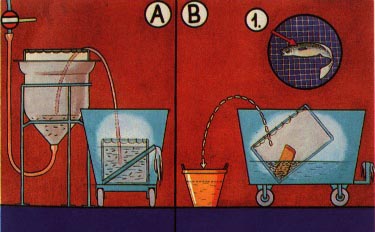
(A) The water flow of the rearing jar is stopped and the early
fry are gently siphoned into a fine-mesh bag placed in the
well-aerated water of a mobile tank.
(B) The water level in this tank is then slowly reduced and the
small fish are transferred with a bowl into a larger container.
(1) The functioning air bladder of the early fry is now clearly
visible.
It is very important not to forget to check that the
water temperature in the various containers should be
similar!
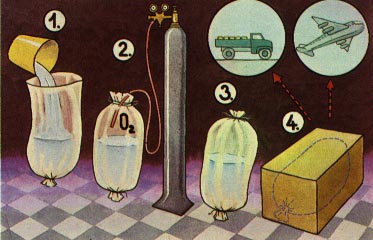
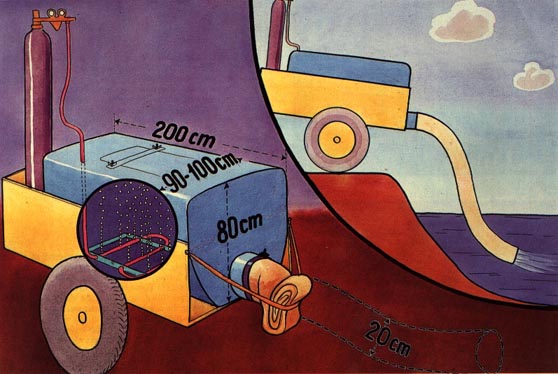
For long-distance journeys, bags of strong plastic (0.3-0.5 mm thick) are preferable. (1) These bags (55-60 cm in diameter and 80-90 cm deep) are filled with 20 litres of clean water, its temperature being the same as that of the water containing the early fry. (2) Put 100 000 early fry into this water and fill the free space above the water surface with oxygen. (3) The bag should then be tightly closed with a piece of string and checked for possible leaks.
For further safety, it is common practice to use two plastic bags placed one inside the order, before pouring the water in.
In such cases, one million early fry per cubic metre of water can be safely transported to the ponds. To avoid injuries, they are either siphoned from the tank directly into the pond water, using for example a 6-8-cm diameter rubber pipe, or they are released through a 20-cm flexible ripe attached to the bottom of the tank.