![]()
This note explains what a kipper is, and how it is made from herring. Advice is given on the care of the raw material, and on the whole commercial process from splitting the fish to storage and distribution of the finished smoked product.
Some information is also given on the preparation and smoking of small quantities of kippers, and sketch designs are shown for small, home-made kilns.
The manufacture of kipper fillets is described, and the storage life of kippers and kipper fillets is given for a range of temperatures.
The word kipper probably derives from the Dutch küppen, meaning to spawn, and was first applied to out-of-season salmon which, because of their emaciated condition and lack of fat, were usually split and smoked to make them more palatable. As early as the fourteenth century there were references to the ‘kipper time’ in connection with the Thames salmon fishery.
Kippered herrings of the kind we are familiar with today were probably first made in the first half of the nineteenth century; John Woodger of Seahouses in Northumberland is reported to have made kippers in the 1840s by rousing split herring in dry salt and then smoking them heavily for several days in a brick kiln.
Heavy salting and smoking were necessary then to prevent spoilage during distribution but improved transport facilities and the advent of refrigeration made these requirements no longer essential; the modern kipper is a lightly brined, lightly smoked product with a much shorter shelf life at room temperature and a mild smoky flavour.
A kipper is a fat herring with guts and gills removed, split down the back from head to tail, lightly brined, dyed if desired, and cold smoked at an air temperature not higher than 30°C.
Boneless kippers are block fillets of fat herring, brined and smoked as for kippers. Kipper fillets are either single fillets of fat herring brined and smoked as for kippers, or single fillets cut from boneless kippers.
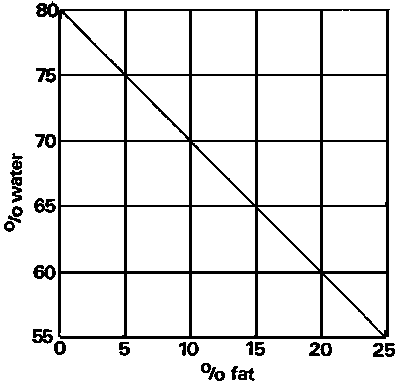
The quality of kippers depends a great deal upon the fat content of the herring from which they are made. The herring spawns once a year, in spring or in autumn, and the amount of fat present in the flesh varies throughout the annual reproductive cycle. There is usually a long period of starvation after spawning, followed by a time of intensive feeding while the milts and roes are developing. The feeding rate sometimes falls again just before the roes mature and the fish spawns. When the herring is feeding, fat is deposited in the brown layer just beneath the skin, and when it is starving these reserves of body fat are drawn upon. Thus for a typical autumn spawner the fat content may be as low as 2 per cent after a long period of starvation, then rise to as high as 20 per cent or more in a month or two when the fish is feeding; as the feeding rate falls again, the fat content may fall to 15 per cent by the time the fish spawns, and then continue to fall during the post-spawning period back to about 2 per cent when the cycle starts again. Spawned, starved herring with low fat content are known as spents.
The annual reproductive cycle of the herring can also affect its suitability for kippering in other ways. Herring approaching maturity and feeding actively often have very soft flesh and thin skin; they are therefore easily damaged during processing. Digestive juices are very active during feeding, and these can quickly perforate the belly wall of the dead fish after capture, making it unsuitable for kippering. The belly walls of newly spawned herring are often black and unsightly.
The water content of herring increases as the fat content falls; therefore lean herring do not make the best kippers. If they are smoked long enough to give the desired flavour, the texture becomes unacceptably dry.
Fat content can be used as a rough guide when selecting herring for kippering; fish with more than about 7-8 per cent fat are usually suitable. Since the weight of fat plus water remains constant, a rough measurement of weight loss on drying can be used as a simple quality control procedure.
Fig. 1. Fat content of herring.
Fatty fish like herring spoil very rapidly; therefore they must be chilled quickly immediately after capture, and kept chilled until they are processed. Since herring are usually caught in great numbers in a very short space of lime, gutting at sea is generally impracticable; rapid chilling and protection from damage are therefore even more important.
Herring should be stowed at sea in thin layers to prevent crushing, preferably in shallow boxes to avoid rehandling during landing. There should be a layer of ice in the bottom of the box, a sprinkling of ice among the fish and another layer of ice on top. Top icing only is not good enough. About 1 kg of ice is required to reduce the temperature of 6 kg of warm summer herring from 15°C to 0°C, plus extra ice to compensate for warm air and warm structure in the fishroom, and to keep the fish cold all the way to the factory. Re-icing may be necessary at the quayside if most of the top layer of ice has already melted before landing. Well iced herring should be kippered within 24 hours of catching to give a first class product, but acceptable products can sometimes be made from herring kept well iced for 3-4 days.
Herring for kippering, or for freezing prior to kippering, can also be stowed at sea in refrigerated sea water (rsw) at 0 to - 1°C, although the method is not at present used commercially in the UK. Brining times before kippering have to be shortened slightly when rsw herring are used, to allow for the salt taken up during storage. Herring in rsw are generally still acceptable for kippering after 4-5 days’ storage, and for freezing after 1 day, provided there has been no delay between catching and immersion in the refrigerated sea water. Feedy summer herring are particularly susceptible to delays before chilling and freezing; they develop burst bellies which make the fish unsuitable for kippering. Bulk stowage of herring is not recommended; the large mass of fish is generally inadequately iced, and spoilage is extremely rapid, particularly when the herring are fat and feeding heavily. Kippers made from herring kept in this way for only a few hours will include a high proportion of seconds and rejects.
Overland transport of iced herring from quayside to factory should be in insulated vehicles; all too often herring become warm and spoilt when what little ice there is disappears during a long cross-country journey on an open lorry.
Most large smoking plants require to operate all the year round for economic reasons, but British-caught herring with the desired fat content are not available throughout the year. On the other hand, there are sometimes surpluses of good, fat herring that the factories cannot cope with. Whole herring can be frozen in time of plenty to provide the smokers with good raw material throughout the year.
Herring for freezing should be properly iced at sea or stored in rsw and frozen within 24 hours of catching. The freezing can be done either in trays in an air blast freezer, or in a vertical plate freezer producing large blocks about 50 mm thick and about 25 kg in weight. The frozen herring should be glazed or closely wrapped and sealed in stout polyethylene film to reduce dehydration and rancidity in cold storage, and kept at -30°C for no more than 8 months.
Great care must be taken when freezing herring for kippering to avoid physical damage. Tails are particularly prone to damage once the fish are frozen; fish so damaged are impossible to handle in splitting machines that depend on gripping by the tail. When using a vertical plate freezer, damage to tails and skins can be largely avoided by freezing the herring in a polyethylene sack containing water.
It is also possible to freeze herring after they have been split, but they store less well, since fish with a large cut surface go rancid rather more quickly than whole fish. Furthermore, there is unlikely to be spare splitting machine capacity available at the times when surpluses need to be frozen.
Blocks of herring can be thawed satisfactorily in a number of ways, for example in still or moving warm air, in warm water or by electrical heating methods. An outline of each of these methods is given in Advisory Note 25.
Fat herring have a rather soft texture and can easily be damaged during splitting. If thawing is closely controlled so that a little ice still remains along the backbone when the fish are removed from the thawer, tearing of the flesh during the cutting and cleaning operations in the splitting machine is much reduced.
Washing
All herring, whether chilled or thawed after cold storage, should first be washed to remove loose scales and other debris. Small quantities can be washed by hand, by swilling the fish in open-mesh baskets in baths of clean water, but several machines are available for dealing with herring in bulk. Most types comprise a revolving drum which is either partially immersed in water or fitted with sprays. Where mesh-belt elevators are used to carry the herring to the splitting machines, the fish can be washed quite effectively by fitting sprays at intervals above the belt.
Splitting
Herring may be split by hand or by machine, but in all commercial operations of any size, splitting is now done by machine. There is a variety of makes on the market and, with proper maintenance, they present no serious problems. The herring is usually pulled by the tail through a succession of cutting and cleaning operations, in which the guts and gills are removed, the fish is split along the back from tail to head, opened flat and cleaned along the backbone. Most splitting machines are loaded by hand and, where a proportion of the herring have broken tails, care must be taken to make sure the mechanism properly grips the fish.
For hand splitting, the herring is laid on the filleting bench with the back of the fish facing the filleter. The blade of a small kippering knife is inserted at the centre of the back of the head and a cut made through the skull to the mouth. The knife is again inserted at the same entry point and a second deep cut is made down to the tail, keeping the blade of the knife close enough to the backbone to leave just a thin layer of flesh over it. The herring is then opened so that the backbone is on the left side of the kipper, gills and guts are removed, and the backbone trimmed where necessary with the knife. The split herring is then washed before brining.
Brining
The brining time for kippers depends mainly upon the size of the fish and the fat content; the salt content of the finished product should be between 1-8 and 2-5 per cent to suit the average palate. The split herring may be immersed in a brine bath in batches, or they may be moved through the bath on a conveyer. Brine strength in baths for batch operation is usually kept at 80° brineometer, whereas in continuous briners it is possible to maintain a strength of about 98°, thus reducing considerably the residence time.
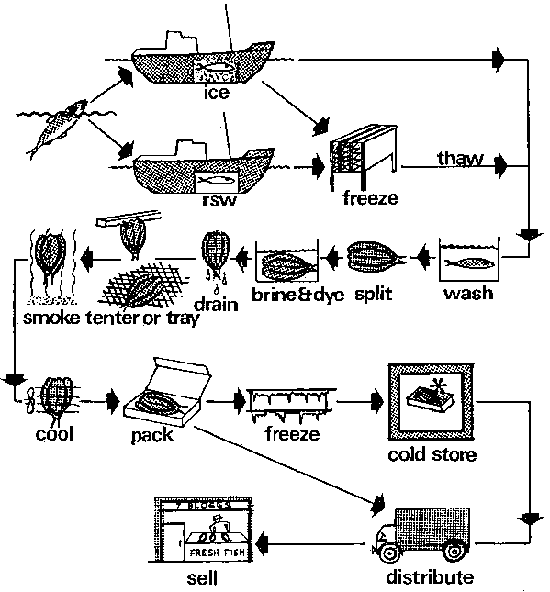
Fig. 2. Process diagram for kippers.
Medium-sized fat Scottish herring brined in batches require about 15 minutes in 80° brine to give the kipper an acceptable salt content, whereas very large herring, from Iceland for example, may take 20-30 minutes and a small, lean winter herring may take only 10 minutes. A herring that takes 15 minutes in an 80° brine bath requires only about 6 minutes in a continuous briner where the split fish are in a single layer and the brine is almost saturated.
The disadvantages of batch brining are the difficulty of achieving uniform salt uptake throughout the mass of fish, the variation in brine strength as salt is absorbed by the fish, and the increasing contamination of the brine with scales and debris until it is changed. The larger the bath, the less frequently the operator is willing to change the brine; it is therefore very difficult to maintain the correct brine strength and to keep the brine clean. Brine strength is controlled by taking a sample from the bath, checking it with a brineometer, and then stirring in additional salt in the bath to bring it back up to strength. This check should be made at least four times a day.
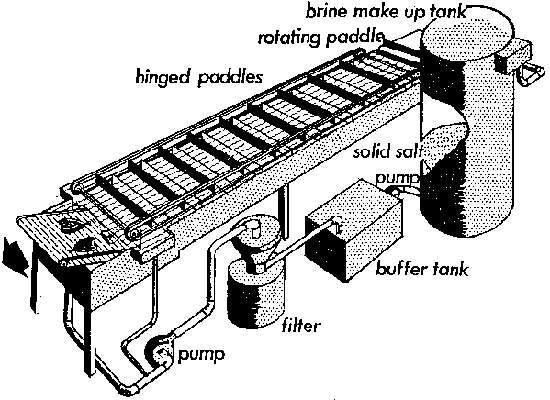
In large kippering plants, a continuous briner is a practicable proposition which eliminates most of the problems encountered with batch briners. In a continuous briner the split fish are moved in a single layer through the brine by paddles on an endless chain, the speed of which can be adjusted to give the required residence time. The brine is continuously recirculated through a vibrating sieve to remove debris, and then passed through a bed of solid salt to maintain the strength close to saturation point. Dimensions of the bath can be made to suit the output and the physical space available.
Fig. 3. Continuous briner.
Colouring
There is a small demand for undyed kippers, but these are rather pale in colour after smoking. Most consumers prefer a rich mahogany colour which cannot be achieved by smoking without losing a lot of weight and producing an overdried product, so that most kippers for the British market are dyed in the brine bath.
The dyes used are mostly water-soluble coal tar derivatives, which the processor buys in powder form; a dye is dissolved in water and added to the brine bath until the dipped fish are judged by eye to be of the required colour. The dye mixture used almost universally at present for home kipper production is known as brown FK, but mixtures of other permitted dyes are available that give the desired colour. It would be possible to control the concentration of dye to a specific level in the finished product, at least with continuous briners, by metering the amount of dye added to the bath.
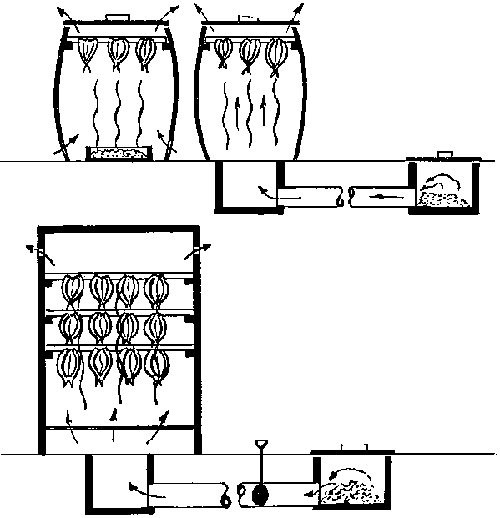
Tentering
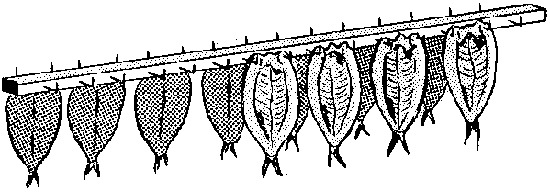
This is a laborious, time-consuming step in the process. The tenter stick is a strip of wood, typically 1 -2 m long by 40 mm by 30 mm, fitted with a row of right-angled sharp hooks along each side. Each split fish is hung tail down on a pair of hooks so that it remains open when exposed to the smoke in the kiln. The tentered fish are left to drip for about an hour before they are loaded into the kiln.
Fig. 4. Split herring on tenter stick.
Tentering has a number of disadvantages. Apart from the labour involved in tentering the fish, the tenter hooks make unsightly holes in the kipper, the sticks inevitably become rather dirty since the hooks make them very difficult to clean, and some of the dirt is transferred to the product. Tenters are used in all types of kiln but, for use in the mechanical kiln, wire-mesh trays are a more attractive alternative.
Trays instead of tenters
Plastic-coated or stainless steel wire-mesh trays have been in use for some years for the smoking of boneless kippers and kipper fillets but have not, until recently, been used for making kippers. The main difficulty has been that when the split herring are left to drip on trays, a small pool of brine remains in the belly cavity of the fish; this leaves either a wet patch on the kipper after smoking or, if the pool dries up, a white patch of salt which spoils the appearance of the product. It is possible, however, to overcome this problem by draining the split fish before they are laid on the trays by tumbling the fish through a rotating perforated drum to remove the excess brine.
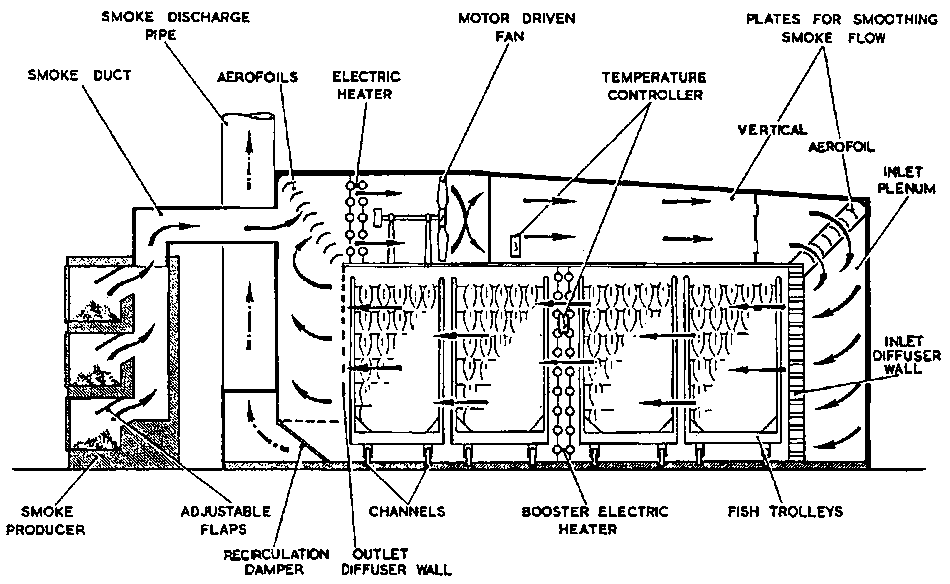
Smoking
When split herring are hung in a stream of smoke, two things happen: chemical constituents of woodsmoke are deposited which give the kipper its characteristic flavour and also act as a very mild preservative, and some of the moisture in the fish is lost by drying, thus making the texture firmer. Hardwood chips and sawdust are burned to produce the smoke.
Brined, dyed, fat herring take four hours in a mechanical kiln with all fires lighted to yield well cured kippers, and during this time should lose on average about 14 per cent of their brined, drained weight. The temperature of the kiln should not rise above 30°C. A weight loss of about 10 per cent during smoking is necessary to obtain the typical texture of a kipper when using lean herring, whereas a weight loss of up to 20 per cent can be tolerated when kippering very fatty herring without the product tasting too dry. Thus, although it is reasonably straightforward to make kippers of uniformly good quality in a mechanical kiln, the operator must have some knowledge of the raw material in order to obtain the right amount of drying and at the same time produce the desired smoky flavour. In large installations it is worth while making regular checks on weight loss by first weighing the empty trolleys complete with tenters or trays, weighing the same trolleys when loaded with fish after dripping and, finally, weighing again after smoking. The trolleys can also be weighed at the half-time turnround as a process check during smoking. Weight loss can be checked on a smaller scale by weighing individual tenters or trays.
Full details of the design and operation of mechanical smoking kilns are given in the publication ‘Fish Smoking: A Torry Kiln Operator’s Handbook’ by G. H. O. Burgess and A. McK. Bannerman, published by Her Majesty’s Stationery Office, 1963.
The smoking of kippers in a traditional chimney kiln is a slower and less easily controlled process; it is impossible to give precise smoking times because so much depends on outside weather conditions and on the ability of the smoker to control his fires, re-arrange the tenters during smoking and strip the kiln on completion. Even the most experienced smoker has difficulty in turning out uniformly smoked and dried kippers, both within a batch and from one kiln loading to another. Typical smoking times range from 6-12 hours.
Mechanical kilns based on the original Torry design are now available in a range of sizes from several British manufacturers, and large traditional kilns are rarely built nowadays. However, there are occasionally requests for advice from individuals who want to construct a very small kiln as cheaply as possible in order to smoke a few kippers for their own use. The performance of small, homemade kilns is unpredictable, and the user has to experiment to determine the best working conditions. Some simple sketches of possible designs are shown in figure 6; there is no room in this short note to give details of construction, but the sketches may serve as a starting point for those who wish to try their hand.
Fig. 5. Diagram of a Torry mechanical kiln.
Fig. 6. Sketches of simple home-made kilns.
Cooling
Warm kippers straight out of the kiln will rapidly turn flabby and sour if packed right away and, in summer, may turn mouldy. The full trolleys can be left to cool at ordinary air temperature, preferably well away from wet areas where the air is likely to be very humid. Where the kilns are supplying a packing line in a large installation, an air blast chilling tunnel operating at 0°C is essential for cooling the full trolleys rapidly before the trays or tenters are emptied. Chilling after smoking is strongly recommended for kippers that are to be distributed in consumer packs for sale from chilled retail cabinets.
Packing
The traditional container for kippers is the ½-stone or 1-stone wooden box, with the kippers in pairs face to face, either loose or wrapped in film and heat sealed or closed with a label. The wooden box is rapidly being replaced by coated fibreboard boxes which can carry attractive advertising material for display in the retail shop. Kippers are also distributed chilled in individual consumer “packs for sale in self-service shops, either over-wrapped in film and heat sealed or in vacuum pouches. The shelf life of kippers distributed chilled is not significantly extended by any kind of packaging. A considerable proportion of kipper production is distributed frozen or kept in bulk in cold store by the processor for breaking down later into smaller packs. Packing for freezing and cold storage is discussed in the next section.
Kippers can be frozen satisfactorily for long term storage; in practice quick freezing means that the time to pass through the temperature range 0 to -5°C should not be more than a few hours, and the fish is retained in the freezer until the warmest part is reduced to -20°C. Kippers should be frozen as soon as they have been cooled after removal from the kiln; stale kippers should never be frozen.
It is extremely difficult to freeze kippers properly when packed in thick wooden boxes, even when spaced out in an air blast operating at - 35°C; when boxes are stacked in a cold store to ‘freeze’, the centre of the stack may take days to come down to temperature, and the method cannot be recommended.
Kippers in waxed cartons less than 50 mm thick are normally frozen in horizontal plate freezers; kippers in cartons thicker than 50 mm are usually handled in an air blast freezer. Care must be taken to space the cartons so that cold air can flow past the upper and lower surface of each pack; when the stack is a solid one, most of the cold air bypasses the product altogether, and freezing rate is poor.
For cold storage in bulk, kippers can be frozen into blocks by packing them in metal trays with a waxed paper or polyethylene liner, and then freezing them between plates or in an air blast; each layer should consist of single fish, not pairs, with adjacent fish slightly overlapping to make a cohesive frozen block that can be handled without falling apart. The blocks are packed in an outer fibreboard carton for storage. Blocks of this kind have a longer storage life when they are vacuum packed in pouches that are a good barrier to oxygen, since the kippers go rancid less quickly.
Kippers can be frozen in consumer packs, most commonly in pairs in a boil-in-the-bag vacuum pouch, in either air blast or plate freezers.
Guidance on the quick freezing offish is given in more detail in Advisory Note 27.
Kippers keep less well in cold store than whole herring, and herring keep less well than white fish; therefore frozen stock should preferably be in the form of whole herring rather than kippers. Kippers spoil in cold storage mainly because the fat becomes unpleasantly altered, and disagreeable flavours and odours develop; the changes are accelerated by the presence of salt. The lower the storage temperature, the longer kippers can be kept in first class condition; a temperature of -30°C is recommended. Vacuum packaging can further increase the frozen shelf life by keeping out oxygen. Typical storage times for chilled and frozen kippers are given in the table below. More detailed advice on the cold storage of frozen fish is given in Advisory Note 28.
|
Storage life of kippers |
||
|
storage temperature °C |
|
keep in first class condition |
|
15 |
|
2-3 days |
|
0 |
|
4-6 days |
|
-10 |
|
3 weeks |
|
-20 |
|
2 months |
|
-30 |
|
4-5 months |
|
-30 |
vacuum packed |
1 year or more |
Most of what has been said about kippers applies equally to kipper fillets. This section describes only those parts of the process that are different.
Kipper fillets are prepared either by cutting block fillets, smoking them and then cutting single fillets from them, or by cutting single fillets from the raw herring and smoking them.
Block fillets are taken by making a transverse cut across the back of the head of the herring, and then cutting down towards the belly wall and in towards the backbone, continuing the cut to the tail so that the flesh on one side of the fish is separated from the bone. Care must be taken not to penetrate the belly wall. The cut is repeated on the other side of the fish, so that the double fillet, joined by the skin and back fins, can be removed from the head and skeleton in one piece. The tail fin is left on if the block fillets are to be tentered. Machines are available commercially for taking either block fillets or single fillets from herring for kippering.
Fillets from medium sized fat herring require 3-4 minutes immersion in 80° brine, whereas large fillets may require 6-8 minutes. As with kippers, brining times are shorter for lean herring than for fat ones. The brining time for fillets in an almost saturated brine in a continuous briner is 1½ minutes.
Kipper fillets are smoked for 2½-3 hours in a mechanical kiln, depending on size, and should lose 10-12 per cent of their brined weight. The temperature in the kiln should not rise above 30°C. Kipper fillets may take 4-8 hours in a traditional chimney kiln.
Kipper fillets for canning can be prepared in the following way. Block fillets are cut from good quality herring, brined for 3 minutes in 80° brine without dye and hung on tenters to drain for 1 hour. They are smoked in a mechanical kiln for 2½ hours at 30°C, and then for 1 hour at 50°C. When the block fillets are cool, single fillets are cut off, packed in 200 g oval cans and covered with vegetable oil. The lids are clinched on, and the cans are evacuated, seamed and heat processed at 115°C for 1 hour. The cans are then cooled, washed, labelled and stored. The period of hot smoking helps to remove moisture that would otherwise be released during processing in the can, and results in a canned product of the desired golden brown colour. Less smoke is added when kippering for canning, by lighting only half the usual number of fires, but drying is still important to give the right texture; weight loss during smoking should be about 20 per cent.
Handling fresh kippers and kipper fillets
Have a look at some of the kippers as soon as they are delivered. These are some of the points to look for before putting them in the chillroom:
an attractive gloss with some oil showing on the undamaged cut surfaceKeep kippers chilled: they should be cooled to 0ºC before despatch, and kept at this temperature throughout the distribution chain, preferably in insulated vehicles. Run the chillroom at 0·5 to 2·0°C if both wet and smoked fish are being kept; the temperature can be lower, 0 to -1°C, if only smoked fish is kept. Spread the boxes out in the chill; they will cool more quickly.
no black smuts
no sliminess or green discoloration of the belly walls
a pleasant smoky smell, free from any off odours
flesh that is firm and springy to the touch
dark reddish brown colour for dyed kippers, golden brown for undyed ones
no sign of mould.
Don’t keep kippers more than 3-4 days; they won’t keep in first class condition, even at chill temperature, after this time.
Order fresh stock at least twice a week, and don’t order too much.
Don’t put out large displays; keep most of the stock in the chill, sell from the display and replenish from stock at frequent intervals.
Refrigerate the display; if the cabinet or slab is not refrigerated, put the kippers on trays on a bed of ice, but don’t put ice on the fish.
Wrapped kippers don’t keep any longer than unwrapped ones; keep them no more than 3-4 days and watch for signs of mould.
Never try to sell kippers of doubtful quality; try eating some; they should be slightly salty, pleasantly smoky, and free from any rancid or bitter flavours. When in doubt, throw them out!
Don’t attempt to freeze unsold kippers; they can be properly frozen only when they are newly made; freezing isn’t a salvage operation.
Handling frozen kipper products
Don’t keep them for ever; frozen kippers will keep in cold storage at - 30°C for 4-5 months in first class condition, but in a shop frozen food cabinet running at about -20°C the shelf life is 1-2 months. Try to turn the stock over at least once a month. Examine kippers frequently for signs of surface drying.
Frozen kippers may be allowed to thaw during distribution, or at the shop, but when they are thawed, treat them as fresh; thawed kippers won’t keep any longer than chilled ones.
Never attempt to refreeze thawed kippers.
Don’t try to freeze on the cheap; newly made kippers should be frozen in a plant that is designed for the job. Badly frozen kippers can damage the trade.
Keep the freezer cabinet in working order; have it maintained regularly, don’t overfill it, and make sure it’s never switched off.
Further advice on the display of fish in retail shops is given
in Advisory Note 12, and more detailed advice on the retailing of smoked fish is
given in Advisory Note 14.
![]()