![]()
![]()
![]()
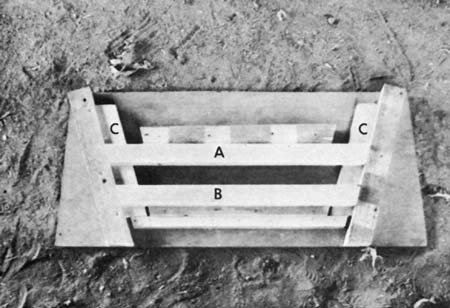
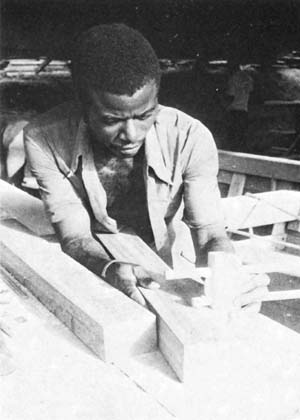
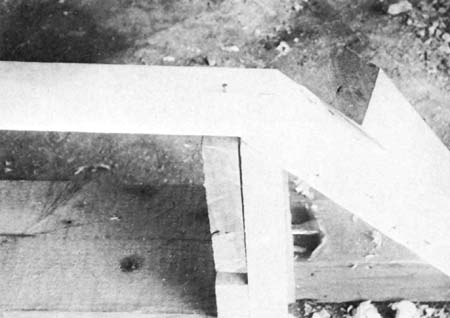
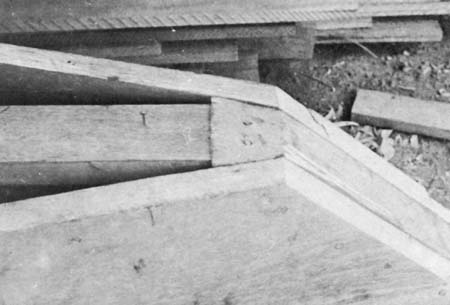
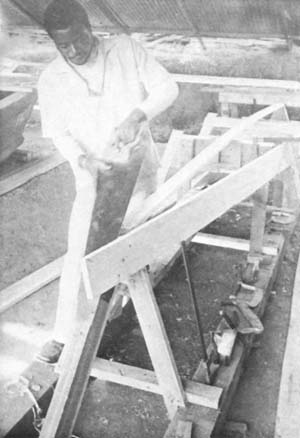
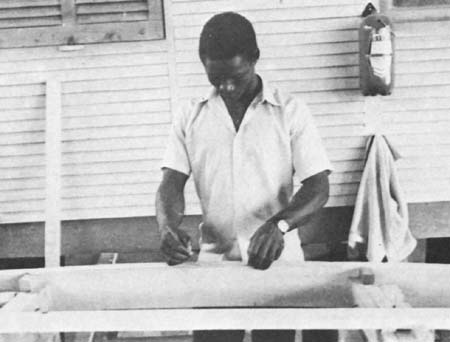
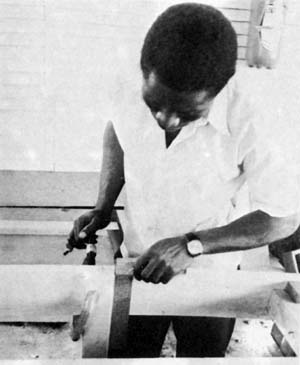
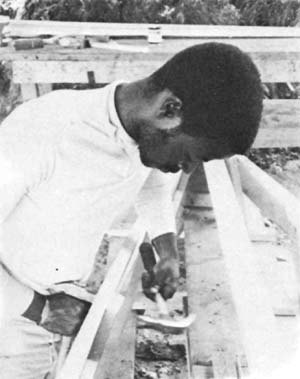
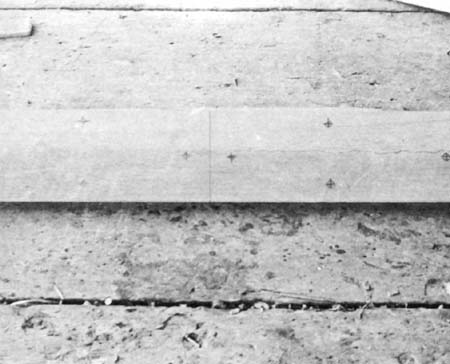
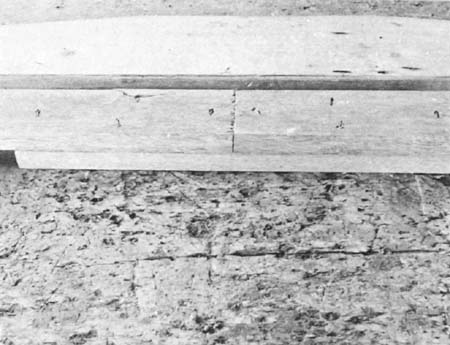
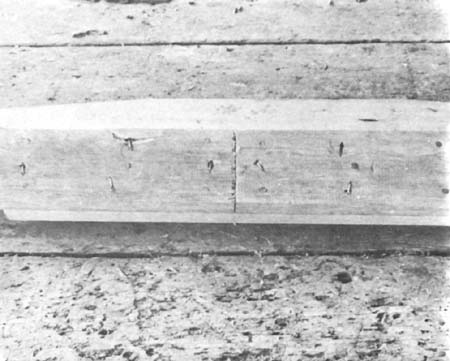
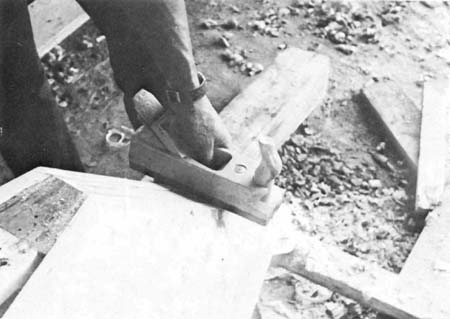
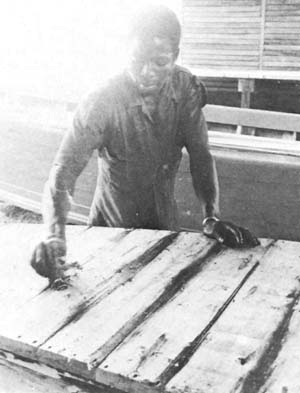
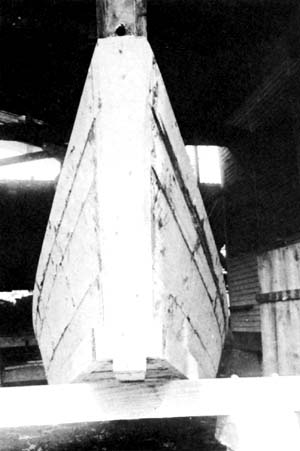
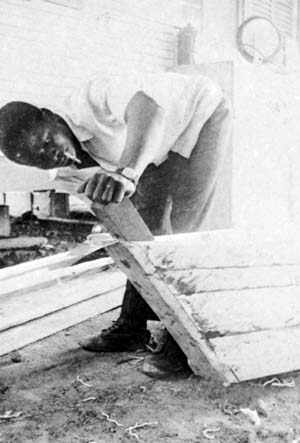
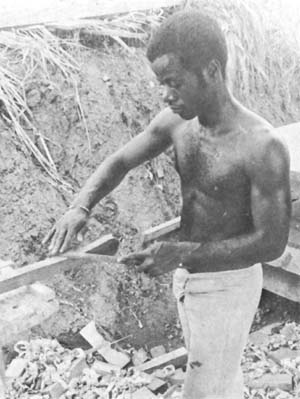
Fig.68 Dans du contreplaqué marin ou extérieur de 5 mm on découpera les gabarits A, B, C, selon le dessin “membrures”. Ceux-ci serviront à tracer les bois des membrures. A une extrémité d'un gabarit de traverse A ou B on percera des trous de 5 mm selon le dessin “trous de vis”, ce qui servira à marquer le perçage des vis.
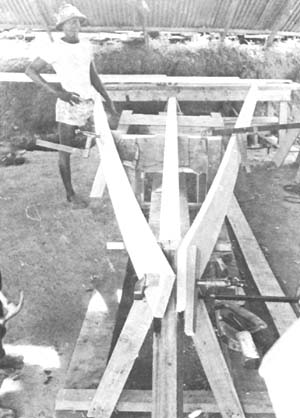
Sur un contreplaqué extérieur de 60 × 124 cm épaisseur 10 mm on tracera la membrure selon le dessin “membrures” en commençant par l'axe central.
On préparera les bois H, E, D, F du dessin “gabarit de membrures” qu'on clouera au contreplaqué selon ce même dessin.
Après que les bois auront étés pointés au contreplaqué du côté tracé, on devra retourner le contreplaqué pour y traverser des clous dans les bois.
Fig.68 A piece of ¼" marine or exterior plywood is used to cut out the patterns A, B, C according to the design “Frames”. These are used to trace the frame parts. At the end of the patterns A or B drill 3/16" holes according to the design “Frame screws”. This will be used to mark the exact place of the screw holes.
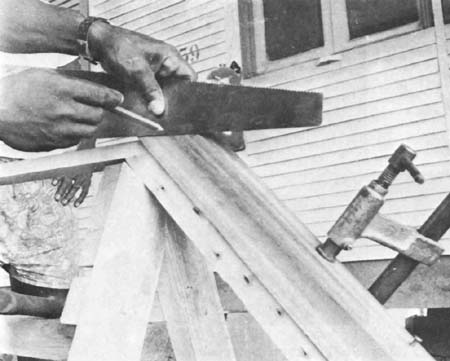
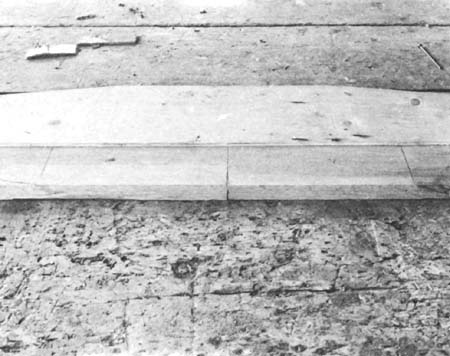
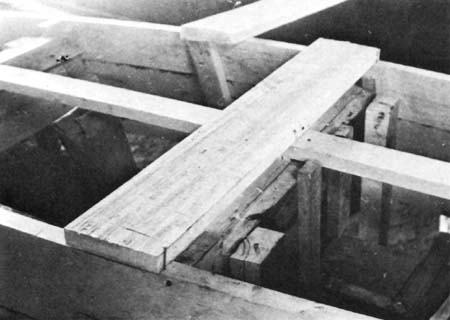
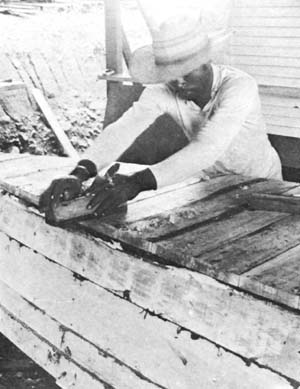
On a piece of ⅜ or ½" marine or exterior plywood 24" × 48", trace the frame starting with the axis line.
Parts H, E, D, F of drawing “Frame pattern” should be nailed to the plywood according to the same drawing. After they have been tacked on the drawn side of the pattern, turn round and nail parts H, E, D, F from the other side of the plywood to ensure solid fastening.
MEMBRURES
FRAMES

r. lefebvre fao
GABARIT DE MEMBRURES
FRAMES PATTERN
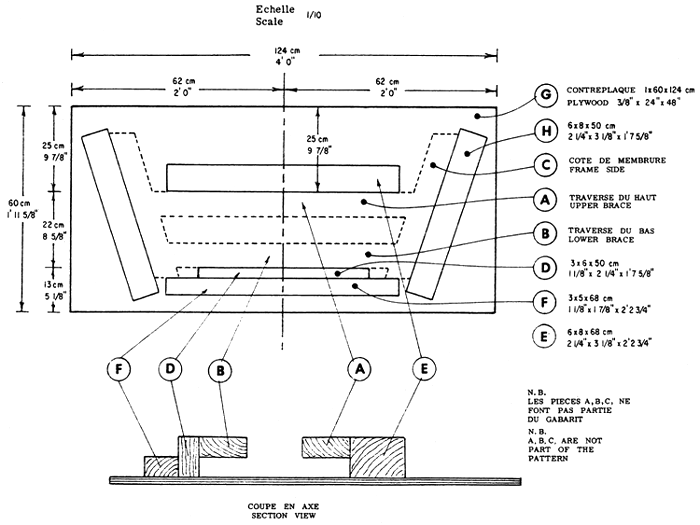
r. lefebvre fao
GABARIT DE MEMBRURES
FRAME PATTERN

 |  | |
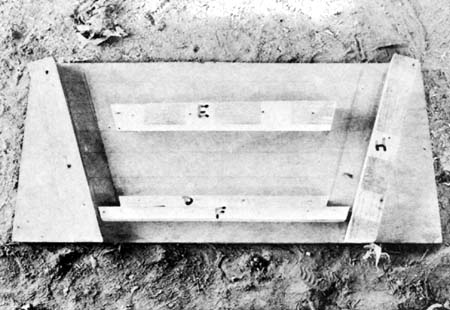
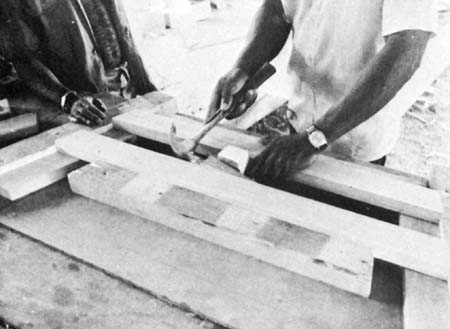
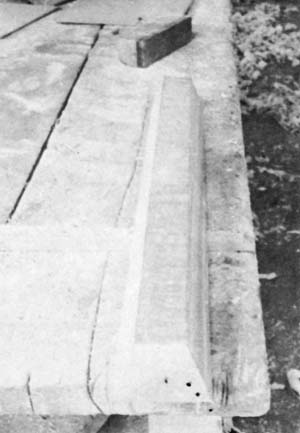
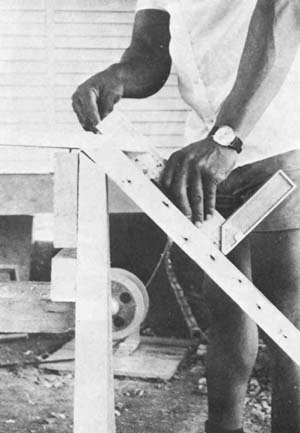
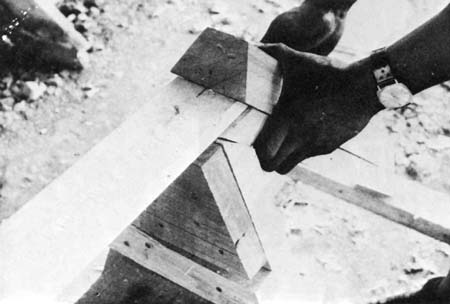
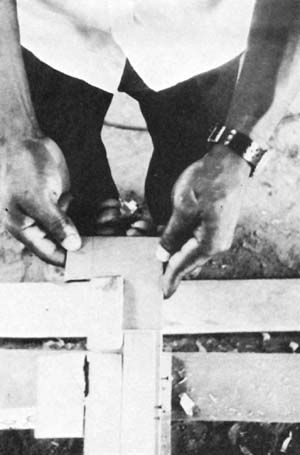
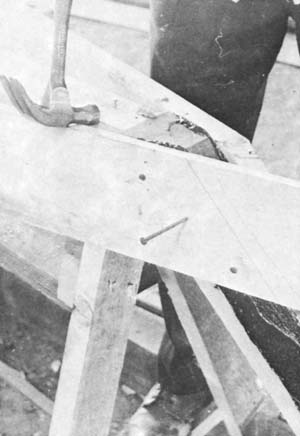
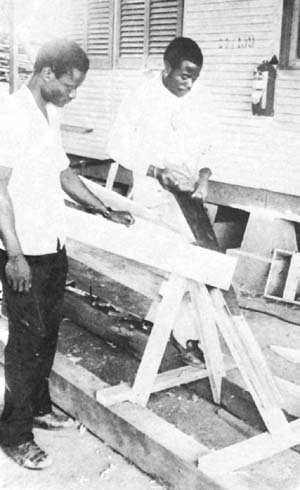
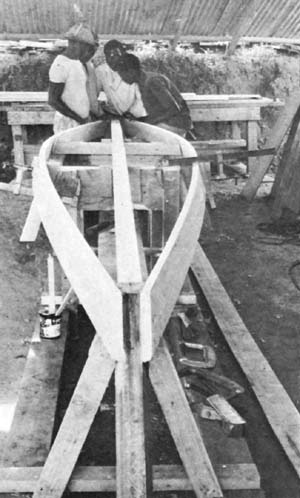
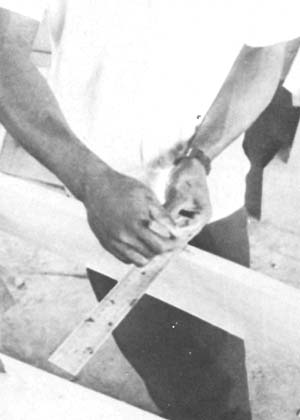
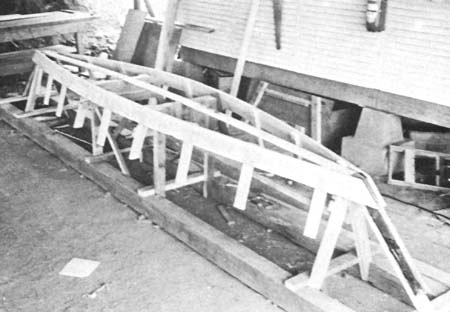
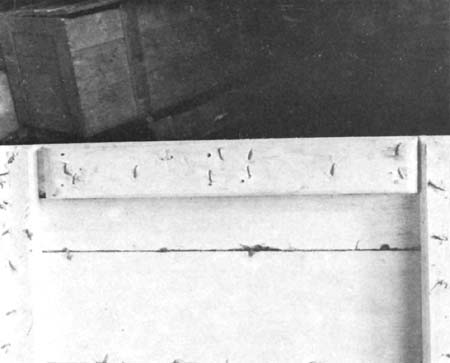
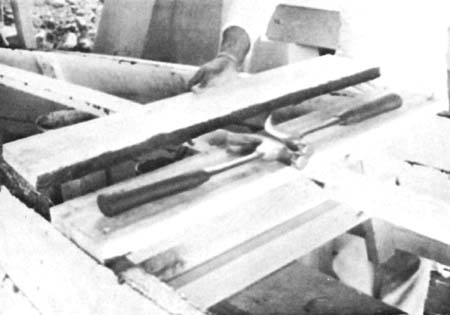
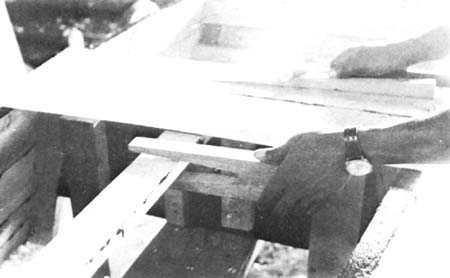
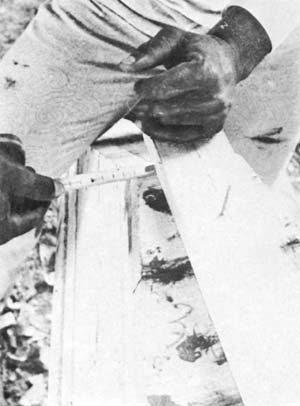
| Fig.69 Tracer quatre côtés, C deux traverses du haut A et deux traverses du bas B avec les gabarits de traçage | Fig.70 | |
| Fig.69 Trace four sides, two upper braces and two lower braces using the tracing patterns |
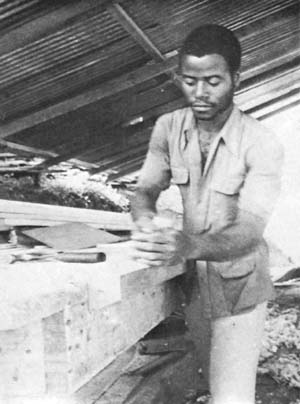
 |  |
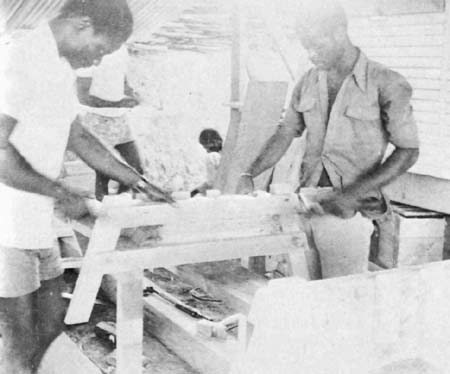
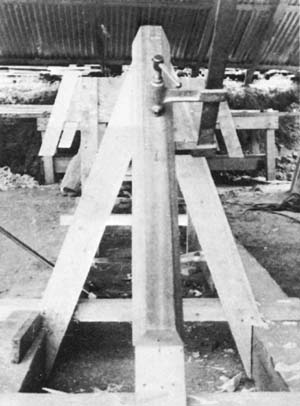
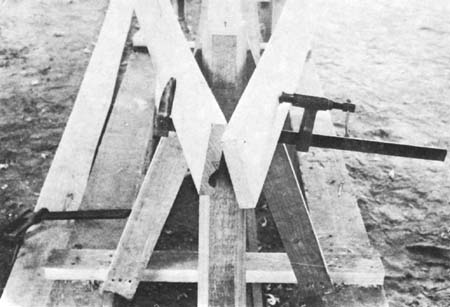
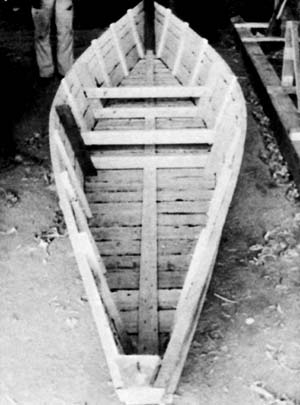
| Fig.71 Assembler les parties de membrure dans le gabarit | |
| Fig.71 Place frame parts in the pattern | |
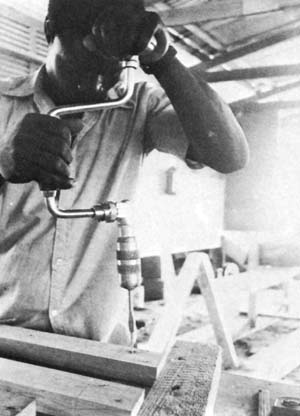
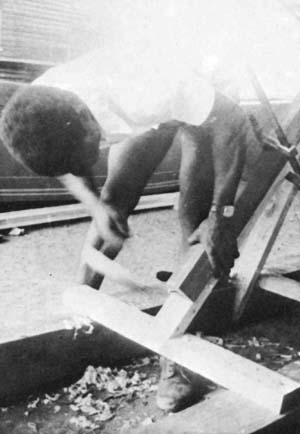
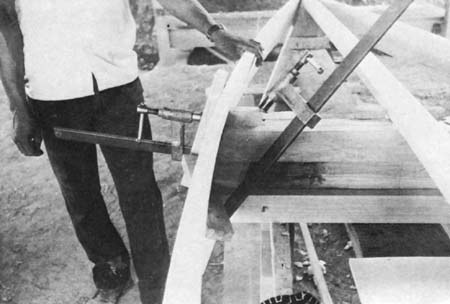
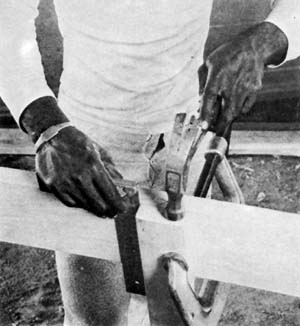
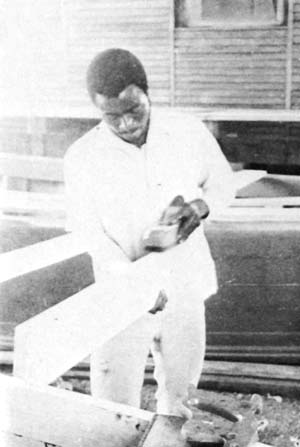
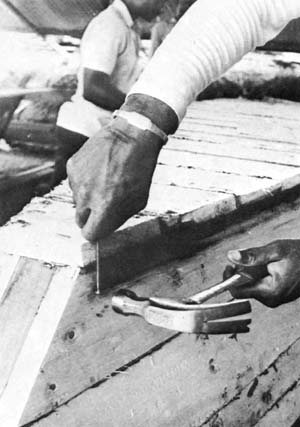
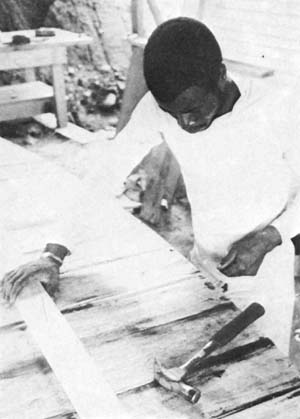
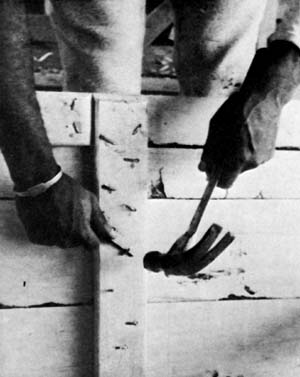
 | Fig.73 Percer les trous de 4 cm de profondeur avec un foret de 4 mm ou avec un clou dont la pointe a été aplatie à cette largeur. Laisser le foret dépasser de 4 cm du vilebrequin Fig.73 Drill 5 ½" holes 1½" deep either with a regular bit or a nail flattened to proper width. Let the bit protrude 1½" from the drill |
 | |
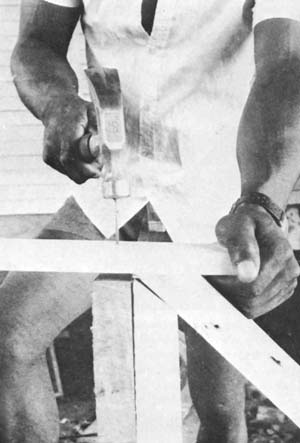
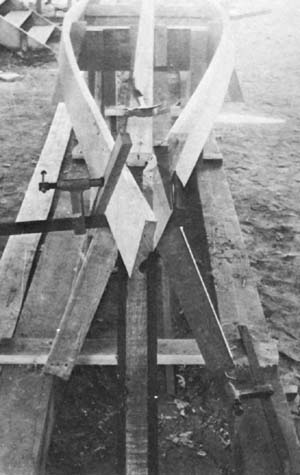
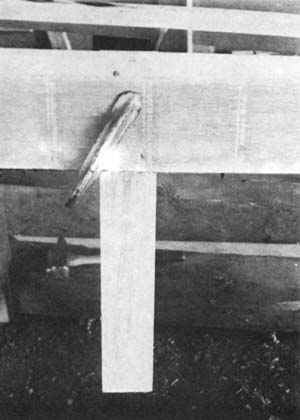
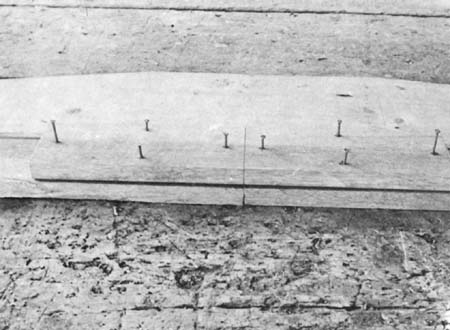
| Fig.72 Coincer les deux traverses par un bloc et un coin. Taper doucement sur les bouts de côtés de membrures pour s'assurer qu'ils buttent contre le gabarit. Avec le gabarit troué de traverses marquer les trous de vis sur chaque traverse Fig.72 Tighten the two braces with a block and wedge. Tap lightly on upper ends of frame sides to ensure that bottom edges touch pattern blocks. Mark screw holes on both braces with pattern | |
| Fig.74 Avec une fraise ou un gros foret, fraiser ces trous pour y recevoir la tête de vis Fig. 74 With a countersink bit or large drilling bit enlarge the holes to lodge the screw heads |
 |  | |
| Fig.75 Frotter le filetage des vis avec du savon pour faciliter le vissage | ||
| Fig.75 Rub screw threads with soap for easy screwing | ||
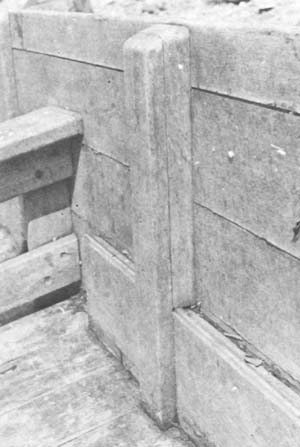
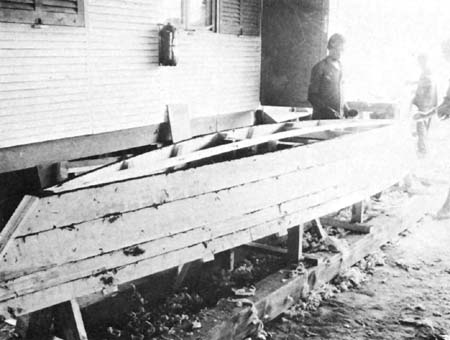
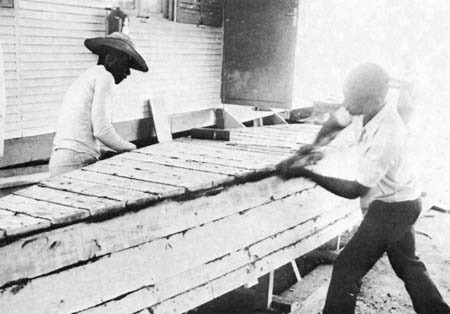
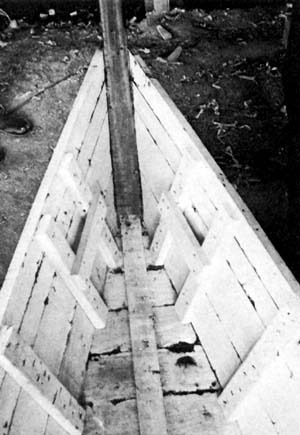
 | Fig.77 Installer les membrures à cheval sur les planches de montants de façon à ce que les traverses touchent la face des planches
et que les côtés des membrures embarquent sur les côtés des planches. Les traverses doivent donner vers le centre de la pirogue. Vérifier que la traverse du bas de la
membrure soit partout à l'égalité du dessus de la planche de montant Fig.77 Install frames on the crossplanks so that the frame braces face the crossplanks and frame sides lie on the ends of crossplanks. Frame braces should face the centre of the canoe. Check that lower brace is flush with top of the crossplanks | |
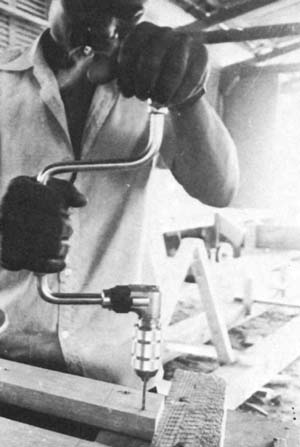
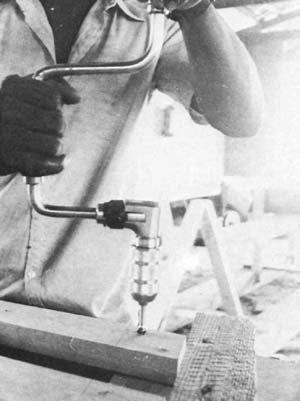
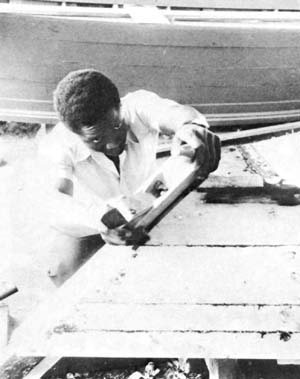
| Fig.76 Visser de préférence avec une mêche de tournevis dans un vilebrequin Fig.76 It is best to screw with a screwdriver bit set in a hand drill | ||
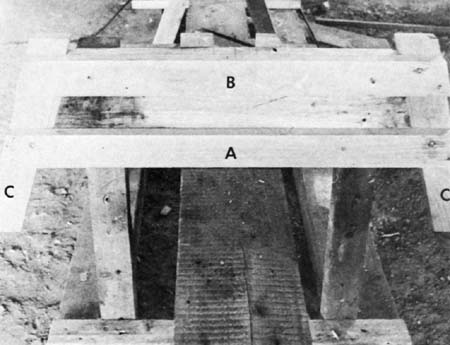
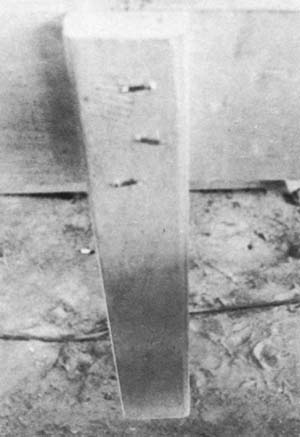
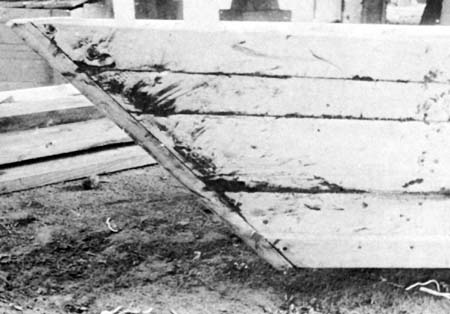
Fig. 78 Comme les côtés de la membrure sont appuyés à
fond sur les planches de montant les membrures sont
centrés automatiquement
Fig.78 Since the frame sides are tight against the ends
of the crossplanks, frames are automatically centred
 |  |
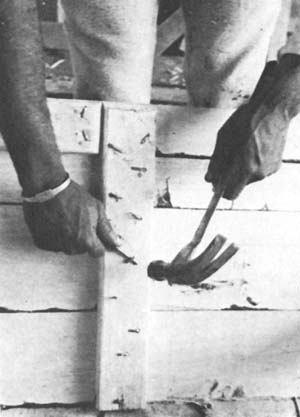
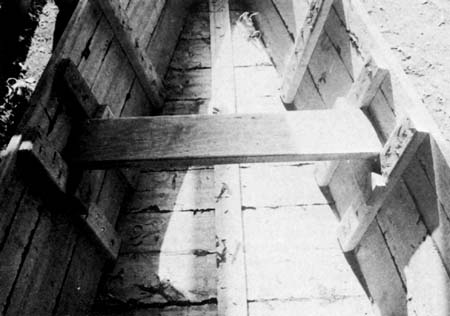
| Fig.79 Fixer temporairement en clouant la traverse du bas contre la planche. Laisser les têtes de clous dépasser de quelques centimètres | Fig.80 Remarquer que les côtés des membrures donnent vers les bouts de la pirogue et les traverses sur le centre |
| Fig. 79 Fasten temporarily by nailing the braces to the crossplanks. Let nail heads protrude at least ½" | Fig.80 Note that the sides of the frames are facing the ends of the canoe whereas the braces face centre |
 | GABARIT D'ETRAVES |
 | |
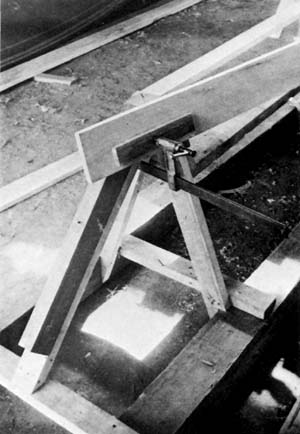
| Fig.82 A la base du triangle fixer un bois de
2,5 × 5 × 20 cm Fig.82 Fasten a stock of 1" × 2" × 8" at the base of this triangle | |
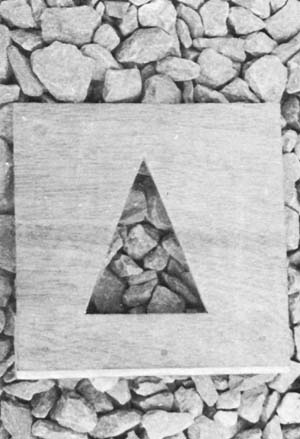
| Fig.81 Dans un contreplaqueé de 5 mm découper un carré de 20 cm de côté. Tracer une ligne centrale et triangle selon dessin “gabarit d'étrave”. Découper ce triangle avec un ciseau à bois en faisant attention à laisser une rive droite et nette à l'intérieur du triangle | |
| Fig.81 Cut a square of 8" sides from ¼" plywood. Trace axis and triangle according to stem pattern design. Cut out with a wood chisel, taking care to leave a clean, straight line at the inside of the triangle |
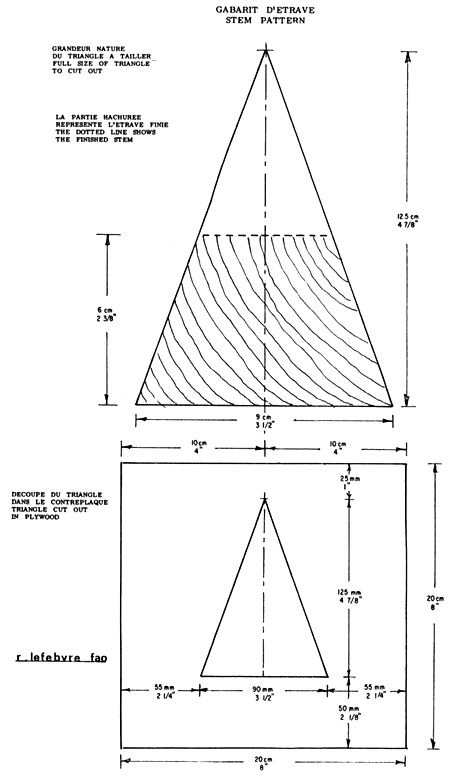
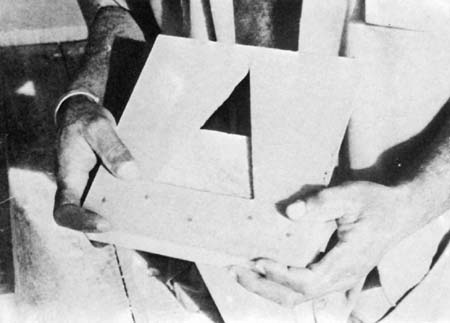
Fig.83 Après avoir dressé les bois d'étrave aux dimensions 6 × 9 × 80 cm, appliquer le gabarit sur les bouts du bois
Fig.83 After planing stem timbers to size 2 ⅜" × 3 ½" × 2' 7 ½", hold pattern against timber ends
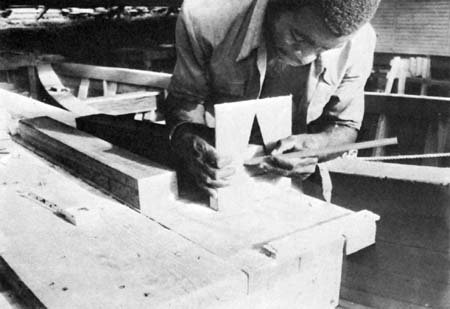
Fig.84 et tracer aux deux bouts
Fig.84 and trace at both ends
 |  | |
| Fig.85 Avec un tresquin partir de l'endroit où s'arrête le traçage du gabarit et tracer cette ligne tout du long sur le dessus des bois | ||
| Fig.85 With a marking gauge start from the pattern marks and trace all along top of timber | ||
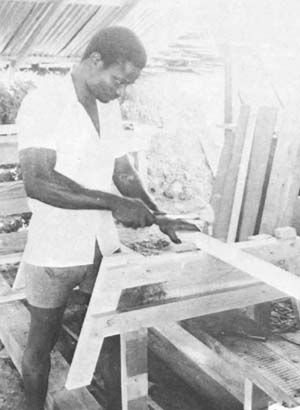
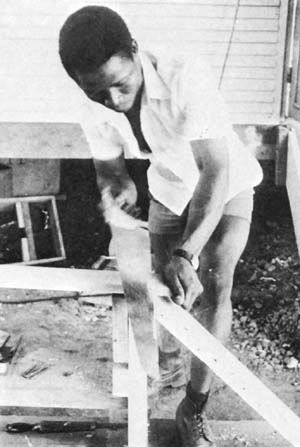
 | Fig.87 Raboter les parties extérieures aux marques de
trusquin. Etrave finie Deux étraves seront requises par pirogue Fig.87 Plane the timber until the marks are reached. Photo shows the stem ready to install. Two stems are required for each canoe | |
| Fig.86 Pour maintenir le bois durant le rabotage le clouer en oblique aux extrémités contre le c�té de l'établi Fig.86 To hold timber during planing, edge-nail it to the sides of the workbench | ||
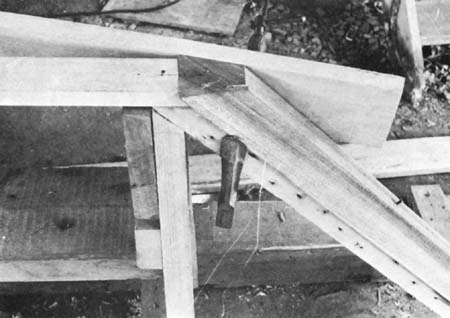
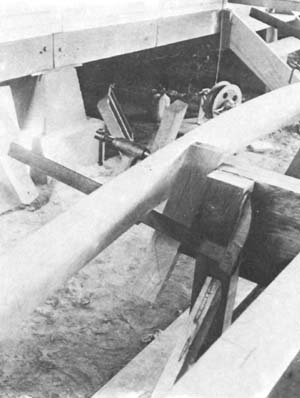
 | Fig.88 La carlingue doit dépasser de quelques centimètres de chaque porte-étrave; on la cloue temporairement dans le taquet de montants obliques après avoir vérifié son alignement avec le porte-étrave Fig.88 The inner keel must extend a little beyond each stem support. After checking its alignment with the stem support, tack it temporarily to the plate of the end posts | |
 | ||
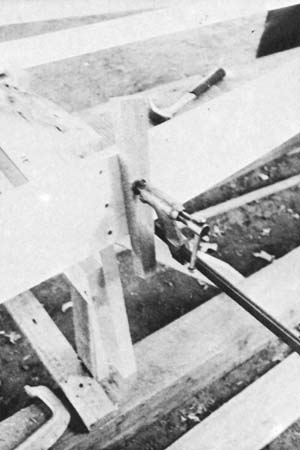
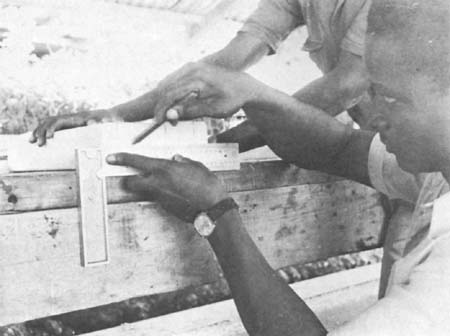
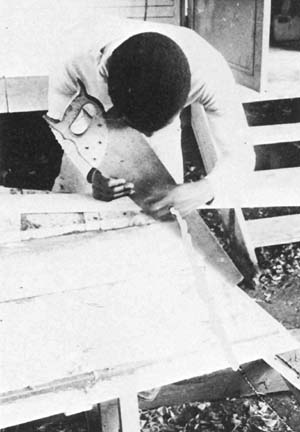
 | Fig.90 On marquera l'endroit de coupe en tenant une équerre sur le porte-étrave Fig. 90 Trace the cut by holding a square against the stem support | |
| Fig.89 On fixera la carlingue aux traverses de membrures avec deux clous de 7 cm Fig.89 Fasten inner keel to the lower braces of the frame with two 2 ¾" nails | ||
 |  |
| Fig.91 On scie les bouts dépassant des porte-étraves | Fig.93 Ainsi que le centre des bouts d'étraves |
| Fig.91 Saw off the ends of the inner keel protruding beyond the stem supports | Fig.93 Also mark the centre on the ends of the stems |
 | |
| Fig.92 On marquera le centre des bouts de carlingue | |
| Fig. 92 Mark the centre of inner keel right by the cut | |
 |  |
| Fig.94 On posera les étraves sur les porte-étraves en faisant coincider les marques de centre. On tient l'étrave en place par un serre-joint et on centre l'autre bout sur le porte-étrave | |
| Fig.94 Place the stems on supports, making sure that centre marks coincide. Hold stem in place with a clamp and centre the other end on the support | |
 | Fig.96 L'autre bout sera fixé en travers par une pointe en oblique Si le bois est dur on devra percer pour clouer On pourrait aussi fixer l'étrave en clouant par le dessous du porte-étrave Fig.96 The other end of the stem is fastened with a nail at an acute angle. The stems can also be held by nailing through from the underside of the supports |
| Fig.95 La fixation temporaire des étraves se fait par un clou en travers de l'étrave à environ 30 cm du bout de la carlingue | |
| Fig.95 Nail through stem to support temporarily, at about 12" from the intersection with the inner keel |
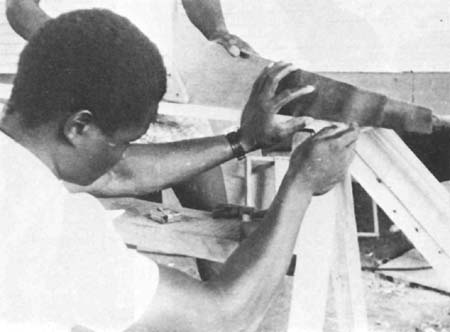
Fig.97 Pour couper se guider sur le dos de la scie appuyée
contre la quille
Fig.97 To mark the cut at the bottom of the stems, place
the back of the saw against inner keel
 |  | ||
| Fig.98 Appliquer ensuite contre l'étrave et tracer | |||
| Fig.98 Hold side of the saw against side of the stem and trace | |||
| Fig.99 Couper au dessus du trait pour finir au rabot en vérifiant le joint carlingue-étrave avec le c�té du rabot. Marquer le centre de l'étrave sur la partie rabotée. Ajuster avec le centre de la carlingue et pointer l'étrave contre le porte-étrave � proximité de la carlingue pour éviter tout déplacement durant la fixation des bouchains | |||
| Fig.99 Cut a little above the mark and finish by planing. Check straightness of the joint with the side of the plane. Mark centre of stem on the planed surface. Adjust to centre of the inner keel and tack down to avoid movement of the stem during chine installation | |||
 | r. lefebvre fao |
 |  |
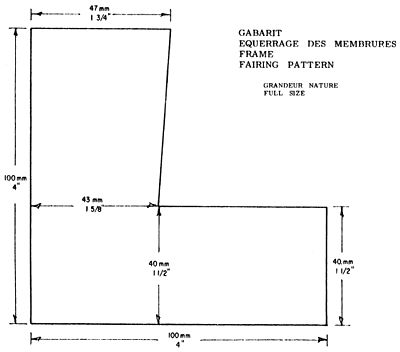
| Fig.100 Avant de poser les bouchains on devra équerrer les côtés de membrures selon le gabarit d'équerrage des membrures. C'est du côté donnant vers les extrémités de la pirogue qu'on doit raboter, très peu à la fois, jusqu'à ce que le gabarit s'appuie bien sur le plat de la membrure et le côté raboté Fig.100 Before installing chines, frames must be faired according to the pattern. Planing should be done little at a time until the pattern fits snugly against the frame and the planed side | Fig.102 On le maintiendra par un serre-joint dont la vis est calée d'un bloc pour ne pas abîmer le bouchain. On pliera le bouchain jusqu'à l'autre étrave pour s'assurer de sa longueur suffisante. Si la planche est trop courte on y fera un joint. (Voir détail au chapitre joint.) On fera de même pour l'autre bouchain. Appliquer le produit d'étanchéité sur les deux côtés de l'étrave. Reposer le bouchain en prenant soin que le doigt du serre-joint appuie contre le porte-étrave e l'arête de l'étrave |
| Fig.102 Hold the chine with a clamp using a block under the clamp screw so as not to ma the wood. Bend the chine all the way to the other stem to make sure it is long enough. the chine is too short make a joint (see chapter Joint). Repeat for the other chine. Apply putty on the two faces of the stem. Replace the chine taking care that the finger of the clamp rests on the stem support and stem edge | |
 | |
| Fig.101 Ajuster un bouchain pour qu'il dépasse un peu de l'étrave. Noter que la rive du bouchain doit effleurer le bout raboté de l'étrave | |
| Fig.101 Fit the chine to extend a little beyond the stem. Note that the edge of the chine has to be flush with the planed end of the stem |
 | |
| Fig.103 Ce n'est que dans cette position que le serre-joint tiendra bien | |
| Fig.103 The clamp has to be in this position to be tight | |
 |  |
| Fig.104 Serrer le bouchain en position contre la première membrure | Fig.105 Ajuster le bouchain à effleurer le haut de l'étrave |
| Fig.104 Tighten the chine in position against the side of the first frame | Fig.105 Adjust the chine to be flush with the planed end of the stem |
 |  | ||
| Fig.106 Fixer avec 3 clous de 8 cm. Il serait bon de tracer une ligne de clouage sur le bouchain afin que les clous ne dépassent pas à l'intérieur de l'étrave. Cette ligne visée au centre de l'étrave évitera de placer des clous trop près de la face de l'étrave et qu'on devrait replacer pour raboter les bouchains contre la face de l'étrave Fig.106 Nail the chine to the stem with three 3" nails. It is recommended to trace a nailing line to avoid that the nails extend inside the boat. This line will also avoid nails being too close to the stem and having to remove them when planing the planking | Fig.107 Ajuster le bouchain contre la première membrure en frappant sur un bois appuyé contre le bouchain Fig.107 Adjust the chine against the first frame by tapping on a wooden board held on top of the chine | ||
 | |||
| Fig.108 Tenir le bouchain en place par un serre-joint Fig.108 Hold the chine in place with a clamp | |||
 |  | ||
| Fig.109 Fixer avec 3 clous de 7 cm. Noter que le serre-joint est en dehors de la ligne de clouage. Garder le serre-joint en place jusqu'au cintrage des bouchains à l'autre étrave Fig.109 Fasten with three 2 ¾" nails. Note that the clamp is outside the nailing line. Keep clamp in place until both chines are bent on the other stem | Fig.110 Scier le bout de bouchain dépassant de l'étrave Fig.110 Cut the chine end protruding from the stem | ||
 | |||
| Fig.111 Poser l'autre bouchain et clouer sur l'étrave avec 3 clous de 8 cm, et la première membrure avec 3 clous de 7 cm. Noter que lorsqu'on utilise un serre-joint sur les planches tendres on doit toujours protéger le bois par des cales aux points d'appui du serre-joint Fig.111 Install the other chine in the same way. Note the blocks under clamp to avoid damage to the wood | |||
 |  |
| Fig.112 Couper le bout de la deuxième planche de bouchain Fig.112 Cut the end off the second chine plank | Fig.114 Les maintenir par un serre-joint. En vérifiant que ces planches soient à la hauteur de l'étrave, appuyer un des bouchains contre l'étrave et tracer une ligne de coupe dépassant l'étrave. Relâcher les deux bouchains et couper la planche marquée. Appliquer le produit d'étanchéité des deux côtés de l'étrave. Rapprocher les deux bouchains en même temps contre l'étrave Fig.114 Keep them together with a clamp. While making sure that the chines are at the height of the stem, press one of the chines against the stem, trace a cutting line and let the cut chine extend beyond the stem. Release both chines and cut the marked one. Spread putty on stem. Bring the two chines back against the stem |
 | |
| Fig.113 Attraper l'autre bout des bouchains et les presser ensemble au-dessus de la deuxième étrave Fig.113 Get hold of the ends of the chines and bend both at the same time over the other stem |
 |  | |
| Fig.116 Clouer les bouchains avec chacun 3 clous de 7 cm dans la deuxième membrure. Si le bouchain tombe plus bas que le coin de la membrure, le relever avec un serre-joint | ||
| Fig.116 Nail both chines to the remaining frame with three nails of 2 ¾". If the chine goes below the frame edge, use a clamp to raise it. Use a block at the contact point of the clamp | ||
| Fig.115 Les maintenir par un serre-joint calé de blocs. Le serre-joint devra être décalé de la ligne de clouage. Le serrejoint pourra tomber sur la ligne de clouage pour autant qu'il soit au centre de la planche. On pourra alors clouer de chaque côté avant d'enlever le serre-joint. Scier les bouts assez près de l'étrave pour qu'il ne reste qu'à raboter | 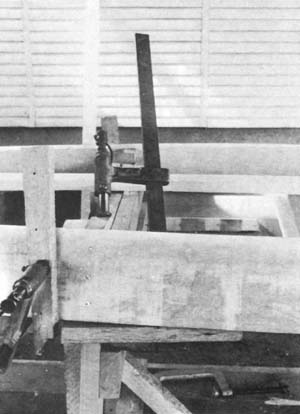 | |
| Fig.115 Maintain the chines with a clamp fixed on the inside of the nailing line. The clamp can also be on the nailing line provided it is in the centre of the plank. Nails will then be hammered on each side of the clamp before removing it. After the second chine is nailed down, the ends should be cut close enough to the stem so that only planing remains to be done | ||
| Fig.117 Bien appuyer le bouchain contre la membrure avec un serre-joint car il aura tendance à ne pas coller contre le coin de la membrure. Si le bouchain est plus haut que le coin de la membrure taper sur un bois contre le bouchain pour le faire descendre | ||
| Fig.117 As the chine will have a tendency to pull away from the frame edge, use a clamp to check this problem. If the chine is too high, tap with a block and hammer before nailing | ||
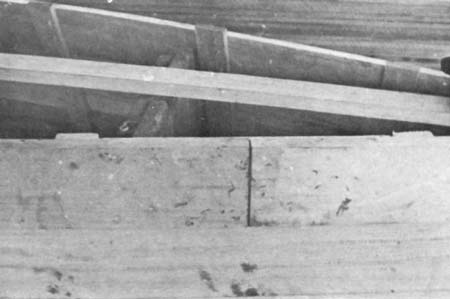
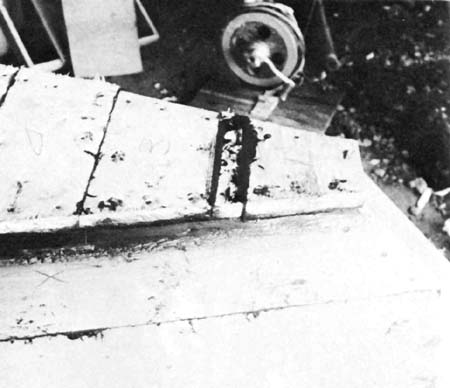
Fig.118 Position préférée d'un joint dans le bouchain
Fig.118 The best place for a joint is between two
stiffeners
 | Fig.119 Si les longueurs disponibles ne suffisaient pas, pour disposer le joint entre deux renforts comme ci-haut on fera un joint normal. On devra fixer le renfort sur le joint et ajouter du côté des bordés une pièce de même épaisseur que le joint Fig.119 If the plank lengths are not long enough, make a normal joint between two stiffeners. The stiffener will be fastened later to the jointing plank. A piece of wood of the same thickness as the jointing plank will be placed on top of stiffener and planking |
 |  |
| Fig.120 Compter 14 morceaux de 3 × 7 × 43 cm. Arrondir les deux arêtes d'un même côté. Marquer le centre de la largeur sur deux renforts. Aligner les renforts par rangée et marquer | |
| Fig.120 Count 14 pieces of 1 ⅛" × 2 ¾" × 16 ¾". Mark the centre of the width on two stiffeners. Align them all and mark off | Fig.122 Mesurer à partir du même point de la membrure et marquer à tous les 55 cm en allant vers les étraves |
| Fig.122 Measure and mark every 1' 9 ⅝" from there to the stems | |
 |  |
| Fig.121 Mesurer 50 cm à partir de la membrure et marquer | |
| Fig.121 Measure 1' 7 ⅝" from the frame and mark the chine | |
| Fig.123 Tracer ces marques à l'équerre | |
| Fig.123 Trace these marks with a square |
 |  | |
| Fig.124 Aligner le centre des renforts sur ces marques et tenir par une presse. Ajuster le renfort à 2 ou 3 mm plus bas que le bouchain | ||
| Fig.124 Match centre of stiffeners with these marks and hold with a C-clamp. Adjust stiffeners ½" lower than the chine | ||
 | Fig.126 Il est préférable que la vis de la presse soit à l'intérieur de la pirogue et le doigt de la presse centré à l'extérieur du bouchain pour pouvoir clouer de chaque côté Fig.126 The clamp screw should be on the inside of the canoe to ease nailing, the clamp finger at the centre of the plank to permit nailing on each side of it 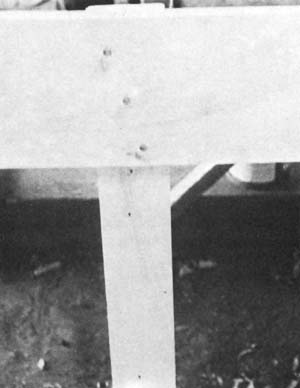 | |
| Fig.125 Assurez-vous que le renfort est d'équerre avec le bouchain Fig.125 Make sure the stiffeners are square with the chine | ||
| Fig.127 Les clous de 7 cm devront être décalés de façon à ne pas fendre les renforts Fig.127 The 2 ¾" nails are staggered in order not to split the stiffeners | ||
 |  |
| Fig.128 Retourner les pointes en travers du grain et vers le centre du renfort. Le clou du centre peut être tourné d'un côté ou de l'autre | Fig.130 Le charpentier chevronné se servira d'une grosse pointe comme appui sur le bout du clou pour le retourner dans le renfort |
| Fig.128 Turn nail ends across grain and toward centre of stiffeners. Turn centre nail in or out | Fig.130 The experienced carpenter bends the nails over a bigger nail |
 |  |
| Fig.131 Les pointes des clous doivent être retournées dans le bois pour éviter que les filets de pêche ne s'y accrochent. Il y aura donc 7 renforts par bouchain | |
| Fig.129 Pour retourner les pointes, maintenir un marteau sur la tête du clou pendant qu'on frappe de travers sur le bout du clou | Fig.131 Nails so bent will not get caught in the fishing nets. There are seven stiffeners on each chine |
| Fig.129 To bend nail ends, hold hammer on nail head while striking sideways on nail end |
Arrêter de fixer cette planche sur le renfort du centre et répéter les mêmes opérations sur le bordé de l'autre côté de la pirogue jusou'au renfort du centre. A ce point, cintrer les deux planches en même temps vers l'étrave. En appuyer une contre l'étrave. Rapprocher les deux bordés de l'étrave et les y maintenir par une corde. Reprendre le clouage au centre en allant vers l'étrave et alterner de côté à chaque renfort afin de terminer le clouage des deux planches en même temps à l'étrave. Surtout, ne pas clouer une planche tout au long d'un même côté avant de clouer l'autre.
Pour le bordé supérieur, procéder de la même manière, mais en ne fixant que deux clous par renfort.
Pour le livet il en est de même mais avec deux clous de 7 cm.
Nail this plank on the central stiffener and then start on the other side of the canoe up to the central stiffener. At this point, bend both planks at the same time toward the other stem and tie them down with a rope. Start nailing again from the central stiffener toward the other stem, alternating the nailing to have both sides of the canoe progressing together. It is important not to nail the plank on one side all the way and the plank on the other side after. This would force the mould and produce a twisted canoe.
Proceed in the same way for the upper planking, using only two nails on each stiffener.
The same goes for the sheer, but with two nails of 2 ¾".
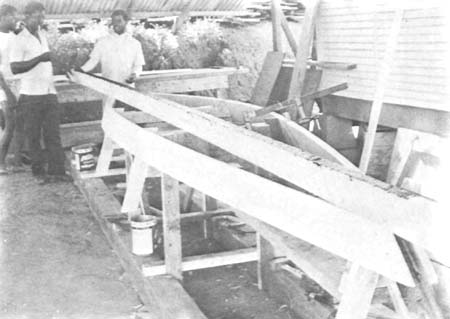
Fig.132 Appliquer le produit d'étanchéité sur une rive
de la planche
Fig.132 Apply putty to one edge of the lower planking
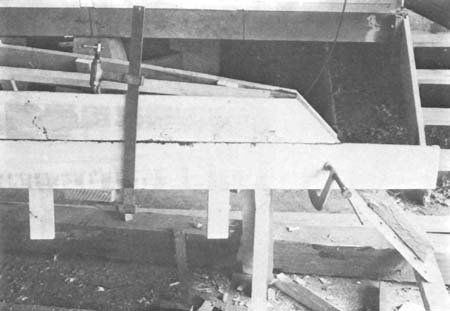
Fig.133 S'assurer qu'il y en a sur les côtés des étraves.
Fixer à l'étrave comme pour le bouchain mais avec des
clous de 7 cm
Fig.133 Make sure there is enough putty on both sides of
the stems. Fasten to the stem the same way as before
but use 2 ¾" nails
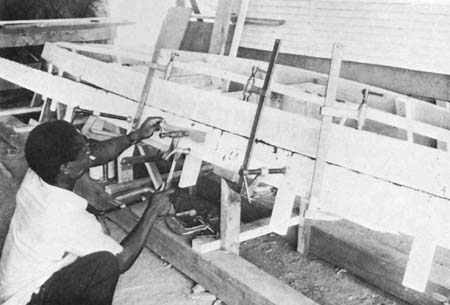
Fig.134 Tenir sur les renforts par des presses et fermer le joint entre les deux planches par
un serre-joint prenant appui sur le bouchain. Au moment de clouer sur un renfort, toujours
avoir un serre-joint dans les intervalles de chaque côté du renfort à clouer. Protéger les
rives du bordé avec des bois entre le doigt du serre-joint et le bordé. Fixer avec trois
pointes de 6 cm décalées en diagonale
Fig. 134 Press the stiffeners with C-clamps and close the plank joint with bar clamps fitted
on the chine. When nailing on a stiffener always use a bar clamp in the intervals on each side
of the stiffener being nailed. Protect the edges of planks with blocks under the clamps. Fasten
with three 2 ¼" nails staggered diagonally
 |  | |
| Fig.135 Toujours vérifier que les bordé appuyent sur toute la largeur contre les renforts | Fig.136 voici un exemple où le bordé ne colle pas | |
| Fig.135 Always check that the planking fits closely against the stiffeners in all its width | Fig.136 Here the planking does not adhere to the stiffener |
 |  |
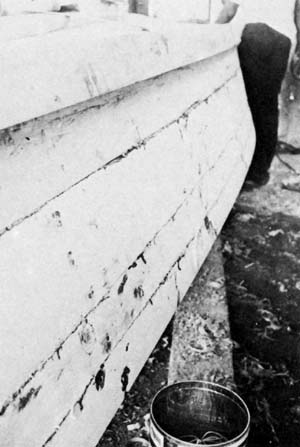
| Fig.137 Pose du livet | Fig.138 Bordés posés |
| Fig.137 Installing the sheer plank | Fig.138 Side planking |
Un joint dans un bordé doit être fait entre deux renforts. Pour savoir où couper le bordé, on l'appuiera en position sur étrave, renforts et membrures. Dans l'intervalle entre deux renforts où le bordé doit s'arrêter on marquera le centre de cet espace sur le bordé à couper. Le bordé sera coupé à l'équerre.
La longueur de la cale-entretoise sera de deux centimètres plus courte que la distance entre les deux renforts.
If a joint is necessary in the side planking, it should be placed between two stiffeners. In order to know where to cut, apply the plank in position and bend it starting at the stem. Mark the centre of the distance between the two stiffeners where the plank ends. Take this mark to the plank and out the plank square across.
The length of the jointing plank will be 1" shorter than the inside distance between the two stiffeners.
Fig.139 Position du joint entre deux renforts
Fig.139 Position of joint between two stiffeners
 |  |
| Fig.140 Marquer le centre de la cale-entretoise et pointer 8 clous | Fig.141 Placer les deux bordés à joindre, bout à bout enlignés contre la règle |
| Fig.140 Mark centre of the jointing plank and nail down with 8 nails | Fig.141 Set the two planks to be jointed end to end aligned against the side of the straightedge |
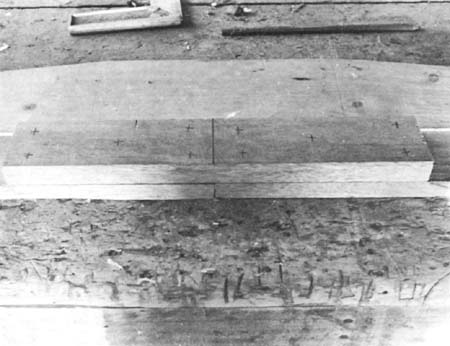
Fig.142 Poser la cale-entretoise centrée sur le joint
Fig.142 Centre the jointing plank on the joint
 |  |
| Fig.143 Enfoncer partiellement les clous du centre et vérifier la ligne droite de l'assemblage contre la règle | Fig.144 Enfoncer tous les clous et retourner en travers du grain |
| Fig.143 Hammer nails halfway down close to the joint and check the straight line against the straightedge | Fig.144 Hammer nails all way down and bend nail ends |
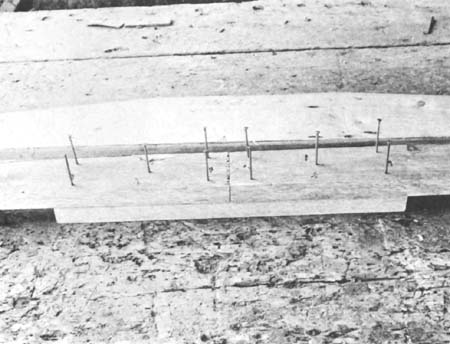
Fig.145 Poser 10 autres clous sur les bordés, disposés
selon photo, enfoncer et retourner.
Lorsqu'ou aura plus d'un joint à faire dans les bordés,
le deuxième sera à l'autre bout du bateau et alterné
ainsi de suite
Fig.145 Place 10 more nails on the planking as indicated
on the photo, hammer in and turn ends. When there is
more than one joint to be made in the planking, the
second joint should be at the other end of the canoe.
Joints should always be alternated this way
 |  |
| Fig.146 Le joint aura cette apparence de l'intérieur du bateau | Fig.147 et cette apparence de l'extérieur du bateau |
| Fig.146 The joint will look like this on the inside of the canoe | Fig.147 and like that on the outside |

Fig.148 Enlever le plus gros de l'excès sur le bouchain
Fig.148 Start fairing of the chine by planing off excess
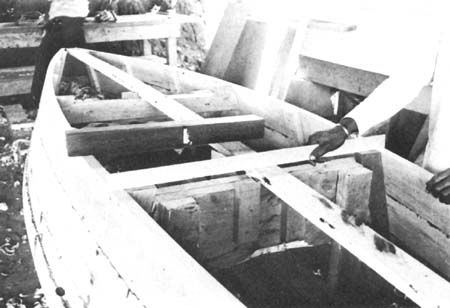 Fig.149 Vérifier � nouveau avec la règle l'endroit raboté Fig.149 Check both chines and the inner keel with the straightedge | |
 | |
| Fig.150 Avec l'oeil le long du bouchain vérifier s'il y a des bosses et les raboter | |
| Fig.150 Sight carefully along chine to check for evenness, and plane where necessary |
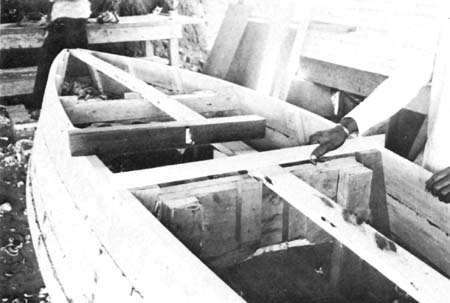
Fig.151 Terminer l'équerrage en appuyant une règle contre
la carlingue et les deux bouchains. La règle doit
toucher à plat partout
Fig.151 Complete fairing making sure that the straightedge
touches both chines and the inner keel at the same time
 |  |
| Fig.152 Enlever les clous tenant l'étrave au chassis et raboter les bouts de bordés dépassant de l'étrave | Fig.153 Vérifier le rabotage de cette façon Fig.153 Check the planing in this way |
| Fig.152 Remove the nails which hold the stem to the stem support. Plane off the ends of the side planking |
Numéroter chaque planche avant de les enlever.
Enlever les clous qui tiennent les membrures au chassis.
Remplir d'une cheville de bois, trempée de produit d'étanchéité, le trou en travers les étraves.
Appliquer le produit d'étanchéité sur les bouchains et le dessous des étraves.
 |  Fig.156 Appuyer la planche suivante et tracer le long du bouchain Fig.156 Push next plank against the firs and trace along the chine | |
| Fig.154 Aligner la première planche avec une membrure Fig.154 Align first bottom plank with one frame | ||
 | ||
| Fig.155 Vous assurer que la planche dépasse d'au moins 2 mm à chaque bout Fig.155 Make sure that the ends of the plank stick out at least 1/16" on each side | 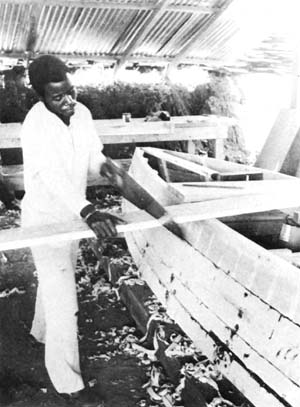 | |
| Fig.157 Retourner la planche et scier en dehors du trait en s'appuyant sur le fond du bateau Fig.157 Turn the plank over and cut outside of the line, leaning the plank against the bottom of the canoe | ||
 |  | |
| Fig.158 Dresser sur place et essayer contre la planche en place jusqu'à ce qu'on ne voit pas le jour entre les deux planches. Eviter que le joint ne soit ouvert vers l'intérieur du bateau | Fig.160 Avec trois clous de 7 cm clouer sur le bouchain, en ligne avec une membrure. Enduire de produit d'étanchéité le côté adjacent de la planche suivante | |
| Fig.158 Edge-plane each plank and check with the preceding plank until no light filters between the two planks. Make sure the plank seam is absolutely tight | Fig.160 Apply putty on the chine and stem ends. Fasten the first bottom plank with three 2 ¾" nails to the chines and two 2 ¼" nails to the inner keel. Align this first plank carefully with a frame. Apply putty on the edge of the adjoining plank | |
 | ||
 | ||
| Fig.161 Près de l'autre côté de la planche coincer la serre contre la carlingue Fig.161 Fix wood clamp onto the inner keel close to the free side of this plank | ||
| Fig.159 Vérifier avec une équerre Fig.159 Check with a square. Prepare each bottom plank this way and number them. Remove nails holding the frames to cross planks | ||
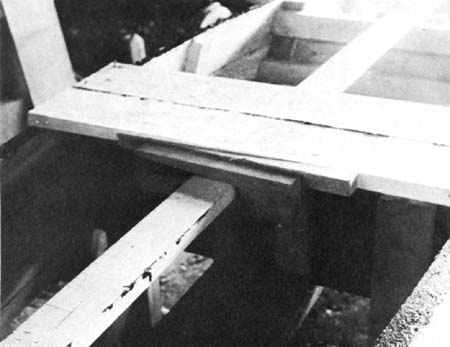
Fig.162 Avec un coin de 3 × 40 cm forcer la deuxième planche à coller contre la première. Le mastic
devra gicler du joint. Fixer avec 3 clous de 7 cm contre le bouchain et 2 clous de 6 cm contre la carlingue.
Les clous sur la carlingue devront être chevauchés comme sur les renforts pour éviter de
fendre. En clouant sur la carlingue on donnera sur chaque clou, un dernier coup de façon à forcer la
carlingue à coller contre la planche de fond
Fig.162 Press this plank against the first by forcing a 1" × 15" wedge between the wooden clamp and
the second plank. Putty should ooze from the joint. Nail down as before. Stagger nails on the inner
keel to avoid splitting. When nailing the inner keel, give a sharp blow to each nail to improve contact
between the two parts
 |  |
| Fig.163 Procéder ainsi jusqu'à ce qu'on ait couvert le fond du bateau Fig.163 Continue like this until the bottom of the canoe is covered | Fig.164 Si en posant la dernière planche près de l'étrave, celle-ci a une largeur de moins de 10 cm, réduire la largeur de la planche précédente afin de pouvoir bien clouer la planche du bout |
| Fig.164 If the end plank is less than 4" wide, reduce the width of the preceding plank to ensure secure fastening of the end plank |
 |  | |
| Fig.165 Raboter la dernière planche en ligne avec l'étrave | Fig.167 Sur le bouchain chasser les têtes de clous à proximité des planches de fond (avec la tête d'un clou de 10 cm) | |
| Fig.165 Plane the last plank in line with the stem. Fill nail holes with dowels brushed with putty | Fig.167 Countersink the heads of the nails on the chine over the stem close to the bottom planks, using the head of a 4" nail | |
 |  | |
| Fig.166 Vérifier comme ceci Fig.166 Check fairing in this manner | Fig.168 Raboter le bout des planches de fond à égalité avec le côté du bouchain | |
| Fig.168 Plane off ends of the bottom planking flush with the chine planks | ||
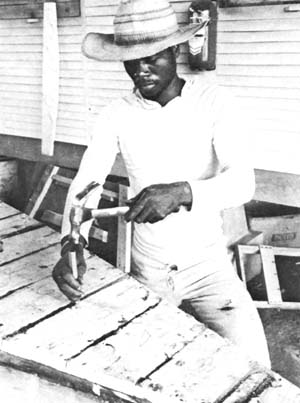
Fig.169 Chasser les clous du fond
Fig.169 Countersink the nails of the
bottom planking
 |  | |
| Fig.170 Nettoyer le surplus de produit d'étanchéité aux joints | Fig.171 Raboter les surépaisseurs entre les différentes planches de fond | |
| Fig.170 Clean off surplus putty | Fig.171 Plane off excess thickness from bottom planks |
 |  | |
| Fig.172 Centrer la quille sur le fond audessus de l'étrave en mesurant l'égalité de chaque côté. Pointer en place. De même à l'autre bout du bateau | Fig.173 Au centre de la longueur du bateau mesurer jusqu'à égalité des deux côtés et pointer | |
| Fig.172 Centre keel on the bottom over the stem. Nail down and repeat at the other end | Fig.173 Measure for symmetry in the centre of the canoe and nail the keel down |
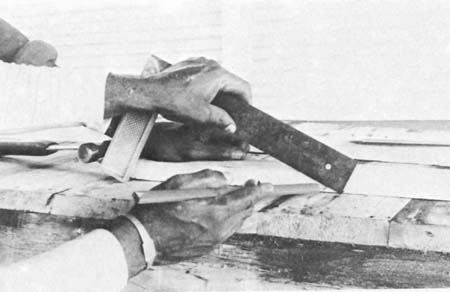
Fig. 174 S'il y a besoin d'un joint dans la quille, tracer une ligne à
angle en appuyant une équerre de 30 cm le long de la quille. Répéter
l'opération sur l'autre pièce de quille et couper. Joindre de façon à
ce que le recouvrement du joint soit vers l'arrière du bateau
Fig.174 If the timber is short and a joint is necessary, trace a line
at an angle by holding a 12" square on its ends along the keel. Repeat
on the other side and cut. The overlap should be near the rear of the
canoe
 | Fig.175 Aprés avoir fixé la quille sur le fond avec les clous de 7 cm espacés de 30 cm, tracer les bouts et couper Fig. 175 After nailing the keel on the bottom and inner keel with 2 ¾" nails spaced 12", trace ends and cut off |
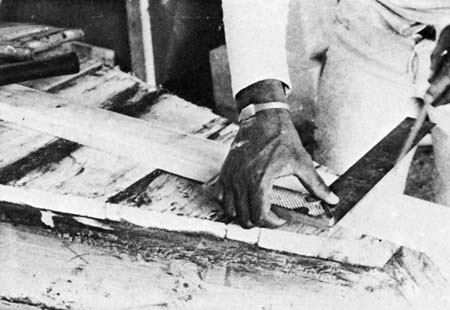
Fig. 176
 | Fig. 177 Plane only one edge of this moulding and place that side toward the sheer. Let other side stick out from the bottom planks. Fasten with 3" nails on the stems and 2 ¾" nails on the stiffeners. Nail only from the bottom of the moulding so that there are no nails in the ends of the bottom planks. Nail only on stems and stiffeners even if there is some play between moulding and bottom planks. Make sure the nails of the bottom planks at the chine are punched in well | |
| Fig. 177 N'en dresser qu'une rive qu'on posera vers le bas alors que l'autre dépassera un peu les planches de fond. Fixer avec les clous de 8 cm sur les étraves et 7 cm sur les renforts. Ne clouer que vers le bas du couvre-joint de façon à ce qu'il n'y ait pas de clous dans le grain des planches de fond. Ne clouer que sur les étraves et les renforts même s'il y a du jeu entre le couvre-joint et les planches de fond. Chasser les têtes des clous fixant les planches du fond au bouchain | 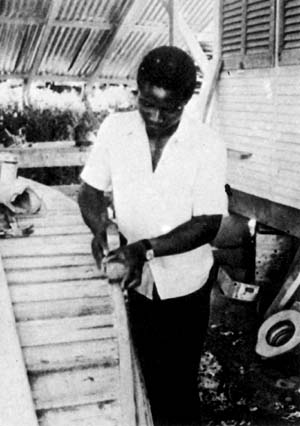 | |
| Fig. 178 Raboter le couvre-joint à l'égalité du fond Fig. 178 Plane off the moulding flush with the bottom | ||

r. lefebvre fao
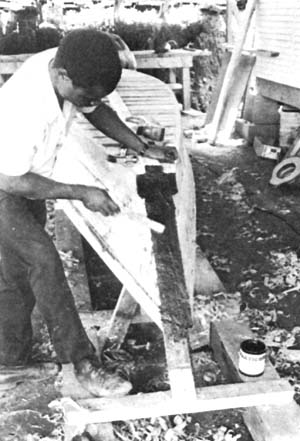
Fig. 179 Préparer le bois selon le dessin.
Appliquer le produit d'étanchéité. Fixer
avec des clous de 7 cm
Fig. 179 Prepare stem moulding according to
drawing. Apply putty. Fasten with 2 ¾"
nails
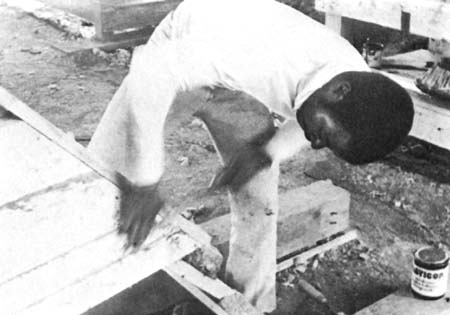
Fig. 180 Si l'on désire éviter l'usage d'un gabarit on peut clouer
en place une planche de 2 × 14 × 70 cm
Fig. 180 If you do not want to use the stem moulding pattern, nail
a plank of ¾" × 2' 3 ½" in place. Whether or not to use the
pattern is a question of availability of tools
 |  | |
| Fig. 181 Raboter et scier l'extrémité selon les formes couvertes par cette planche Fig. 181 Plane and saw this plank according to the pieces covered | Fig. 183 Autre vue de la lisse d'étrave avec le haut fini et le trou d'amarrage percé. Noter le recouvrement des bouts de la quille et des lisses de bouchain Fig. 183 Other view of stem moulding with mooring hole. Note how this moulding covers the ends of chine mouldings and keel |
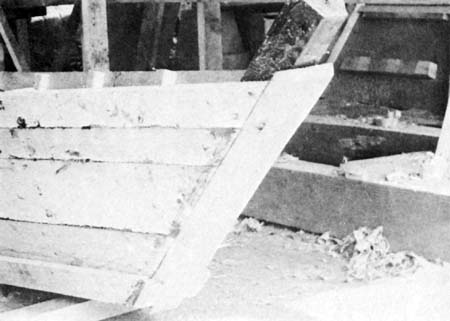
Fig. 182 Lisse d'étrave finie et posée
Fig. 182 Finished stem moulding
L'emplacement des bancs est dicté par le goût personnel des pêcheurs de la région où le bateau est construit. A ce sujet il y a autant d'opinions qu'il y a de recettes de couscous. Nous présentons ici la version d'un banc de deux pagayeurs sur l'avant et d'un sur l'arrière. Quel que soit l'emplacement, la construction des assises des bancs demeure la même.
The position of the seats is a matter of personal preference of the fishermen. There are as many opinions on this subject as there are couscous recipes. Here we show one seat for two paddlers in front and one at the rear. The framing construction of the seats is the same wherever you place them.
 | Fig. 184 A partir du premier renfort de l'arrière poser un autre renfort à une distance de 16 cm. Sur ces deux renforts fixer un taquet de 3 × 7 cm à 27 cm du livet. A partir d'une planche de 3 × 15 × 36 cm tailler le banc dont un côté aura 36 cm de long et l'autre 30 cm. Fixer contre chaque taquet avec deux clous de 7 cm Fig. 184 Install a stiffener at 6 ¼" from the first stiffener from the rear. Fasten a beam of 1 ⅛" × 2 ¾" onto these two stiffeners at 1) ½" from the sheer line. Cut the seat 14 ⅛" × 12", using a plank 1 ⅛" × 6" × 14 ⅛". Fasten to each beam with two 2 ¾" nails | |
| Fig. 185 Banc fini Fig. 185 Finished seat |  | |
 | |
| Fig.186 Le banc avant aura une longueur de 74 cm d'un côté et de 70 cm de l'autre Fig.186 The length of the front seat is 2' 5½" on one side and 2' 3½" on the other | |
 | |
| Fig.187 Le banc avant sera situé sur l'avant du troisième renfort à partir du bout. Arrondir les bouts des renforts et des membrures à la hauteur du livet Fig.187 The front seat is placed in front of the third stiffener from the stem. Round off edges of the stiffeners and frames at sheer level |
 |  | |
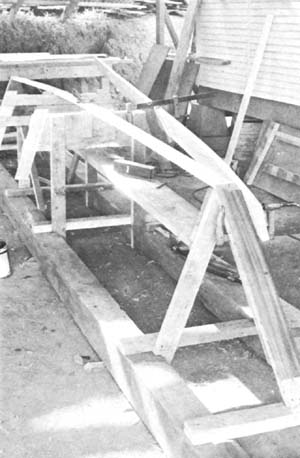
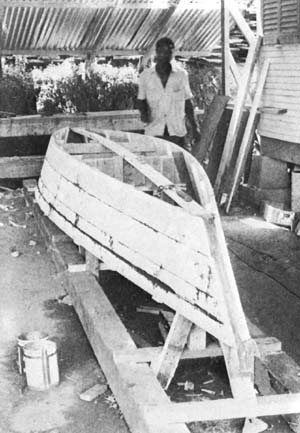
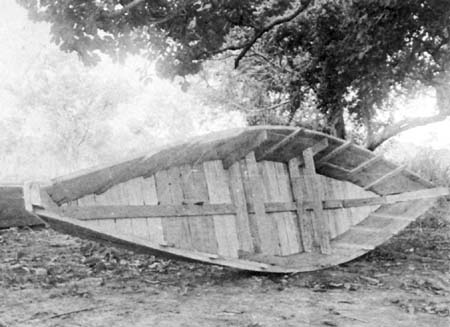
| Fig.188 Pour enlever le bateau du chassis employer quatre ou six personnes Fig.188 Call four to six people to remove the canoe from the mould. It can be done by one person by lifting the canoe and sliding it on one side | ||
 | Fig.189 Caler le bateau sous les côtés pour l'empêcher de bouger Fig.189 Block the canoe under the sides to prevent rocking | |
 | ||
| Fig.190 Retourner les clous dépassant des renforts et de la carlingue. Les meilleurs charpentiers retourneront la pointe des clous dans le bois à l'aide d'un clou de 10 cm Fig.190 The remaining nail ends are turned under | Fig.191 Percer le trou d'amarrage dans l'étrave avec une mèche de 20 mm Fig.191 Drill mooring hole in the stem with a ¾" bit | |
 |  | |
| Fig.193 | ||
| Fig.192 Certains pêcheurs ne voudront pas que l'étrave dépasse de la pirogue car leurs filets s'y accrochent. Il faudra alors couper ce bout, que l'on rabotera ensuite en arrondissant Fig.192 Some fishermen will want the stem end flush with the sheer so that nets will not catch on it. In that case cut the end and round off with a plane | 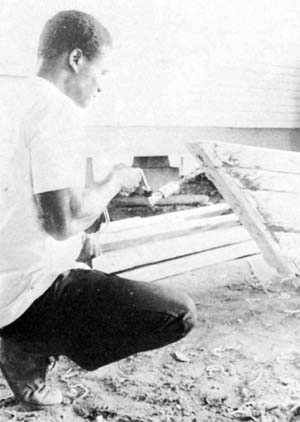 | |
| Fig.194 On percera le trou d'amarrage en choisissant un alignement de la mèche pour ne pas rencontrer de clous Fig.194 When drilling the mooring hole, choose a spot where you will not hit against nails | ||
 |  | |
| Fig. 195 Trou d'amarrage vu de l'intérieur Fig.195 Mooring hole seen from inside | Fig.197 Intérieur avant finition Fig.197 Inside of canoe before finishing |
Fig.196 Vue du fond
Fig.196 Bottom of canoe
r. lefebvre fao
 |  | |
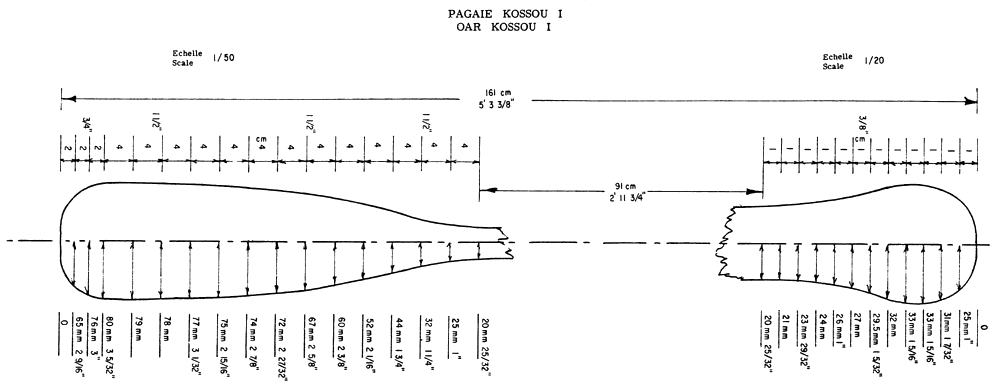
| Fig.198 Dans un contreplaqué de 5 mm on taillera un gabarit selon le dessin Fig.198 Cut a pattern from ¼" plywood according to the design | Fig.200 On sciera la planche selon le contour tracé. Une scie à chantourner est préférable pour ce travail, mais plusieurs charpentiers se servent d'une scie ordinaire Fig.200 Use a keyhole saw to cut out the oar, giving better results than an ordinary saw | |
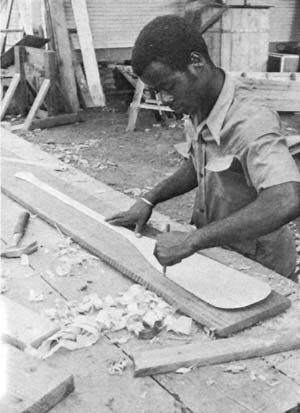 | 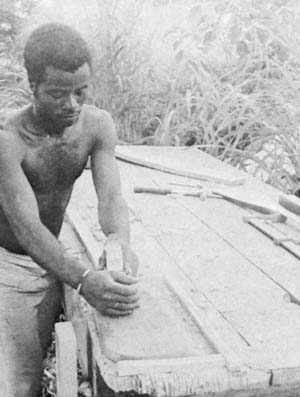 | |
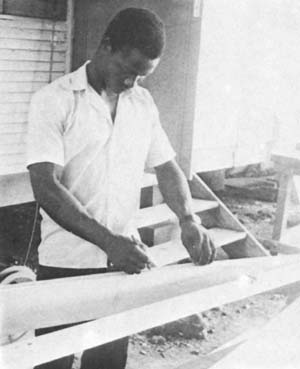
| Fig.199 Sur une planche de 25 mm d'épaisseur on tracera la forme de la pagaie à l'aide du gabarit. La planche devra avoir une largeur de 16 cm et une longueur de 1,61 m Fig.199 Trace oar shape onto a mahogany plank 1" × 6 ¼" × 5' 3 ⅜" | Fig.201 On rabotera les deux faces de la pagaie Fig.201 Plane both sides of the oar |
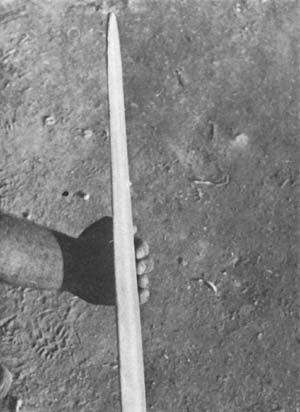 | 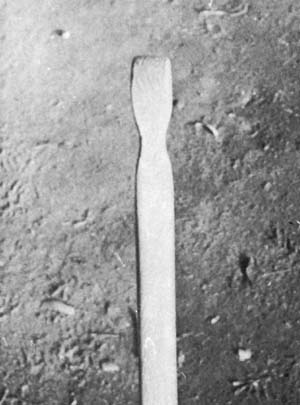 | |
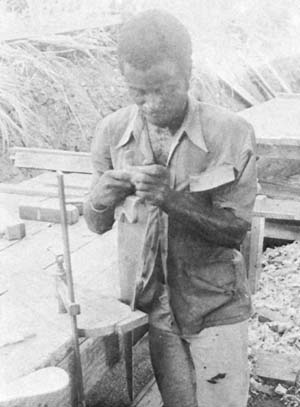
| Fig.202 On rabotera jusqu'à obtenir une épaisseur de 5 mm au bout. L'épaisseur augmentera jusqu'au début du manche Fig.202 Plane until the blade tip is ¼" thick. The handle itself is 1" thick | Fig. 204 A la tête du manche on creusera de chaque côté du plat, pour la prise des doigts Fig.204 Make dents on top of the handle for easy holding | |
 | 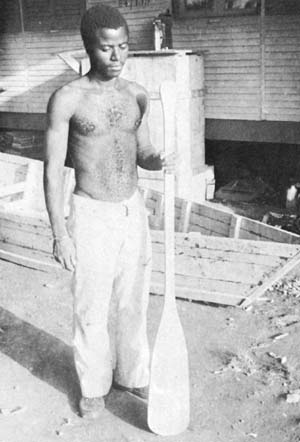 | |
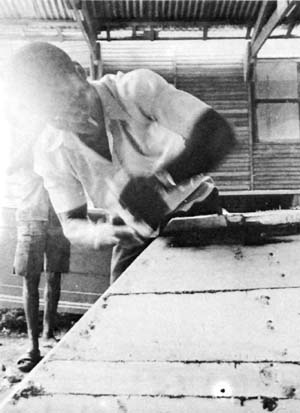
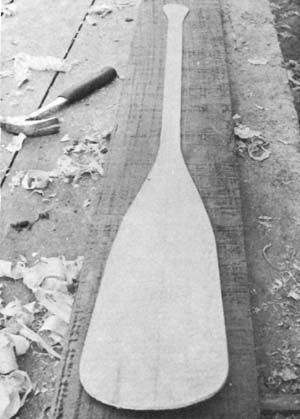
| Fig.203 On arrondira tous les côtés avec une lime à bois (un côté plat, un côté demi-rond) Fig.203 Round off all edges with a bastard wood rasp | Fig.205 Pagaie terminée Fig.205 Finished oar |
![]()
![]()
![]()