![]()
![]()
![]()
SCS/82/SBTC/PRAC. 1
TITLE: Orientation exercise: Study of the seabass
OBJECTIVES:
PROCEDURE:
From freshly preserved specimens of full-grown seabass study the external morphology of the fish. Pay special attention to the form of the body of the fish, notice the characteristics of the head: the jaws, eyes, preoperculum, operculum, nostrils; and on the body, the dorsal fins, pectoral fins, caudal fin, pelvic fins, anal fin, and the scales. In the fins, notice a spinous and a soft rayed portions in some of them.
Dissect freshly-killed specimens and examine the gills, parts of the mouth especially the teeth, tongue, further down examine the digestive tract, notice its length in relation to the length of the fish. Note and identify the other internal organs, but particular attention should be given on the gonads. Study the differences of the female with that of the male gonad.
Shift your observations to living specimens of seabass that will be made available to you. Observe the characteristics and behaviour of the larvae, fry, juveniles, and the full-grown fish.
REQUIREMENTS:
Describe a full-grown seabass and mention especially the characteristics that you can use to distinguish it from other closely related species. Take up both external morphology and internal anatomy.
Describe the behaviour of live seabass in different age stages mentioning what possible characteristics you can use to distinguish the seabass larvae, fry, juveniles or adult seabass when encountered in natural waters.
SCS/82/SBTC/PRAC. 2
TITLE: Preparation and maintenance of seabass hatchery
OBJECTIVES:
To learn and practice the steps in preparing seabass hatchery for spawning work on seabass or other finfish.
To study the proper methods of water management of a seabass hatchery.
To know the methods of aerating hatchery tanks and the types and operation of aerators used.
To have an idea and to practice the feeding routine for larvae, fry, juveniles and broodstock of seabass kept in the hatchery.
To know the water quality characteristics that need to be monitored in a seabass hatchery and to practice how to undertake this monitoring including the kinds and uses of equipment required.
PROCEDURE:
This is a long-term exercise and after it is started it will need following up in future days until the training course is completed. Under the guidance and advice of staff concerned, you will be instructed and have actual practice on the following:
REQUIREMENTS:
Keep record of all the activities you undertook in this exercise and summarize this at the end of the course.
If you have any suggestions, recommendations for improvement in the methods and equipments used in this work, describe these also in your results.
SCS/82/SBTC/PRAC. 3
TITLE: Growing food organisms and feeding of larvae and juveniles
OBJECTIVES:
To know the various food organisms used in seabass hatcheries and to practice how to culture them.
To practice when and how they are fed to different age stages of the seabass.
PROCEDURE:
Under the guidance of staff instructor, obtain the materials and equipment needed and practice culturing various types of algae used in seabass hatcheries (Chlorella, Tetraselmis, diatoms, mixed blue-greens, etc.). Learn and practice also how to culture zooplankton particularly rotifer (Brachionus plicatilis).
As occasion would require, you will be supplied with brine shrimp (Artemia salina) which you will hatch and culture. You should learn how to assess the hatching rate of the Artemia cyst so that you can determine a good brand to purchase from the market. Study the technique of maintaining brine shrimp culture and learn where the different stages in the life of this organism is used in seabass hatchery work.
Find out the sources of Daphnia or Moina used as food in the seabass hatchery and learn how to work a culture of them. Study the age stage of seabass when they are used as food and learn the technique of their use.
REQUIREMENTS:
For the culture of algae, rotifer, brine shrimp, and other micro-crustaceans (Daphnia, Moina) used as food organisms in seabass hatchery summarize how they are cultured and maintained. Describe the techniques in their use.
Give suggestions for improvements (if any) in the culture of these food organisms or in their use.
SCS/82/SBTC/PRAC. 4
TITLE: Identification of diseases and parasites of seabass
OBJECTIVES:
PROCEDURE:
Detailed procedures for the identification of diseases and parasites of seabass are enumerated below (Parts I–III). While only parts of these procedures can be practical in this course, they are all indicated for use as future reference, if required.
Part I — Method of dissecting fish for health examination
Fig. 1. Body structure of normal fish (Seabass, Lates calcarifer) Lateral view.
A. Right
B. Left
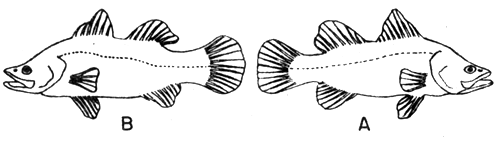
Fig. 2. Hold a pectoral fin with tweesers cut and open a small area underneath just enough to insert surgical scissors in (at the point 1).
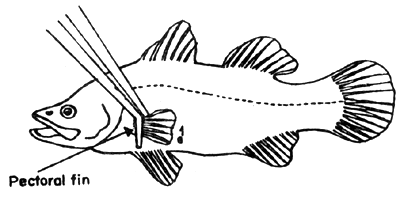
Fig. 3. Dissect carefully from 1 to 2, avoid cutting the internal organs.
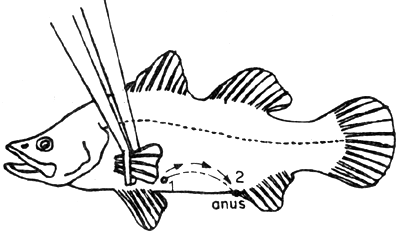
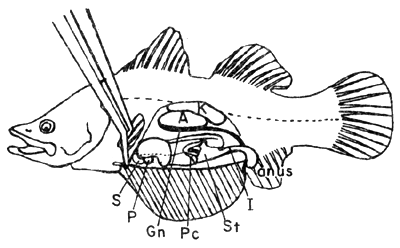
Fig. 4. General anatomical view
A. Air bladder
G. Gall bladder
H. Heart
I. Intestine
K. Kidney
P. Pancreas (Hepatopancreas in some fishes and shrimp)
L. Liver
St. Stomach
S. Spleen
Gn. Gonad
Pc. Pyloric cecae
Pr. Peritoneum
FISH EXAMINATION RECORD
| Sample No.: | Date: | Locality: | |||||
| Scientific name: | Common name: | Vernacular name: | |||||
| Sex: | Age: | Length: | |||||
| Size: | |||||||
| Weight: | |||||||
| Mature or immature: | Alive or dead: | Hours: | |||||
| Life history: | |||||||
| Environment: | |||||||
| Feeding: | |||||||
| Treatment: | |||||||
OBSERVATION RECORD:
| 1. | Body shape: | |
| 2. | Body colour and surface: | |
| 3. | Mucous on body surface: | |
| 4. | Fins and tail: | |
| 5. | Nostril and top of mandible: | |
| 6. | Operculum, outside: | |
| inside: | ||
| 7. | Eyes: | |
| 8. | Anus: | |
| 9. | Gills: | |
| 10. | Buccal cavity: | |
| 11. | Liver: | |
| 12. | Gall bladder: | |
| 13. | Intestine: | |
| 14. | Fat tissue and their membrane of intestine: | |
| 15. | Stomach: | |
| 16. | Spleen: | |
| 17. | Air bladder: | |
| 18. | Kidney: | |
| 19. | Heart: | |
| 20. | Fat tissue on the membrane of intestine: | |
| 21. | Wall of abdomen (cutting surface): | |
| 22. | Trunk cavity: | |
| 23. | Muscle: | |
| 24. | Brain: |
Part II — Identification of diseases and parasites of seabass
LABORATORY METHOD
Hispathology
Histology, the study of the micro-anatomy of specific tissues, has been successfully employed as a diagnostic tool within medical and veterinary science. Since then, considerable developments have taken place in all aspects of cellular biology with the result that today many novel and sophisticated histological techniques only recently devised for the mammalian histologist are now available to the fish histopathologist.
Before any satisfactory histological sections can be produced from biological material, strict attention has to be paid for its preparation. The very rapid rate of autolysis of fish tissues compared to that of homeotherms means that they must be handled rapidly to prevent degenerative changes within the specimen making ultimate diagnosis either unreliable and impossible.
Sampling procedure
For satisfactory histological preparations, only freshly killed or moribund fish should be considered. For most external lesions, careful post-capture treatment is essential because of the cause with which the teleost epidermis is abraded.
If the lesions are internal and the whole fish is to be preserved, it is essential that the full length of body cavity is opened, normally by slitting along the mid-ventral line. The viscera and swim-bladder should be carefully displaced and each organ incised at least once to allow maximum penetration of the fixative.
Fixation
The primary objective of fixation is to preserve the morphology of the tissue in a condition as near to that existing during life. This presupposes inhibition of both autolysis the “self-destruction” of tissues by intracellular enzymes released from their normal membrane-bound site after death-and putrefaction-the effects of bacterial degradation of the tissue.
Proper fixation is fundamental to satisfactory histological preparation and its importance cannot be over-stressed. If fixation is unsatisfactory, the end product will be a direct reflection of this.
Fixatives in common use in fish pathology
1. Formaldehyde
The most widely used fixing agent in any histological laboratory is formaldehyde (H.CHO).
Formaldehyde is not suitable for fixation in its concentrated form (40%), but forms an integral part of various compound fixatives usually in combination with such diluents as tap/ distilled water, buffer salt solution or physiological saline.
Fixative incorporating Formaldehyde
Phosphate buffered formalin
| 40% formaldehyde | 100 ml |
| Tap/distilled water | 900 ml |
| NaH2PO4H2O | 4 g |
| Na2HPO4 | 6 g |
Most tissues, though adequately fixed in 8–24 hours for routine diagnostic purposes, require a considerably longer fixation time if optimal preparations are to be made.
2. Bouin's fluid
| Saturated aqueous picric acid | 75 ml |
| Formalin | 25 ml |
| Acetic acid | 5 ml |
Although it is widely used in fish pathology because of its rapid penetration with little shrinkage or distortion, Bouin's fluid does cause partial disruption of red blood cells and has a swelling effect on collagen fibres.
Small pieces of tissue 2–3 mm thickness are fixed in 2–3 hours; larger blocks require up to 24 hours.
Decalcification — Decalcification techniques are less frequently employed in the fish laboratory.
The primary object of decalcification is to remove calcium ions from bony components of the specimen without damaging other components, so that sectioning is facilitated.
Processing
Schedules for the processing of fish tissues for hispathology Schedule A (manual processing)
Schedule X (rapid manual process)
NOTE: These schedules are given only as a general guideline and may be required to be altered to suit specific tissues.
In order to infiltrate with wax it is first necessary to remove all water from the fixed tissue. It is usual to begin dehydration with a 50–70% dilution of alcohol in water to prevent the distortion that would occur if a direct transfer to absolute alcohol were made. It is found to be an advantage particularly when dealing with hard tissue such as skin to incorporate within the processing schedule a number of baths of 8% phenol methyl alcohol (66 O.P.) as phenol has a softening effect on the tissues. Tissues are finally transferred through absolute alcohol baths (74 O.P.) to complete dehydration.
As alcohol is not miscible with paraffin wax, it is first necessary to treat the tissue with an agent which is miscible with both substances. There are several such reagents is general use of which xylene, chloroform and toluene are the most favoured. Xylene is probably the most commonly used and has the added advantage of actually rendering the block transparent when clearing is complete. It is rapid in action but tends to make tissues rather brittle if exposure is prolonged. Chloroform, on the other hand, although the most expensive of the clearing agents, does not appear to have the same hardening effect as Xylene and is found to be more satisfactory with fish tissues. It should be noted, however, that chloroform has a very low boiling point (60°C). If block are transferred directly to wax of a temperature higher than 59°C disruption of the tissue can occur with catastrophic results.
All clearing agents are volatile and in many cases toxic and inflammable. They should therefore be handled with care and stored in stoppered containers.
The function of wax impregnation is to provide a hard supported block for sectioning. Ideally, the wax should be of the same hardness as the tissue under investigation; this is, however, seldom achieved, owing to the large variety in consistency found in fish tissue. The hardness of wax is indicated by its melting point (M.P.), the harder the wax the higher the melting point. The waxes most commonly in use are in the range 54–58°C. There are a large variety available to the histologist and the ultimate choice is largely dependent upon the tissue under investigation. However, for routine work with fish tissues where there is a considerable variety of tissue consistencies an embedding medium such as Polywax * which consists of a blend of paraffin wax and plastic polymers is particularly useful.
Vacuum embedding, whereby impregnation with wax takes place at reduced pressure, is of particular value for difficult tissues, although the technique is seldom used routinely.
Embedding is carried out when impregnation is complete in order to provide a solid matrix to support the tissue. Various types of containers are used for this purpose including ice-cube trays, watch glasses and other small containers.
An alternative method which has proved eminently suitable for the smaller laboratory or where technical assistance is at a premium involves the use of Tissue-Tek** process (embedding cassettes). This technique is designed to complement the automatic tissue processor and provides a fast and efficient method for handling speciments from initial processing through embedding and sectioning to storing on file.
Sectioning
Section cutting probably causes more frustration in the fish histology laboratory than any other histological technique. To become competent in this aspect takes experience, a great deal of patience and an awareness of the problems that can influence it. Sections are cut on a microtome which like all scientific equipment comes in a variety of styles accompanied by an equal variety of efficiency. For the routine diagnostic fish laboratory a rotary microtome capable of cutting fairly large blocks (up to 30 × 30 mm) is ideal and should also be of sufficient weight to enable difficult tissue to be cut without vibration at the knife edge. Generally, blocks of fish tissue are cut at 5 cm.
Blocking out procedure for wax-impregnated tissue
Glass and metal moulds should be smeared with glycerin to prevent wax adhering to the surface.
Molten wax is then poured into the mould, within a few seconds the wax at the base of the mould will have solidified.
With heated forceps, the tissue is transferred and orientated so that the face to be cut is firmly embedded in the solidifying layer.
The mould is identified by labelling with the block number.
When a thin layer has hardened on the outer surface, the mould is quickly submerged in cold water which hastens hardening of the complete block.
When completely solidified, the block is removed from the mould and mounted on wooden blocks for microtomy.
Cooling of block
When cutting blocks, it will be found to be a distinct advantage if the blocks are kept cold by storage for several hours if necessary on ice. This procedure results in a firmer block and is particularly useful for difficult objects such as skin.
Staining
There is a wide variety of staining techniques applicable to fish pathology. Those though to be most significant from the diagnostic view-point are listed in the relevant appendices.
Staining techniques of value in the routine diagnostic laboratory
Before staining, sections must be completely de-waxed by placing in two changes of xylene each of 5–10 min duration. Sections are then transferred to water by first removing the xylene in absolute alcohol for 2–5 min and passing the sections through descending grades of alcohol, e.g., 90 percent, 70 percent, 50 percent, thus avoiding the possibility of sections being removed from the slide by diffusion currents.
* Difco Laboratories, Detroit, Michigan, U.S.A.
** Ames Company, lowa, U.S.A.
Haematoxylin and eosin (for general histology)
Take sections to tap water as described above, removing artefact pigments if necessary.
Stain in haematoxylin for 5–20 min depending on which stain is used (Lendrum's iron haematoxylin is recommended, see below).
Wash in running water for 2 min.
Differentiate in 0.5 percent acid-alcohol for a few seconds. Check differentiation level by examination under the microscope.
If the nuclei are sufficiently stained, ‘blue’ in 2% potassium acetate (if Lendrum's haematoxylin is used) for 5 min or alternatively in Scott's tap water substitute (see below) for 5 min.
Wash sections in H2O.
Stain in 1 percent alcoholic eosin for 3–5 minutes.
Remove excess eosin by rinsing sections in absolute alcohol (74 O.P.).
Check counterstaining and if satisfactory clear in xylene.
Mount in a synthetic resin medium.
RESULT. Nuclei: blue. Cytoplasm, connective tissue, red blood cells and muscle: red/pink.
Haematoxylin formulae
Although most haematoxylin stains may be obtained ready for use from various manufacturers, many workers prefer to make up their own solutions. Those listed below are the most commonly used in fish diagnostic laboratories.
EHRLICH'S ALUM HAEMATOXYLIN
| Haematoxylin | 6 g |
| Absolute alcohol | 300 ml |
| Distilled water | 300 ml |
| Glycerol | 300 ml |
| Glacial acetic acid | 30 ml |
| Potassium alum | in excess |
The haematoxylin is dissolved in the alcohol before adding the other ingredients. The solution may be “ripened” by exposing it to sunlight in a loosely stoppered container for several weeks; alternatively it may be partially oxidized by the addition of 0–3 g sodium iodate and is then ready for use. Staining time: 50–60 min.
HARRIS ALUM HAEMATOXYLIN
(modified from Mallory 1938)
| Haematoxylin | 1 g |
| Absolute alcohol | 10 ml |
| Ammonium or potassium alum | 20 g |
| Distilled water | 200 ml |
| Mercuric oxide | 0.5 g |
| Glacial acetic acid | 8 ml |
| (after cooling) |
Dissolve the haematoxylin in absolute alcohol, and the alum, previously dissolved in hot distilled water. Heat the mixture to boiling point and add the mercuric oxide. Cool rapidly and filter. The stain is ready for use when cool. Staining time: 20–30 min.
MAYER'S HAEMALUM
| Haematoxylin | 1 g |
| Distilled water | 1 000 ml |
| Ammonium or potassium alum | 50 g |
| Sodium iodate | 0.2 g |
| Citric acid | 1 g |
| Chloral hydrate | 50 g |
Dissolve the haematoxylin in the distilled water and add the alum, warming the solution if necessary to dissolve. Add the retaining ingredients. The solution is ready for use immediately.
The author has found the following modification of the formula gives a stronger, more precise, nuclear staining.
| Haematoxylin | 0.5 g |
| Distilled water | 500 ml |
| Ammonium or potassium alum | 25 g |
| Sodium iodate | 0.1 g |
| Acetic acid | 20 ml |
Do not add citric or chloral hydrate. Staining time: progressive 15 min; regressive 45–60 min.
Part III — Bacteriology
The diagnostic bacteriology of fish is basically similar to that of higher animals but many of the wide range of potential pathogens are from genera unfamiliar to the veterinary or medical micro-biologist. Isolation and interpretation of results also pose a number of problems due to the characteristics of the aquatic environment, which often has its own heavy microbial flora, and the intimate relationship between the physiology of a poikilotherm and its environment.
A significant number of bacterial diseases of fish involve micro-organisms which are components of the normal flora of gut or integument, which only become pathogenic under the influence of environmental changes such as rapid alteration of temperature, pollution, or dietary or hormonal stresses.
Diagnostic procedure
Dead fish should never be used for bacterial diagnosis because of the rapid post-mortem invasion of the tissue which takes place immediately after death or even peri-mortem and which may completely mask the original bacterial flora responsible for the condition. Ideally, several specimens should be examined from a range of live clinically affected fish, including early stages of the disease as well as moribund specimens.
Fish may be sacrified either by decapitation or anaesthetic overdose. If an internal bacterial examination is required the body surface should be disinfected and the viscera and kidney exposed by slitting along the ventral surface with a sterile scalpel then aseptically removing part of the abdominal wall.
Inocula for culture are best obtained by searing the exposed surface of the organ under investigation with a heated scalpel blade. A sterile area and the resultant inoculum streaked upon the requisite medium. Incubation temperatures vary with the organisms so that unless a good indication of the likely agent is forthcoming from the clinical picture or from smears it may be necessary to incubate at a range of temperature as well as on a range of media. Although for bacteriaemic diseases, the heart and kidney are the organs of choice, other organs should also be cultured to maximize the chances of recovery of any bacteria present.
Sampling of external lesions is extremely difficult since skin lesions are invariably invaded by secondary or saprophytic bacteria or fungi. These may mask the initial causative organism or even completely displace it.
In addition to culture, it is important to prepare smears from obvious lesions and, since many conditions are septicaemic, from blood and to obtain impression smears from renal or splenic parenchymal tissue. And then stained by Gram's method is recommended. Careful examination of such smears is of great value in establishing whether the condition has a bacterial component.
There are several diagnostic keys available for the fish pathogenic bacteria (Bullock 1971; Lewis 1973; Shotts & Bullock 1975). The taxonomic scheme of Glorioso et al. (1974) aimed at definition of all types of bacterial pathogens of aquatic animals is the most comprehensive but is more demanding in time and media. Once the morphology and Gram-staining proclivity of bacteria within a lesion have been defined in smears, subsequent rational isolation and identification should be possible.
REQUIREMENTS:
As much as possible from your work in this exercise, answer the following questions:
What groups of parasites have been found in seabass? Describe and mention especially the characteristics that you can use to classify them. Record the location, habitat and number of parasites. From your studies, how can you treat them.
From your observation, please put all records in the “Fish Examination Record” and consider what diseases you have found. What treatment should be applied?
SCS/82/SBTC/PRAC. 5
TITLE: Rearing of seabass broodstock in hatchery facility
OBJECTIVES:
To know proper techniques of feeding seabass brood-stock being reared in a hatchery — kinds of food, quantities to feed, frequency of feeding, techniques of feeding, etc.
To know how to monitor water quality in the broodstock tanks especially those useful for proper development of the broodstock.
To determine proper aeration of broodstock tanks.
To know the maintenance requirements of the tanks such as keeping it sanitary, removal of unused food and wastes, transferring broodstock in tanks when needed.
To be able to detect diseases or stress on the broodstock and the application of practical remedies or control.
To know how to handle female spawners as well as male spawners, maintaining proper sex ratio, especially upon approach of full maturation.
PROCEDURE:
You will be alloted, by groups some of the seabass brood-stock of the Institute to take care of during your training. Learn the history of the broodstock you will be handling, including source, age in the hatchery, present size and condition of the fish.
Take over with care the rearing of this broodstock under close advise of the instructor. Bear in mind the objectives above in the work on this broodstock during your assignment to this exercise. This is also a long-term exercise which should be continued during the duration of the course.
REQUIREMENTS:
Describe in detail the exercise you got in handling the seabass broodstock mentioning any new information which you may have come across in this work.
If you have any suggestions to give to improve this work, explain.
SCS/82/SBTC/PRAC. 6
TITLE: Larval rearing of seabass
OBJECTIVES:
To know the various receptacles used for rearing seabass larvae and how to prepare them for use.
To know the stocking density for seabass larvae in the rearing containers for proper growth and survival.
To learn about methods of providing aeration during larval rearing of seabass and how this is maintained.
To learn the proper feeding routine for the proper rearing of seabass larvae.
To be able to recognize and eliminate diseased or weak seabass larvae or fry.
To grade at periodic intervals seabass larvae to remove the “giants” and/or the “dwarfs”.
To learn the proper management of water needed in the rearing of seabass larvae and how to keep it in good quality.
PROCEDURE:
Obtain from your instructor stock of seabass larvae and the facilities to use for rearing the larvae. Prepare the rearing receptacle by cleaning it well and filling it with good quality water. Obtain previous history of the stock of larvae that you have and start the larval culture as instructed.
REQUIREMENTS:
Describe in detail your experience and observations in the rearing of seabass larvae. What have you observed to be the major cause(s) of mortality of seabass larvae? Explain.
If you have some suggestions to make to improve the present system used in the Institute, explain your suggestion.
SCS/82/SBTC/PRAC. 7
TITLE: Collection and selection of seabass spawners
OBJECTIVES:
To study the nature of the environment where the spawner migrate and congregate to spawn.
To know and list the types of gears used in catching the spawners at the spawning grounds.
To record nature of tide, time of the day, phase of moon and nature of weather during the spawning day(s) of observation.
To be able to select a healthy running ripe female spawner among a batch of captured full-grown seabass from the spawning grounds.
To be able to identify potential milters from the batch of caught full-grown seabass.
To learn how to handle properly the spawners so that the ripe eggs and sperms can be extracted as needed.
PROCEDURE:
This practicum will require an evening field trip preceded by orientation instructions by the staff instructors before the field trip. Keen observations should be made on the objectives listed (1–6) so that records of observations can be made at site.
REQUIREMENTS:
Upon return to the Institute, organize and record the observations you made in the field. Is there or are there any places in your country where similar conditions like the mouth of Songkhla Lake exists? Mention these places and subsequently on your return you may wish to investigate if seabass spawning exists.
Make any comments or suggestions you can give on the environment, conditions of spawning site, method of collection of spawners, and disposition of spawners.
SCS/82/SBTC/PRAC. 8
TITLE: Spawning seabass by stripping running ripe spawners
OBJECTIVES:
To learn how to select running ripe females as source of eggs for spawning by stripping.
To learn how to select mature male spawners as source of sperm for spawning by stripping.
To observe and practice the techniques of seabass spawning by stripping.
To make post stripping procedures of egg fertilization, preservation of sperms or eggs, disinfecting and washing after fertilization.
To observe methods of handling the fertilized eggs for proper development.
PROCEDURE:
This practicum will require an evening field trip to the spawning ground on a selected day. The staff instructor will give you background orientation on the procedure before the trip. Observe keenly during the trip so that you can accomplish the objective listed.
REQUIREMENTS:
Describe in your own words the observation and practice you have undergone during this trip keeping in mind particularly the objectives listed above. Should you have any comments or suggestions to make, explain.
SCS/82/SBTC/PRAC. 9
TITLE: Study of seabass egg, embryonic development, hatching and early larval development
OBJECTIVES:
To learn how to distinguish the immature eggs, mature unfertilized eggs, and the newly fertilized eggs of seabass.
To study the nature of the milt and sperm.
To observe the embryonic developmental stages in relation to time (hours/minutes) until hatching.
To observe how the seabass egg hatches.
To observe how the seabass hatchling looks like and follow its changes during the early larval development.
PROCEDURE:
If lucky during and after evening field work, you will have in hand a good amount of fertilized eggs. Recall in previous practice your observations on the immature egg, the mature egg and the sperm. This time observe under magnification how the newly fertilized egg looks like. Follow up the development of the embryo noting the time spent under each developmental stage.
Observe how hatching is accomplished, noting the duration from fertilization when this takes place.
Examine closely the newly hatched larvae (hatchling) and follow up its development in the days to come until it metamorphoses into fry and juvenile. This latter part is a long-term part of this exercise which you should continue to keep up.
REQUIREMENTS:
Record your observations on the above in detail; if necessary use drawings and tables.
SCS/82/SBTC/PRAC. 10
TITLE: Natural spawning of seabass in controlled environment
OBJECTIVES:
To be able to trace the development of seabass broodstock from its larval stage to the third year.
To learn the feeding procedure followed in the development of the broodstock.
To study the necessary facilities, equipment and supplies for the development of broodstock supply.
To learn the appropriate age of broodstock to spawn, quality of broodstock to use, and the existing conditions (tide, phase of moon, weather, water quality, etc.) when spawning takes place.
To practice the handling and management of the spawned fertilized eggs.
To study how to handle broodstock for repeated spawning.
PROCEDURE:
In previous practice, you have taken part in taking care of the broodstock kept under the Institute's hatchery facility. Recall the methods you have gone through. This time you will actually work closely and actually try to spawn the spawners reared under controlled environment. Practice the techniques involved under close supervision and advice of the experienced staff instructors.
REQUIREMENTS:
After going through this very important exercise, recall your experience and describe in detail in your own words.
Are there any suggestions, constructive comments you may have on the procedures and techniques used?
SCS/82/SBTC/PRAC. 11
TITLE: Improved grader for sorting seabass fry
OBJECTIVES:
To minimize losses of fry through the cannibalistic behaviour of the species.
To minimize handling in manual sorting.
To minimize post-grading mortalities due to physical damage, disease infection and other forms of stress.
PROCEDURE:
Using an improved grader, fabricated from plastic sheet mounted on suitable wooden frame, conduct the following grading procedure:
Dip out fry from a nursery tank and place them in plastic basins allowed to float in the tank.
Do same for all tanks, in which the fry need grading.
Identify roughly number of size groups of fry contained in plastic basins.
Allocate tanks thus, vacated of fry to each size groups, and at the same time give a revised stocking density for each tank.
Pass fry through graders and distribute graded fry according to prescribed schedule.
After grading, allow fish to settle down for an hour or two, dip out all sub-normal looking individuals especially dark-coloured fry close to water surface.
Sub-normal fry thus removed be immediately treated with drug.
REQUIREMENTS:
Briefly make a report on the following observations:
Number of size groups graded.
Roughly note the length of each size group.
Give the number (or a rough estimate) of fry/fingerlings having a bulging abdomen, and the size group(s) involved.
Give the number (or a rough estimate) of sub-normal fish, and describe briefly their conditions and reasons for being termed sub-normal.
SCS/82/SBTC/PRAC. 12
TITLE: Field observations on the seabass industry of Thailand
OBJECTIVES:
To make a field trip to selected seabass production centre(s) in Thailand and make observations and inquiries on the industry.
To inquire on the practical methods used by private producers of seabass in Thailand.
To observe the design of projects and equipments, facilities, and materials being used.
To inquire on the profitability of private projects, including costs/benefits, and market outlets.
To inquire on sources of stock and other needed supplies and their costs.
To observe or inquire how the products are handled.
PROCEDURE:
Join the arranged field trips and take notes of your observations. Take into consideration the listed objectives above. Include other information which you find useful especially in your future work.
REQUIREMENTS:
Write a narrative of the observations you made during the field trips. For some of the methods used, you may have some suggestions or recommendations. Record these in your report. Record variations on the industry among the centres visited, if any.
SCS/82/SBTC/PRAC. 13
TITLE: Designing of a seabass hatchery
OBJECTIVES:
To learn how to select a suitable site for a seabass hatchery.
To prepare the layout, and as far as possible, the design and structural details for a proposed seabass hatchery.
To prepare tentative items and estimates of investment or capital costs involved.
To prepare tentative items and estimates of possible operational costs that may be involved.
To predict possible production and value of production and look into feasibility of this type of venture.
PROCEDURE:
Based on the previous lectures and practical exercises already completed in this course, select a prospective site for a seabass hatchery in your country. Bear in mind the criteria for the selection of suitable site for this type of project. Prepare the layout for such a hatchery giving, as far as possible, the design, structural details and the necessary facilities and equipments required.
Make estimates of costs.
Make estimates of production and value of production and analyze possible profitability of such a project.
REQUIREMENTS:
Make a report based on the directions set under procedures, above.
SCS/82/SBTC/PRAC. 14
TITLE: Designing netcages for seabass culture
OBJECTIVES:
To know the materials to use in making various types of netcages for rearing seabass.
To design and practice the making of a seabass nursery netcage.
To design and practice the making of a seabass grow-out netcage.
PROCEDURE:
Initially, make a checklist of the materials and equipments needed in making a seabass nursery and grow-out netcage. Prepare a typical design for this type of cages. Practice in actual making such cages.
REQUIREMENTS:
Record the checklist of materials and equipments used in making the cages.
Draw the design of typical nursery as well as grow-out netcages giving all structural details.
Prepare costings of materials and equipments used and submit this list.
![]()
![]()
![]()