![]()
![]()
![]()
5.1 How do I Choose my Ingredients?
5.2 How do I Decide How Much of Each Ingredient to Use (Formulation)?
5.3 What Machinery Do I Need? And Where Do I Get It?
5.4 How Do I Make Compound Feeds?
5.5 Economics of Feed Production
5.6 What Special Problems Am I Likely To Have In Making Compound Feeds?
In an earlier part (section 2) of this manual the reasons for feeding were explained. A description of the different feed components was given in section 3, together with some notes on feed compositional tables. In section 4 the advantages of using compounded feeds rather than individual ingredients was discussed.
Let us assume therefore that you are now convinced that feeding your aquaculture stock with compound feeds is a good idea. You have perhaps already looked for local suppliers of compound feed designed for the species you are growing. Maybe you have already tested them on your farm. Perhaps there were none readily available locally however. If there were, you might have thought that they were extremely expensive. So you have begun to think "can I make my own compound feeds?", "if so, how do I begin?", "what equipment will I need?" This section of the manual provides preliminary answers to each of these questions.
First of all - yes, you can make your own feeds. If your aquaculture production does not exceed 300 tons per year it may not be difficult to do so. If your farm is very large it may be more difficult because the scale of the feed-making operation becomes a large extra management problem. In the latter case there would be, unless you put the feed mill under separate management, a danger of its operation becoming too important a component of the farm manager's responsibilities. Also, professional advice would be essential in designing the feed manufacturing plant, selecting and installing equipment, and training staff to operate it. This section of the manual does not attempt to deal with the establishment of a large feed mill, which is a very specialized topic. However, it does show how simply feed-making operations can be established on a small farm scale. Small scale feed manufacture is not difficult but it does require a lot of care if the feed is going to be successful for your farm. If you decide not to make your own, some suggestions on ways to locate suppliers of ready-made feeds are given in section 10 of the manual.
In the previous paragraph I said that I regarded the feed requirements of a farm with an aquaculture production of not more than 300 tons per year as a relatively small scale operation, for which it is possible to set up a feed production plant on the farm site. On a moist feed basis, the feed requirement for a farm of this size would not exceed an average of about 3 tons per day, though it could seasonally rise much above this level. Remember that the higher AFCR's of moist feeds, due to their higher moisture content, mean that you would require larger amounts of them than you would of an equivalent dry feed. Also, since the storage of moist feeds would require refrigeration, you would have to make your feeds on a daily basis. However, the making of moist feeds is a much easier and cheaper form of farm manufacture than setting up a dry feed plant. Also, moist feeds can be quite easily converted into dry feed if preferred.
An idea of the scale of equipment cost involved in making your own feed is given in section 5.3.
The labour involved in feed manufacture is mostly needed for moving ingredients and finished compound feed from one part of the plant to another. In small plants, moving feed by hand between different pieces of equipment will also be necessary. It is only efficient to have full-time labour employed for the feed plant if the mill is going to be in operation all day, every day. It is difficult to ensure regular operation of a dry pellet mill which is manufacturing for only one production unit (your farm) since the smallest equipment available may produce more than the average daily requirement of feed. There is therefore a tendency to make feed intermittently and draw feed from stock on a daily basis. The result is that the plant and its labour force may be standing idle much of the time. Moist feed requires daily manufacture but the operation need not take all day. Some farms find that they are able to use the same labour force to feed the fish as to make the feed itself. Most of the work in the feed mill can therefore be done by drawing labourers from the general pool of labour available on the farm. It is essential to have a full-time foreman and a deputy, who is responsible solely for feed manufacture, raw material intake, quality control, storage, etc.
There is a wide choice of machinery available for feed manufacture; section 5.3 explains the different types and their functions and gives some examples of them, while Appendix III lists the names and addresses of some feed equipment suppliers.
Sections 5.1 and 5.2 deal with the selection of raw materials and the formulation (i.e., how to choose how much of each ingredient) of compound feeds. Section 5.4 deals with the methods of making feed. This manual thus explains the general way in which these operations may be tackled so as to give an understanding of these topics. It is suggested, however, that you seek on-site advice when you start up operations on your own farm, particularly for formulation work. Once you have started making your own feed you will become more and more confident and you will be able to alter your own feed formulae and adjust your manufacturing techniques to reflect changes in feed requirements and ingredient availability. Advice in the initial stages may be obtained through your local fisheries department or from international advisers supplied as part of aquaculture development programmes funded through the development banks (World Bank, Asian Development Bank, etc.,) or UNDP, or by bilateral funding agencies.
Three major factors govern the choice of ingredients, once you have decided to make your own aquaculture feeds. These are:
- Suitability for species being cultured (type and quality)
- Quantity available locally and regularity of supply
- Cost
SUITABILITY
Major sources of high-protein animal and vegetable ingredients, together with cereals or cereal by-products and, probably, vitamin/mineral premixes will be required. In fact a very wide range of ingredients can be utilized - this topic has been covered in section 4. Each species has its own dietary requirements (section 6). Some thrive better on certain types of ingredients than on others and different proportions of them are needed. The dietary requirements of different species are discussed in section 6, while Appendix II gives some typical examples of the various ingredients and their proportions (formulae) used in actual diets. Choosing the ingredients to be used in feed manufacture on your farm is firstly a matter of matching the types available locally (or that can be imported) with the needs of the formulae of feed suitable for the species of fish or shrimp which you are farming. The first thing to do therefore is to prepare a list of the raw materials available to you.
Having prepared that list, you must make an assessment of the quality of the ingredients available. This means you must carefully define each raw material (see sections 3 and 4) and allot to it a real or theoretical analytical composition. This information is essential before formulation work (section 5.2) can be done. Real analyses of local ingredients may be available from the suppliers or from surveys conducted by local government departments of fisheries or other livestock production departments or by local universities. In the absence of local information, ingredient compositional tables have to be used (Appendix IV). This is less satisfactory than the use of accurate local information but is often necessary.
Finally, you must try to find reputable suppliers who are known to supply good quality ingredients, free from adulteration and toxicity. Quality, as is stressed in many parts of this manual, is an essential part of your feeding programme which, if neglected, can have disastrous results. Talk to other livestock farmers and to the livestock departments in local universities and government institutions - they will be able to point you towards the reliable suppliers of ingredients.
QUANTITY AND REGULARITY OF SUPPLY
Choose ingredients which are regularly available in sufficient quantities. Some ingredients are only available seasonally. The more regular the supply of each ingredient is, the better. Otherwise you will have to purchase much larger quantities than you would like to, and face the problems of longer-term storage, or you will have to make frequent changes in your feed formulation because of the lack of a specific ingredient which is not available in sufficient quantities to supply your needs. Sometimes a very suitable ingredient may be available locally. However, if you want to include an ingredient in a formulation at a 57, inclusion level, for example, and you are going to make 500 tons of feed per year, but there is only about 100 kg of the material available per week, it is unsatisfactory. It is not going to be suitable for use, even though it is basically a good ingredient. In this situation it would be better Co include it in only one of the types of feed you are making (say for a starter feed) rather than try to include it in them all and run out of it every few days and have to change the formulae.
So, the message is: choose ingredients which are available in sufficient quantities on a regular basis.
COST
Cost is the last but not the least of the three major factors to consider. The cost of each ingredient can vary quite markedly from one location to another, depending on supply and demand. What may be a very acceptable ingredient in one place may have to be rejected, or used in smaller quantities, in another because it is too expensive. Cost obviously interacts with availability and suitability. All these factors have to be reviewed simultaneously in the selection of ingredients for your compound feeds.
You should therefore complete your summary of the raw materials available in a tabular form which shows analytical characteristics (composition - from actual local data or from tables) and cost per unit at the farm site. This table will be used when you formulate your feed (i.e., decide how much of each ingredient to use) and assess its potential cost.
A great deal of information has, by now, been gathered by you. You know (section 5.1) the analytical characteristics and cost of the available ingredients; the requirements (section 6) on the animal you are farming are known; and typical examples of formulae are available (Appendix II). How is all this information to be put to use in deciding how a feed formulation should be constructed? Each ingredient used should be included because it contributes a particular component necessary in the diet. For example, it may be a good source of marine protein, it may supply a need for a certain type of fatty acid, etc. Also the object is to satisfy the dietary requirements of the animal at the cheapest cost. This is known as 'least cost formulation'.
Least cost formulation is best done using a specifically designed computer programme. The computer stores all the data gathered about the available raw materials (analyses and cost), together with the specifications of the feeds to be formulated. It will then do the necessary calculations and will turn out a least-cost formulation. Although computer hardware and software for this purpose is available it may not be economically sensible to purchase it unless very large numbers of such calculations are regularly necessary, e.g., in a large feed mill or a group of smaller ones. On an individual farm it may only be necessary to do the basic formulations once - after that it may only be a matter of examining the effect of relatively minor changes. These changes may be either in specification, based on new information as to the animal's requirements, or in the ingredients, based on new availability or cost data. Linear programming for least-cost formulation is therefore not dealt with in this manual since it is not thought appropriate for small scale aquaculture. Those who are interested in this subject are recommended to consult Chow et al., (1980).
Feed formulation by 'hand' calculation is a tedious and repetitive (but not difficult) process of trial and error. A simple calculator is necessary for this work. Some examples of the way in which it can be done are worked through in this section of the manual.
For formulation, the following information is necessary:
1. A list of available raw materials, together with compositional data and cost information;
2. The specifications of the diet to be made, in terms of levels of protein, lipid, EAA, EFA, etc.;
3. Knowledge of the special suitability of certain individual raw materials for the animal to be fed.
The first step in formulation is therefore to assemble the above information in an organized and accessible way.
The second stage is to draw up a worksheet for feed formulation, which includes provision for the major nutrients and for cost data. An example of a data sheet is given in Table 18.
In Table 18, column 1 is for the full description of the ingredients, column 2 is for the proposed inclusion rate, and column 3 is for the cost of that proposed inclusion rate (e.g., a 21% inclusion rate of an ingredient costing US$ 0.50/kg would contribute 0.50 × 21/100 = US$ 0.105 to the cost of each kg of diet). Columns 4 are for the contributions certain inclusion rates will make to the analytical characteristics of the diet (e.g., a 15% inclusion of an ingredient with a protein level of 44% would contribute 44 × 15/100 = 6.6% of protein to the final diet). Similarly column 5 is to record the available energy contributed to the feed by the inclusion level of each ingredient contemplated (see later in this sub-section for calculation of this factor). The results can then be totalled to see how they comply with the specifications for the ration. Re-adjustments can then be made, using another worksheet or modifications to the same one.
The worksheet given in Table 18 only refers to the major nutrients because it is necessary to balance these with the principal specifications of the diet first, before other factors such as EAA content, etc., can be examined. When the basic diet has been provisionally established its other analytical features can be examined and adjustments made to reach the final, balanced, formulation.
Now let us assume that we have ingredient data ready and that we have inserted on the worksheet (Table 18) what the specifications of the diet to be formulated are. How do we start the formulation? It is here that the experience of the formulator comes in. He will have certain pre-determined ideas in his mind about minimum inclusion rates of certain ingredients, based on his and others' experience. This experience is a constantly changing and developing matter; it is also very specific to the individual doing the formulation. It is therefore impossible to lay down in this manual specific rates of minimum inclusion, especially as there are so many species and different raw materials available. However, it is hoped that the examples of feed formulae given in Appendix II and the discussion of dietary requirements in section 6 will help you to start to form your own judgements of these matters. Personal judgement is an essential part of formulation and it is a factor which the computer cannot replace.
For the purpose of the following examples to be worked through in demonstrating how formulation is done, I have selected a very simple diet -initially to consist of only three ingredients - and a theoretical diet specification. For simplification I am also going to use only two analytical characteristics - the protein and the lipid level. I am also going to assume that, of these three ingredients, one which is of known nutritional value exists locally and is of acceptable cost. The formulator in the example has therefore already decided, on the basis of past experience, on a minimum inclusion rate for it. Thus the amount of this ingredient is already fixed. Let us assume that he has four other ingredients to select from.
To give clarity to the example to be worked through, names of the ingredients 1/ and other information available have been set out below:
1/ It must be stressed that all figures used are fictitious and for example only.
DIET SPECIFICATIONS
|
Species: |
Mermaid |
|
Diet Type: |
Growers |
|
Lipid Level: |
7% (on as-fed basis) |
|
Protein Level: |
26% (on as-fed basis) |
INGREDIENTS LOCALLY AVAILABLE
|
Ingredient Name
|
Analytical Composition on an as-fed basis (%) |
Cost (US$/ton)
|
|
|
Lipid |
Protein |
||
|
Fish Meal |
6.0 |
55.0 |
600 |
|
Exp. Groundnut Cake |
13.7 |
34.5 |
350 |
|
Ext. Soybean Meal |
1.3 |
46.8 |
490 |
|
Ext. Rice Bran |
2.4 |
13.3 |
150 |
|
Maize Meal |
4.5 |
9.8 |
180 |
For the example, I am assuming that the formulator (nutritionist) has made up his mind, from past experience, that mermaids must have a minimum of 10% fish meal in their diet. The inclusion level of this ingredient in the diet is therefore fixed - the fish meal will thus contribute 0.6% lipid, 5.5% protein and US$ 60/kg to the final ration respectively. This can therefore be entered on the diet formulation worksheet (Table 18). Having defined (for this example) that there shall be only two other ingredients, the nutritionist decides to select one high protein ingredient (groundnut or soybean) and one low protein ingredient (rice bran or maize meal). This is because it is already obvious to him that the dietary protein requirements for mermaids cannot be matched if all three ingredients are high in protein or if the remaining two, after fish meal (at a fixed level of 10%), are low in protein. This can be demonstrated as follows. The dietary protein requirement is 26%. The fish meal, at 10% of the diet, will provide 5.5% protein to it. If the remaining 90% of the diet consists of either maize meal (9.8) protein) or rice bran (13.3% protein), or any combination of the two, the final protein content of the diet cannot be high enough:
|
Fish Meal |
Inclusion Level 10% |
Protein Contribution 5.50 |
|
Maize Meal |
90% |
8.82 |
|
Totals |
100% |
14.32% |
|
or Fish Meal |
10% |
5.50 |
|
Rice Bran |
90% |
11.97 |
|
Totals |
100% |
17.47% |
|
|
Inclusion Level |
Protein Contribution |
|
or Fish Meal |
10% |
5.50 |
|
Maize Meal |
45% |
4.41 |
|
Rice Bran |
45% |
5.99 |
|
Totals |
100% |
15.90% |
Table 18 Worksheet for Diet Formulation
|
Ingredient |
Inclusion Rate (%) |
Cost of Inclusion |
Nutrient Contribution on as-fed basis (%) | ||||||||
|
|
|
|
H2O |
LIP |
PROT |
FIB |
NFE |
ASH |
CA |
AVAIL P |
DE (kcal/kg) |
|
|
|
|
|
|
|
|
|
|
|
|
|
|
|
|
|
|
|
|
|
|
|
|
|
|
|
|
|
|
|
|
|
|
|
|
|
|
|
|
|
|
|
|
|
|
|
|
|
|
|
|
|
|
|
|
|
|
|
|
|
|
|
|
|
|
(1) |
(2) |
(3) |
|
|
|
(4) |
|
|
|
|
(5) |
|
|
|
|
|
|
|
|
|
|
|
|
|
|
|
|
|
|
|
|
|
|
|
|
|
|
|
|
|
|
|
|
|
|
|
|
|
|
|
|
|
|
|
|
|
|
|
|
|
|
|
|
|
|
|
|
|
|
|
|
|
|
|
|
|
|
Totals |
|
|
|
|
|
|
|
|
|
|
|
|
Specification |
|
|
|
|
|
|
|
|
|
|
|
In all three cases the protein level is too low. Obviously any other combination of maize meal and rice bran would also fail to supply enough protein. Similarly, if the remaining two ingredients, after fish meal, were the two high protein ingredients, groundnut and soybean, the final protein level would be too high for the specifications:
|
Fish Meal |
Inclusion Level |
Protein Contribution |
|
10% |
5.50 |
|
|
Exp. Groundnut Cake |
90% |
31.05 |
|
Totals |
100% |
36.55% |
|
or Fish Meal |
10% |
5.50 |
|
Ext. Soybean Meal |
90% |
42.12 |
|
Totals |
100% |
47.62% |
|
or Fish Meal |
10% |
5.50 |
|
Exp. Groundnut Cake |
45% |
15.53 |
|
Ext. Soybean Meal |
45% |
21.06 |
|
Totals |
100% |
42.09% |
Clearly the two other ingredients, after fish meal, have to consist of one high protein and one low protein ingredient. The next question to decide is therefore 'what mixture of the two types will provide the correct protein level? There are four possible combinations - groundnut/rice bran; groundnut/maize meal; soybean/rice bran; and soybean/maize meal. This problem is solved as follows:
We know that the 10% inclusion of fish meal will contribute 5.5% protein to the final ration. Thus we know that the other 90% of the diet must contribute the rest (26.0% - 5.5% = 20.5%). This portion of the formulation can be treated as a seperate diet, consisting of the two remaining ingredients. In other words, we can say that the non-fish meal portion of the diet must contain 20.5 × 100/90 = 22.78% protein.
Thus we know that the other two components must provide this final level of 22.78% (say 22.8%) protein to balance the fish meal contribution. The amount of each of the four possible pairs of ingredients which will supply this level of protein can be calculated as follows. A cross is constructed thus:
|
Subtracting No. 3 from No. 1 gives the value of No. 5 |
regardless of the positive or negative signs |
Thus, for the example being worked through, the four possible mixtures can be determined as follows:
Then the actual combinations of ingredients can be calculated as follows:
a)
|
|
(100.0%) |
|
|
|
b)
|
|
(100.0%) |
|
|
|
c)
|
|
(100.0%) |
|
|
|
d)
|
|
(100.0%) |
|
|
|
Thus, for the four alternatives, the levels of each ingredient in the final diet (remember the above mixture constitutes only 90% of the final mix) would be:
|
(Totals = 90%) |
We can now check out the effect of combining each of the four alternatives with fish meal on the final dietary protein level and, while we are doing so, examine also the level of lipid in the final diet achieved by each combination. The diet cost can also be calculated from the ingredient costs.
Remember that the original specifications of the diet to be formulated were:
|
Lipid 7.0% |
Protein 26.0% |
The results of the four possible formulations are:
|
Ingredient 1/
|
Inclusion Rate |
Inclusion |
Contribution to |
|
|
(%) |
Cost (US$/ton) |
Lipid (%) |
Protein (%) |
|
|
a) FM |
10.0 |
60.00 |
0.60 |
5.50 |
|
RB |
49.7 |
74.55 |
1.19 |
6.61 |
|
EGC |
40.3 |
141.05 |
5.52 |
13.90 |
|
100.0 |
275.60 |
7.31 |
26.01 |
|
|
b) FM |
10.0 |
60.00 |
0.60 |
5.50 |
|
MM |
42.7 |
76.86 |
1.92 |
4.18 |
|
EGC
|
47.3 |
165.55 |
6.48 |
16.32 |
|
100.0 |
302.41 |
9.00 |
26.00 |
|
|
c) FM |
10.0 |
60.00 |
0.60 |
5.50 |
|
RB |
64.4 |
96.60 |
1.55 |
8.57 |
|
ESM
|
25.6 |
125.44 |
0.33 |
11.98 |
|
100.0 |
282.04 |
2.48 |
26.05 |
|
|
d) FM |
10.0 |
60.00 |
0.60 |
5.50 |
|
MM |
58.4 |
105.12 |
2.63 |
5.72 |
|
ESM
|
31.6 |
154.84 |
0.41 |
14.79 |
|
100.0 |
319.96 |
3.64 |
26.01 |
|
1/ FM = Fish Meal; RM = Rice Bran; MM = Maize Meal;
EGC = Expeller Groundnut Cake; ESM = Extracted Soybean Meal.
In all four cases, since this is the component we have been balancing, the protein level is correct, at 26%. This checks our previous calculations. Which of these possible formulae agrees with the dietary specifications we seek to meet? Clearly it is (a), which has a lipid level of 7.3%, that meets the specifications best. By coincidence it also turns out to be the cheapest of the four alternatives, so it would be the formulae to select. The compound feed would therefore be made from 10% fish meal, 49.7% rice bran, and 40.3% expeller groundnut cake.
Had the required dietary lipid level in the above example been 5% instead of 7% none of the four alternative formulae would have met this specification adequately, and the formulator would have had to decide how to modify them. In practice there would be several ways of doing this. One would be to add a pure lipid (such as maize/corn oil) to the diet, if one were available, and to modify the levels of the other ingredients to re-balance the protein level. However, this would increase dietary cost; diet (d), which, (because of its lipid level) would be the diet on which this modification would be carried out, is already the most expensive of the alternatives. The most sensible way to overcome this problem would be to remove the restriction (originally only placed on the formulation for the sake of simplicity in this example) that there should not be more than three ingredients in the final diet. If five ingredients are available, why not use four or five of them, instead of three? To do so would provide a more balanced diet in other ways also, probably. A simple way (it is not the only way, nor is it the cheapest solution) of doing this would be to look at ways of combining diets (a) and (d). Compared to the new required lipid level of 5% (a) is too high, at 7.31% and (d) is too low, at 3.64%. I have selected (d) rather than (c), which is also too low in lipid, because formulation (d) contains the least of the most expensive secondary ingredient, soybean meal.
A new formulation, using all five ingredients could be derived in the following way to meet the new 5% lipid, 26% protein specifications. In diets (a) and (d) the 10% fish meal component is common and can be excluded from the calculations. Thus, in diet (a), the other two ingredients (rice bran and groundnut) contribute 1.19 + 5.52 = 6.71% lipid to the feed. In diet (d) the two other raw materials (maize and soybean) contribute 2.63 + 0.41 = 3.04% lipid. The combined contribution required is 5% (the specified dietary lipid level), less the 0.6% (contributed by the fish meal) =4.4%. We can then solve the problem of how to combine all four ingredients to produce the required lipid level by constructing a cross similar to that used in balancing the protein level originally:
Level of Lipid in Two-Component Mixes Proportion to Include
Thus the proportion of the ingredients in diet (a) to use in the final formula would be
and the proportion of the ingredients in diet (d) to be used would be
Applying this to the final formulation, the results would be as follows:
|
Ingredient |
|
Inclusion Level |
|
Fish Meal |
10% × 100% =10.00 % |
(10.0%) |
|
Ext. Rice Bran |
49.7% (from (a)) × 37.1% =18.44 % |
(18.4%) |
|
Exp. Groundnut Cake |
40.3% (from (a)) × 37.1% =14.95 % |
(15.0%) |
|
Maize Meal |
58.4% (from (d)) × 62.9% =36.73 % |
(36.7%) |
|
Ext. Soybean meal |
31.6% (from (d)) × 62.9% =19.88 % |
(19.9%) |
|
|
100.00 % |
(100.0%) |
Let us then check if the new formula complies with the new diet specifications (5% Lipid; 26% Protein):
|
Ingredient
|
Inclusion Rate |
Inclusion Cost |
Contribution to |
|
|
(%) |
(US$/ton) |
Lipid (%) |
Protein (%) |
|
|
Fish meal |
10.0 |
60.00 |
0.60 |
5.50 |
|
Ext. Rice Bran |
18.4 |
27.60 |
0.44 |
2.45 |
|
Exp. Groundnut Cake |
15.0 |
52.50 |
2.06 |
5.18 |
|
Maize Meal |
36.7 |
66.06 |
1.65 |
3.60 |
|
Ext. Soybean meal |
19.9 |
97.51 |
0.26 |
9.31 |
|
Totals |
100.0 |
303.67 |
5.01 |
26.04 |
As can be seen, the new formula complies with the 5% lipid, 26% protein specifications and now consists of a five component diet costing US$ 303.67/ton - 10% fish meal; 18.4% rice bran; 15% groundnut cake; 36.7% maize; and 19.9% soybean.
The above simple examples show how to balance a diet for two components, lipid and protein, from five available ingredients. In practice the problems seem much more complex, since the diets need to be balanced for a number of other component specifications as well (see section 6), such as energy, minerals, essential amino acids (EAA's), etc. Also, many more ingredients are normally used, including a vitamin mix. The principles used are exactly the same as in the above examples, however.
When selecting ingredients in a preliminary way from a wide range of available raw materials it is often useful to make a crude comparison of them for a selected parameter on a 'best-value' basis. The following examples are based on the same ingredient characteristics used in the earlier formulation examples, for which fuller analyses are now given:
|
Ingredient |
H2O % |
LIP % |
PROT % |
FIB % |
ASH % |
NFE % |
Cost (US$/ton) |
|
Fish meal |
8.7 |
6.0 |
55.0 |
2.4 |
24.7 |
3.2 |
600 |
|
Exp. Groundnut Cake |
9.5 |
13.7 |
34.5 |
10.7 |
5.6 |
26.0 |
350 |
|
Ext. Soybean Meal |
11.3 |
1.3 |
46.8 |
5.9 |
6.7 |
28.0 |
490 |
|
Ext. Rice Bran |
8.9 |
2.4 |
13.3 |
9.4 |
9.6 |
56.4 |
150 |
|
Maize Meal |
10.0 |
4.5 |
9.8 |
2.6 |
3.0 |
70.1 |
180 |
Two questions may be posed, for example
a) which of the high protein ingredients is the 'best value' protein andb) which of the two cereal products is the 'best buy' for available energy? The answers to these questions are worked through below:
(a)
|
1 unit (%) of protein from fish meal costs |
|
10.91 |
|
1 unit (%) of protein from groundnut costs |
|
10.14 |
|
1 unit (%) of protein from soybean costs |
|
10.47 |
|
1 unit (%) of protein from rice bran costs |
|
11.28 |
|
1 unit (%) of protein from maize meal costs |
|
18.37 |
Thus it can be seen that the best buy for protein is expeller groundnut cake at these prices and analyses. This assumes that the protein quality (EAA content) of all three is the same. It is not. Fish meal has a much better EAA profile than the others. This is where the nutritionist uses his judgement to over-ride simple calculations. A computer programme would take account of the level of major EAA's in the ingredients as well as other factors in assessing 'least cost' or best buy. It is interesting to note the high cost of protein from maize meal, which would not be used primarily for its protein contribution.
(b)
Using the factors for digestible energy (DE) in kcal/g which are given in section 3.1.5 of this manual (i.e., 3.0 for non-legume and 2.0 for legume carbohydrate (NFE); 8.0 for lipids; 3.8 for plant protein and 4.25 for animal protein), the DE of these ingredients can be calculated as follows:
|
Ingredient |
Calculation 1/ |
kcal/kg |
|
Fish Meal |
= [(55 × 4.25) + (6.0 × 8.0) + (3.2 × 3.0)] × 10 |
= 2913.5 |
|
Exp. Groundnut |
= [(34.5 × 3.8) + (13.7 × 8.0) + (26.0 × 2.0)] × 10 |
= 2927.0 |
|
Ext. Soybean |
= [(46.8 × 3.8) + (1.3 × 8.0) + (28.0 × 2.0)] × 10 |
= 2442.4 |
|
Ext. Rice Bran |
= [(13.3 × 3.8) + (2.4 × 8.0) + (56.4 × 3.0)] × 10 |
= 2389.4 |
|
Maize |
= [(9.8 × 3.8) + (4.5 × 8.0) + (70.1 × 3.0)] × 10 |
= 2835.4 |
1/Calculation: First bracket = protein; second = lipid; third = NFE. The first figure in each bracket is the % of the component, e.g., 55 = 55% protein. This is the same as saying 55 g of protein in 100 g of sample. The final × 10 factor converts the result to kcal/kg instead of kcal/100 g
The cost of energy (cost/kcal) would therefore be as follows:
|
(US$/kcal) |
|
|
Fish Meal |
|
|
Exp. Groundnut |
|
|
Ext. Soybean |
|
|
Ext. Rice Bran |
|
|
Maize |
|
At these prices therefore, rice bran is (just) a cheaper source of energy than maize and both are very much cheaper than the high protein ingredients as energy sources.
These then are the basic principles of formulation calculations 'by hand'. Greater detail, and information on computer techniques, is given in the papers listed in 'further reading'.
Further reading (for section 5.2.):
Hardy (1980); Deyoe (1976); Chow et al., (1980); Butcher (1976); Mason (1976); Halver (1978).
5.3.1 Feed Types
5.3.2 Types of Machinery or Equipment
5.3.3 Equipment Sizing
So far in this section, I have dealt with the choice of raw materials and how to decide how much of each to use in designing a feed (formulation). Now we start to discuss the small scale manufacture (for farms producing less than 300 tons of aquaculture product per year) of aquaculture feeds.
Before dealing with feed production in section 5.4, some information on the topic of machinery is necessary. This sub-section (5.3) defines some of the machinery used in feed manufacture and gives some rough guidelines for sizing of equipment. Examples of feed machinery suppliers are given in Appendix III.
Firstly I want to explain the types of aquaculture feed, before continuing to deal with the kinds of machinery used in their manufacture. Figure 3 shows the major types of feeds used in aquaculture.
Aquaculture feeds fall basically into two types - dry and non-dry. Dry feeds are normally made from dry ingredients but they can also be made by drying a feed made from moist ingredients or from mixtures of dry and moist ingredients. Dry feeds are not completely free from moisture; they reach an equilibrium moisture content (usually about 7-13%) depending on the environment. Non-dry feeds are divided into two major categories - wet and moist. There is no agreed or exact demarkation line between them: I define wet feeds as those which are made entirely or almost entirely from high moisture ingredients, such as 'trash' fish, waste slaughterhouse products, undried forage, etc. As such they would have moisture contents of about 45-70%. Moist feeds are made from mixtures of wet, or moist, and dry raw materials, or from dry ingredients to which moisture has been added. Usually moist feeds range from 18-45% moisture. There is no really clear division between 'moist' and 'wet' feeds. A third class of products - flaked feed - is designed for aquarium fish, fish fry and early post-larval shrimp and is therefore not covered in this manual.
Dry feeds may be simple mixtures of dry ingredients, in which case they are called 'mashes' or meals'. If they are formed into a compacted shape, which may be hard or relatively soft they are called pellets (sometimes large pellets are referred to as cubes in livestock feeds but this term is rarely applied in aquaculture because pellet size is mostly quite small). Pellets can be made in a range of sizes (see section 4.3.). Depending on the processing technique used, pellets may float or sink when placed in water. The non-floating type are often broken up and then sieved into a range of smaller sizes, called crumbles or granules, for small fish or shrimp.
Figure 3 Types of Compounded Aquaculture Feeds
* USED MAINLY FOR LARVAE OR VERY YOUNG FRY AND FOR AQUARIUM FISH THIS TOPIC IS NOT DEALT WITH IN THIS MANUAL
Non-dry feeds, whether 'moist' or 'wet' are either extruded or non-extruded. An extruded feed is one which is made into a product like spaghetti or noodles by forcing it through narrow holes in a special piece of equipment. Non-extruded moist or wet feeds may simply be non-formed single ingredients (such as 'trash' fish) or mixtures of them, or they may be formed by machinery (but usually by hand) into cakes, balls and pastes. Natural binding materials in the feed, or added binders, enable them to be formed in this way. Extruded moist feeds are sometimes re-formed into balls by hand before feeding.
Extruded moist pellets can be dried, by machinery or by sun-drying, into dry sinking pellets - thus the link between the two products in Figure 3. Pellets can also be moistened (re-hydrated) before use to form semi-moist pellets.
During the production of either dry or non-dry feeds heat may or may not be used. Sometimes moist (e.g., 'trash' fish and fish viscera) ingredients may be pasteurized before use. Non-extruded moist feeds may be cooked or steamed during manufacture to increase their water stability. Dry pellets may be made by a 'cold' process or steam may be used in their manufacture. All pelleting generates some heat mechanically. All floating pellets receive a considerable amount of heat during processing.
Table 19 shows the main types of machinery necessary for the production of each type of aquaculture feed dealt with in this manual. A brief description of each piece of equipment follows. The names and addresses of some feed equipment suppliers are given in Appendix III.
Scales
Accurate scales for weighing ingredients and completed feeds are essential parts of all feed mills. For the size of operations being considered here, simple platform scales (Figure 4) are adequate. The type that have a direct reading dial are the easiest to use and are least likely to cause mistakes to be made. Those which require manual balancing by moving counter weights along a bar are less reliable, but cheaper. Accurate manufacture according to formulation depends on good scales; this item is often neglected, with insufficient money being spent on it. Scales with a taring device are the best (the ability to adjust to zero after a container has been placed on them so that the weight of the actual ingredient being weighed can be read directly from the dial).
Table 19 Types of Equipment Necessary for the Production of Different Kinds of Aquaculture Feeds
|
|
Dry |
Non-Dry | |||||
|
|
Mash Meal |
Floating Pellets |
Sinking Pellets |
Granules |
Extruded |
Pastes, Cakes and Balls |
Non-Formed |
|
Grinder/Mill (Dry Products) 1/ |
+ |
+ |
+ |
+ |
+ |
+ |
- |
|
Grinder (Wet Products) |
- |
- |
- |
- |
+ |
+ |
+ |
|
Dry Mixer |
+ |
+ |
+ |
+ |
+ |
+ |
- |
|
Wet Mixer |
- |
- |
- |
- |
+ |
+ |
? |
|
Elevators 2/ |
? |
+ |
? |
? |
? |
- |
- |
|
Conveyors 2/ |
? |
+ |
? |
? |
? |
- |
- |
|
Pelleter and Dies |
- |
- |
+ |
+ |
- |
- |
- |
|
Mincer/Extruder and Dies |
- |
- |
- |
- |
+ |
? 3/ |
- |
|
Cooker/Extruders |
- |
+ |
- |
- |
- |
- |
- |
|
Surge Bins |
? |
+ |
+ |
+ |
? |
- |
- |
|
Cooler/Dryer |
- |
+ |
+ |
+ |
? 4/ |
- |
- |
|
Fat Sprayer |
- |
? |
? |
? |
- |
- |
- |
|
Cooker |
- |
+ |
- |
- |
? |
? |
? |
|
Steam Boiler |
- |
+ |
+ 5/ |
+ 5/ |
- |
- |
- |
|
Freezer |
- |
- |
- |
- |
? 6/ |
? 6/ |
? 6/ |
|
Crumbier |
- |
- |
- |
+ |
- |
- |
- |
|
Sifter |
- |
+ |
+ |
+ |
- |
- |
- |
|
Bag Sewer |
? |
+ |
? |
? |
- |
- |
- |
|
Scales |
+ |
+ |
+ |
+ |
+ |
+ |
+ |
Notes:
1/ Not needed if all dry products purchased in ground form.
2/ Manual labour can substitute, especially in smaller plants.
3/ Feed balls sometimes formed from extruded products.
4/ Only if product not used moist.
5/ Not in 'cold' process.
6/ Only if product not to be used immediately.
Grinders/Mills (Dry Ingredients)
The mill or dry grinder is a means of reducing the size of dry ingredients so that they are suitable for mixing into a feed and for any subsequent processes that occur during manufacture. There are many types of mill available. The two most common ones are attrition, or plate mills, and hammermills.
The attrition or plate mill depends on shearing the feed between two roughened plates, one or both of which are 'rotating'. This type of mill is good for coarse grinding but is not very efficient at producing the fine particles from typical aquaculture feed ingredients which are necessary for high water stability feeds.
Hammermills are the type of impact mill (other types, such as centrifugal impact mills are frequently used for grinding flour) which is most generally suitable for reducing the particle size of a wide range of dry animal feed ingredients. The basic principle of the hammermill is that its grinding chamber consists of a series of stationary or, more often, swinging, hammers pinned to plates attached to a central rotor. The hammers strike and break up the incoming material, which is forced through a perforated steel screen. Sometimes a fan or blower is used to assist the removal of the ground product. The principle of the hammermill is illustrated in Figure 5.
Figure 5: Cross-section view of Hammermi11, showing Rotary Feeder, Air Separator for Heavy Foreign Material, Permanent Magnet, Hammer Rotor and Grinding Screen.
The perforated steel screens of hammermills are available with different hole sizes, ranging from about 0.8 mm upwards, depending on the fineness of the final product desired. The output of the mill depends on the horsepower of the motor, the type of feed being ground, and the size of the screen mesh. For example, a 50 HP hammermill will fine grind about two tons/hour of maize or about 4 tons/hour to a coarser particle size. In most small scale feed mills a 5-10 HP hammermill will adequately cope with the requirement for ground products. Many dry ingredients will be bought in a pre-ground form, though some will require further size reduction.
Grinders/Mincers (Wet Products)
In the manufacture of moist or wet aquaculture feeds it is also necessary to reduce the particle size of wet ingredients. The principle of the wet feed grinder is the same as that of the domestic mincer, with which everyone is familiar. The ingredient falls into a continuous spiral or screw, which is motor driven. The screw forces the feed against a knife which is rotating against a fixed die plate, through which the feed is forced. Die plates are available with a range of hole sizes depending on the coarseness of the final product desired. Often, feeds are minced twice with successively smaller die plates to produce a better result. The product is extruded in spaghetti- or noodle-like form. The principle of a mincer is illustrated in Figure 6.
Figure 6: Principle of Wet Feed Mincer/Grinder
This type of grinder is available in capacities ranging from the small domestic mincer up to commercial sizes capable of grinding many tons of product per hour. Many of the larger mincers are able to tackle bones as well as flesh and also frozen blocks (provided these are pre-cut), frozen whole fish etc., (see Figures 15-18).
Dry Mixers
Efficient mixing is the key to good feed production. The feed will not be the balanced formulation it is designed to be unless it is properly mixed. Dry mixers are a mechanical means of achieving this and are of two main types - vertical and horizontal. The vertical mixer (Figure 7) consists of one or more vertical screws which elevate the ingredients to the top of the mixer where they fall by gravity to the bottom, to be mixed and re-elevated.
Figure 7: Vertical Mixer
Horizontal mixers (Figure 8) consist of a series of paddles or metal ribbon blades mounted on a horizontal rotor within a semi-circular trough. The blades move the material from one end of the mixer to the other, tumbling it as it goes. These mixers usually discharge the mixed product from the bottom, using the same mixer blade action.
Vertical mixers are the most common type found in small livestock feed mills. However, the vertical type is less well suited to aquaculture feeds than the horizontal type, which are much more efficient in blending in small quantities of liquids (such as added lipids) or in mixing ingredients with different particle sizes.
Another type of mixer, which is similar to the horizontal type in action, has a bowl-shaped or flat-bottomed container in which a series of paddles are mounted on a spindle driven by a motor mounted either above or below the mixer (Figures 9 and 10). This type of mixer has the same advantages over the vertical type of mixer as the horizontal mixers mentioned earlier. In addition it is cheap and is therefore frequently used in aquaculture farms, particularly in South East and South Asia. It can also be used for mixing moist feeds.
Wet Mixers
Vertical mixers are unsuitable for mixing wet ingredients. Horizontal mixers are more suitable but, because of their complex construction, are often difficult to clean properly. There is also a tendency for sticky materials to adhere to the blades and to accumulate at one end of the mixer. Simple bowl or circular mixers, illustrated in Figures 9 and 10, are the roost suitable types for mixing wet ingredients or mixtures of wet and dry materials. They can also be used for mixing dry ingredients. This type of mixer is available in sizes suitable for mixing a few kilograms or of dealing with several tons of ingredients. The larger types discharge the mixed product from the bottom.
Figure 9: Bowl Type Mixer
Figure 10: Circular Type Mixer
Elevators and Conveyors
There are many different types of equipment for conveying feeds from one part of a mill to another or from one piece of equipment to another. Some are designed to operate horizontally, some on a slope (Figure 11), others elevate the material vertically to a different level of the building. The requirement for elevators and conveyors will depend on how automated the mill is to be and how its plant is laid out. The utmost use of such equipment is made in the modern animal feed mill (often using pneumatic systems) to minimize labour needs and to maximise the use of land by building multi-storey, rather than horizontally arranged plants. In small-scale aquaculture feed mills, most of this type of work (feed transfer) will be done manually so the topic of mechanical equipment for this purpose is not dwelt upon further here (see 'further reading' at the end of this section).
Figure 11: Example of an Elevator
Pelleters
The process of pelleting consists of forcing a soft feed through holes in a metal die plate to form compacted pellets which are then cut to a pre-determined size. The machinery which has been developed for this purpose is now very diverse in design and there is much controversy between different equipment manufacturers as to which type is the most effective. Most pelleters now have a conditioning unit mounted above them where liquids such as water and molasses can be added to improve pelletability. The water is sometimes added in the form of steam which softens the feed and partially gelatinises the starch content of the ingredients, resulting in firmer (and more water stable) pellets. From the conditioner, the feed falls (Figure 12) into the centre of the pelleter itself. In the pelleter two or more rollers and feed ploughs push the material through the holes of the die plate (Figure 13). A photograph of a die plate is shown in Figure 14. Usually the die plate itself rotates and, on its outer side, stationary knives cut the pellets to a pre-set length. From there, they are transferred to a cooler/drier to remove the heat which is generated during the pelleting process or is often added during steam conditioning. The moisture content of the pellets also needs to be reduced for proper storage.
Pelleting and the efficient operation of pellet mills are specialized subjects on which many books have been written. This manual cannot do more than illustrate the principle behind the pelleting operation and the reader is strongly advised to consult publications cited in 'further reading' at the end of this section, particularly MacBain (two publications, neither dated) and Pfost and Pickering (1976). All makers of pelleting equipment provide instruction in their use and some organize training courses in this and related topics.
Die hole sizes usually range from 2 mm up to 9.5 mm. The thickness of the die plate helps to determine the compactness and stability of the pellet. Pellet dies can be up to about 90 mm thick.
Figure 12a: Component Parts of a Conventional Pellet Mill
Figure 12b: Component Parts of a Conventional Pellet Mill
Figure 13: Typical Die and Roller Assembly used for Producing Hard Pellets
Figure 14: Die Plate from a Commercial Sized Pelleting Machine
Mincers
The same equipment as is used to mince or grind wet ingredients for 'wet' or 'moist' feeds can be used to extrude the mixed feed in 'noodle' or 'spaghetti' form. Examples of suitable mincers are shown in Figures 15-18. This is what makes the production of moist feeds, or dried feeds made from moist feeds extruded in this way, highly suitable for small-scale aquaculture feed production. These mincers are relatively cheap. One mincer can do both jobs (preparing raw materials and extruding the final product). Preferably, more than one should be purchased because this makes mill organization much easier and more efficient and provides a back-up in case of equipment failure. Mincers are extremely simple to operate, unlike pelleters. An example of the moist feed product from a mincer is shown in Figure 19.
Figure 15: Example of Mincer for Extruding Moist Feeds
Figures 16: Example of Mincers for Extruding Moist Feeds
Figures 17: Example of Mincers for Extruding Moist Feeds
Figures 18: Example of Mincers for Extruding Moist Feeds
Figure 19: Extruded Moist Feed Produced by Mincing Equipment
Mincer die plates come in a range of hole sizes and can often be produced locally. It is not normally possible to cut the extruded material to a fixed length (although some more expensive mincers do this too) but the extruded product breaks into short pieces on handling and is easy to feed. It can be fed moist, or dried mechanically or by sun-drying. A combined mixer/mincer for moist diets which can be mounted on land or on a boat is shown in Figure 20.
Figure 20: Combined Mixer-Mincer for Moist Aquaculture Feed Production
Cooker/Extruders (Expanders)
The extrusion cooking process, because it causes a high level of gelatinisation of starches, results in feeds with good water stability. It can produce 'expanded' floating feeds as well as sinking pellets. The process also improves the digestibility of the product. However, extrusion cookers are usually very large and expensive to purchase and operate. As such they are inappropriate for consideration for small-scale aquaculture feed production; they are therefore not dealt with further in this manual (see Pfost and Pickering, 1976).
Surge Bins
This term simply refers to temporary storage bins where feed can be held stationary while awaiting movement to the next stage of the manufacturing process. For example, where a batch mixer takes 15-20 minutes to mix a feed, the presence of a surge bin before it enables the next set of ingredients to be weighed and transferred into it during the mixing process of the previous batch. Surge bins are a means of speeding up production rather than gearing the whole output of the mill to the slowest part of the process.
Coolers/Driers
Pellets from dry pelleters may exit at up to 88°C and 17-18% moisture. The temperature must be quickly reduced to ambient or less and the moisture level to 10-12% or less for proper storage and handling. Pellets must therefore be cooled and dried. Moist pellets, if they are going to be converted to dry pellets, also need drying although their temperature is not normally much elevated during manufacture.
Coolers/driers are of two basic types, horizontal and vertical. In the vertical type, pellets usually fall by gravity into a chamber through which air is sucked by a fan (Figure 21).
In the horizontal type of cooler/drier (Figure 22) the pellets are conveyed on a perforated steel mesh or moving belt through which a cooling air stream is passed. The horizontal method is best for 'sticky' dry pellets or for moist feeds (if it is necessary to dry the latter). Heat can also be applied to the air supplied to horizontal driers for reducing the high moisture contents of moist feeds to those of dry pellets for storage. This type of drier is standard in the production of noodles and spaghetti and other pasta. Horizontal driers may be very large and are often arranged on several spatial levels.
Figure 21: Vertical Cooler/Drier
Figure 22: Horizontal Cooler/Drier
Fat Sprayer
Fat is sometimes added to feed after pelleting or extrusion because high lipid feeds do not pellet so well as low lipid products. Fat is therefore sprayed onto the feed in mixers placed in the production flow after the pelleting equipment.
Cookers
Cookers are used for steaming/cooking feeds to assist water stability through starch gelatinisation. Obviously the design of cookers has almost infinite variation. Hastings (1975) mentions two types capable of steaming up to 10 kg batches of moist feed cakes, made by hand. One is a cylindrical kettle with a false perforated bottom on which the cakes can be placed and steam allowed to enter. The other type has an hour-glass shape and the cakes are placed above a bamboo screen placed over the narrowest section.
Steam Boiler
Where steam is used in the pelleting process, a steam boiler is needed. A pellet mill with a capacity of 1.0-1.5 tons per hour of pellets would require a steam generation plant capable of producing about 60-90 kg/hour of steam at 100-150 psi.
Freezer
A freezer will only be required if it is intended to freeze moist feed or moist feed ingredients for subsequent cold storage. Space can often be rented at a local cold store or fish processing unit; it is doubtful if the purchase of a cold store could be economic for a small-scale aquaculture feed plant.
Crumbler
A crumbler is a roller mill with rolls specially designed for breaking up pellets into smaller particles (Figure 23). Usually the crumbler consists of two corrugated rolls situated below the cooler/drier exit. The pellets can then be diverted into the crumbler, if crumbles or granules are desired, or they can by-pass it.
Figure 23: Crumbler
Sifter
The sifter is a separator, usually oscillating, with a number of screens. It is used to separate off crumbles or granules which are too large and, both in pellet and crumble manufacture, to screen off the dusty portion (fines) of the feed for return to the pelleter for further processing. The sifter (Figure 24) is a means of ensuring a good quality product with the right particle size and a low level of fines, which are wasteful to feed.
Figure 24: Sifter
Bag Sewer
Machines are available for sewing the tops of the bags in which dry feed may be placed for storage. This machine is not normally necessary unless the feed is going to be sold to other farms.
Having decided to set up a plant to produce a certain type of aquaculture feed you then have to decide what size of equipment to purchase. This must be done by working out the maximum amount of feed you need to manufacture in one hour. The following example is provided.
We will assume that you have decided to make a moist feed on a daily basis. Also that you are unable to even out your farm production/harvesting schedule completely because of seasonal differences in growth rate and the fact that you do not have many ponds. Let's say that you have therefore worked out, from typical AFCR's and from feeding rate tables, that you will require between a minimum of 2 tons and a maximum of 8 tons of moist feed per day 1/.
1/ If you are going to produce a dry pellet, your needs could be averaged out (to say 6 tons/day). You could then decide only to work a 7-hour day, 5-day week, 50-week year, building up a stockpile to serve the period when feed demand is greatest. You would then need to size your plant on the basis ofA pelleter capable of producing 1.5 tons/hour would be adequate. Bear in mind that large pellets can be produced more quickly than small pellets so the final sizing of the plant depends on the rate of production of the equipment when it is set to make the sizes of feed you intend to use on your farm.
You have a number of options here. One would be to size your plant so that it is capable of producing 4 tons/day in an 8 hour work shift and, when the demand is greatest, work on a double shift basis. Whether it is best to do that or to size the plant to a capacity of 8 tons/day in an 8-hour shift depends on the local economics of labour and equipment costs. Installing a plant which is capable of producing twice as much feed in a given time does not necessarily double its capital cost.
We will assume, for this example, that you have decided to produce 8 tons/day in an 8-hour shift (average 1 ton/hour). The major piece of equipment you need to purchase, which governs the rate at which your whole mill operates, is the mincer/extruder. You will need one capable of extruding at least 1 ton/hour of the size of feed which you intend to use. I mentioned earlier that the same type of equipment is also suitable for mincing/grinding your moist raw materials. If (say) 30% of the feed, on average, is composed of moist ingredients you will need an additional mincing capacity of 0.3 tons/hour. Rather than buy one mincer capable of (say) 1.5 tons/hour to cover all your mincing and extrusion needs it would be better to buy two separate mincers, one to be used normally for raw material preparation and one normally for mixed feed extrusion. This gives you greater flexibility and means that the two different operations can proceed simultaneously, rather than sequentially. It also gives you a 'spare' mincer if one should break down, which would enable you to cover that emergency through longer working hours until a repair could be effected.
If you are producing one ton per hour maximum of extruded feed you will also need to produce one ton per hour of mixed feed to put into the mincer. However this does not necessarily mean that you need a mixer capable of holding a whole ton in each batch. (Mixing is a batch operation, as compared to extrusion, which is a continuous operation). Again, the final sizing depends on the economics of labour versus equipment costs. It may be better, since at least two batches of feed could be mixed during one hour, to buy a wet mixer capable of mixing 0.5 ton batches. Before the wet mixture is prepared, the dry ingredients may be mixed separately in some processes. As the same kind of mixer will do in both cases, it may be better to buy two small mixers, rather than one large one, from the repair point of view (as in the case of mincers). If the moist ingredients represent 30% of the final product it follows that the dry ingredients will constitute only 70% of the mixing volume if you wish to premix them. In the example given here, I would suggest the purchase of two mixers, each capable of mixing batches in the 0.5 - 0.75 ton range. Going back a stage further in the manufacturing process we come to dry grinding. You must assess what proportion of your ingredients will be delivered in small enough particle size for immediate use and which will have to be ground on the farm site. Let us assume that 50% will have to be ground or re-ground. You would then need to grind (assuming a year-round average of 6 tons/day of feed consumption) tons of dry ingredients per year. Again, you have a number of options. You could grind every day, on a 5-day week, 7-hour day, 50-week year basis, in which case you would need a grinder capable of grinding about 0.5 ton/hour of the ingredient which you have in your formula which is the most difficult (i.e., the slowest) to grind. However, grinding is a noisy, dusty and unpopular activity. Also, grinders are relatively cheap so you might decide to buy a grinder capable of grinding 5 tons/hour and only use it two days per month. Against this you must balance the frequency of raw material delivery and the fact that ground materials do not have such good keeping qualities as unground feeds.
As you will see from the above example there are no strict rules for the sizing of the equipment for your feed plant; many options are open. However, I hope the example and discussion has given you some ideas on how to approach the topic. Start by calculating your maximum daily feed production requirement and work back from the size of the main piece of equipment (pelleter or mincer for formed diets, or mixer in the case of meals or mashes), balancing the important factors shown below:
- ease of operation
- relative cost of options
- back-up capability in case of equipment failure
- storage requirements and availability
- maximum use of equipment
Finally, a word or two about cost. Any costs of equipment quoted in this manual would rapidly become out of date, so no specific details are given. Equipment suppliers (Appendix III) would be able to supply this data at the time the feed plant is being designed. However, the following examples are provided to give some idea of the scale of cost involved in feed manufacture:
a) the equipment necessary (based on manual labour) for a simple mixing and extrusion plant for producing approximately 5 tons per day of moist feed (excluding the grinding of dry materials) was estimated to cost about US$ 20 000 - 25 000 (1984 prices). This figure did not include buildings, power supplies etc.b) a complete 5 tons/day moist feed plant, operating on a 6-8 hour/day basis, inclusive of all grinders, mixers, extruder, conveyors, steelwork, electrical controls etc., but excluding erection costs, building, and commissioning, was quoted at about US$ 160 000 (1984 prices). This plant was based on minimization of labour.
c) a complete 5 tons/day dry pelleting plant as in (b) was estimated at about US$ 140 000 (1984 prices)
d) a simple lay-out consisting of a vertical mixer, a hammer mill, a 1 ton/hour pelleting system, including pelleter, conditioner, cooler, surge bins and crumbler, one bucket elevator, and three screw conveyors, but excluding steam boiler, was estimated at US$ 71 000 (1982 prices) for India (Chow, 1982).
One more point - don't forget to buy adequate spares for all your machinery. No machine works for ever. Make sure you have spares on site of all components which are most likely to wear or break.
Further reading for section 5.3:
MacBain (two publications; neither dated); Pfost and Pickering (1976), ADCP (1983); Csavas et al., (1979); Hastings (1975); Orme (1971); Stivers (1971); Coil Morales (1983a; 1983b); Robinson (1971); Robinette (1977); Hastings (1979); Williams (1986); Simmons (1963).
5.4.1 Simple Mixtures
5.4.2 Forming into a Shape
5.4.3 Cooking
5.4.4 Drying
5.4.5 Compound Feed Production
As has been shown in earlier parts of this manual, there are very many different types of compound feed. The manufacture of some of them is a very sophisticated process, especially steam pelleting (and, even more so, cooker/extrusion expansion techniques). This manual is designed to be simple to read and deals only with the production of feed for small-scale aquaculture. Methods for the production of dry floating or sinking pellets by steam pelleting or cooker-extrusion are not therefore dealt with here. Each topic would require its own manual 1/; it is suggested that the advanced student of feed manufacture should consult Pfost and Pickering (1976) and Simmons (1963), on these topics. The production of dry pellets by another, simpler, process is discussed in this section, however.
1/Small, complete, pelleting plants (e.g., 1 ton/hour) for other livestock are produced by a number of manufacturers (Appendix III), each of which produce detailed manuals of operation of which the two by MacBain (undated) are examples. Several suppliers also produce small, laboratory-scale, pelleters some of which can be used with steam injection. Their output is very small and, as they are not designed for continuous operation (but for research), they are not appropriate for the daily production of feed for a commercial farm.
In this part of the manual a number of relatively simple methods of making compound feeds for aquaculture are dealt with. These are discussed in increasing order of complexity, ranging from a mixture of two ingredients up to the preparation of moist or dry pellets from many ingredients selected according to a formula (see section 5.2) specifically designed for the species being farmed.
This sub-section is therefore divided into five parts, each summarizing methods of feed manufacture, in increasing order of complexity:
- Simple mixtures
- Forming into a shape
- Cooking
- Drying
- Compound Feed Production
As the title implies, this is simply the act of mixing two or more ingredients together. The raw materials used may be all dry, all moist, or a mixture of both. The purpose of mixing them, rather than feeding them to the animals separately, is to provide a more balanced feed (i.e., not all high protein ingredients or all high carbohydrates etc.,).
A simple mixture like this, particularly one consisting of dry materials only, does not remain a single feed once it is put into the water in which the animals live. It will tend to break down very quickly into its component parts. However, it is a simple way of providing a better feed than a single ingredient. Simple mixtures, such as groundnut cake and rice bran, are often made for this purpose where no feed making equipment is available on the farm at all.
The ingredients should be as finely ground when purchased as possible, to ensure that the stock can ingest them. The mixing process can be done by hand, by shovel on the floor, by pounding in a bowl (Figure 25), or by using a simple mechanical mixer. A concrete mixer will do.
The main thing to be careful about in this type of simple mixing is that the proportions of the ingredients are correct and that no contamination occurs. The ingredients should be weighed out, not measured by volume, because the bulk densities of different ingredients vary widely (Appendix XI). An alternative method is to weigh one batch of each ingredient and then to mark its volume in a container specifically reserved for that ingredient, using volume measurement in each successive batch. Even this is a little inaccurate however, because the bulk density of the same ingredient can vary, especially according to its particle size. Care must be taken to see chat only the intended ingredients are included in the mixture. Make sure that the ingredients are well identified and that chemicals which may (but should not be) be stored nearby are not included by mistake. Do not mix feed on a floor area which is contaminated with herbicides or pesticides, for example.
It is more efficient to present a feed mixture to the animals in a form (shape) which will retain its structural integrity until the animals have eaten it rather than break down immediately into its component parts, as will happen with the simple dry mixtures dealt with in section 5.4.1.
Forming the mixed feed into a shape can be done simple by hand - this will be described here. More complicated and efficient ways are described in section 5.4.5.
Forming the mixture into a compact shape requires the addition of a moist ingredient or a liquid - water or an edible oil, for example, - and preferably the inclusion of an ingredient with binding properties. Natural ingredients with known binding properties include cooked (or pre-gelatinized) potato or tapioca starch, sago, sticky rice, etc., (see Appendix XII),
Basically the technique consists simply of choosing ingredients with known nutritional value which will stick together when mixed on their own, or when water or vegetable oil is added to wet them sufficiently. Fat can be better applied if a spraying device is used but remember to use one which is not contaminated with chemicals. The actual moisture content necessary to produce the 'stickyness' needed for constructing this type of mixed feed varies for each mixture. Don't add too much water at first, you can always add more later. Keep moulding the well-mixed mixture in your hand to test its stickyness. It must not be of a runny consistency (too wet) and it must not crumble out of your hand (too dry). The ideal mixture is that which, when you squeeze a ball of it in your hand, extrudes a 'sausage' of dough-like material from between your thumb and your first finger which will stick together and not fall off or be runny. Mixtures of this type can be formed into various shapes. Up to this stage the mixing can be done as in section 5.4.1 - by hand, or by using a simple mixer like a clean concrete mixer.
Figure 25: Mixing Feeds by Hand
The choice of the shape and size of the final product can be modified according to the way in which your stock reacts to the feed. The shape and size should be that which promotes the maximum feeding activity with the least competition between individual animals. Flat cakes, large lumps of paste and spherical balls of material are suitable. Flat cakes have been used successfully for milkfish and shrimp, for example. Feed for eels is often presented in paste form on a feeding tray, from which the eels actively feed. Feed mixtures formed into moist balls have been successfully used with many species, including tilapia and shrimp. 1 have seen marine shrimp feed well on very large (1 kg or more) balls of moist feed.
Here again, as with 'unformed' mixtures, the 'manufacturing' process is very simple. Reasonable care to see that the correct ingredients in the correct proportions are used and that the moisture content is correct will ensure that a good product is made. In a feed designed for milkfish (Table 20), Hastings (1975) defined the added water as 12%, for simplicity. In fact the amount necessary to get a good paste or cake will depend on the actual moisture content of the other ingredients. I prefer therefore to see the formula written as in Table 21. In Table 21, the quantities of all the ingredients have been re-defined as percentages of the total, excluding the water content. The instruction "add water to (the desired) consistency" is then given. The final total moisture content of this feed would have been about 48%.
Table 20 Formula for a Milkfish Production Feed Cake (Hastings, 1976)
|
|
(%) |
|
Trash fish |
10 |
|
Rice bran |
27 |
|
Coconut cake |
12 |
|
Soybean cake waste |
25 |
|
Dry cassava |
14 |
|
Water |
12 |
|
|
100 |
Table 21 Formula, as in Table 20, written in preferred manner
|
|
(%) |
|
Trash fish |
11.4 |
|
Rice bran |
30.7 |
|
Coconut cake |
13.6 |
|
Soybean cake waste |
28.4 |
|
Dry cassava |
15.9 |
|
|
100.0 |
|
Water |
add to consistency |
The smaller the particle size of the ingredients, the better the water stability of the final product will be. The ingredients can be pre-ground (before delivery) or ground and sifted on site. In no case should the feed particles be larger than 2 mm (preferably less than 1 mm).
Wet ingredients must be fresh and the final feed, if fed moist, must be used on the same day as it is made or it must be refrigerated or frozen.
Cooking the moist products described in section 5.4.2 much improves their water stability because it gelatinises some of the natural starches present in the ingredients.
Cooking can be, and often is, done by adding sufficient water to make the mixture into a slurry (like a thick soup or porridge) and heating it in a pot over a fire. The moisture content is then reduced until the mixture is thicker and more viscous (sticky). It can then be formed into balls or cakes and fed. This method of cooking is very simple but tends to overcook the feed. It has the advantage of reducing the bacterial content of the feed but it may also severely damage its quality by destroying vitamins and reducing the availability of amino acids.
A better method is to place the pre-formed cakes or balls into a steamer/cooker (section 5.3.2) and steam them for about 30 minutes. This technique can also be used for pre-gelatinizing the high carbohydrate ingredients of a feed, such as tapioca or potato starch, before they are added to the mixture.
The cakes or other forms of feeds described earlier, whether cooked or not, can be dried so that they can be stored for subsequent use, rather than be fed on the day on which they are made.
Drying can be done in an oven but usually it is difficult to keep the drying temperature low enough to prevent the feed's quality being damaged. Forced air drying is better (a combination of heat of a lower temperature and air circulation). In practice, sun-drying is often satisfactory in tropical climates. Here the feed can be spread in thin layers on a clean flat surface and dried in the sun. It must be protected from birds and other animals and covered during rain. It is best to spread the feed on trays or netting, which can be quickly moved if necessary (rain!). The time necessary for drying depends on the climatic conditions and the original moisture content of the feed. It should be as short as possible to achieve the required moisture content (about 10%). If the drying time is too long the feed will ferment (i.e., microbial and enzymatic action will develop) which will spoil it.
Appendix VII describes a method of sun-drying which helps to protect the feed from rain showers and from other animals.
Feed which is dried this way can either be fed as a hard cake or it can be ground up by hand or in a grinder and then sieved into different sizes for different sized fish or shrimp.
So far, all the processes described have gradually increased the water stability of the feed:
Water Stability
|
Good |
Dried Cooked Feeds |
Made from moist feeds |
|
|
Moist Cooked Feeds |
|
|
|
Moist Uncooked Feeds |
|
|
Poor |
Dry Mixtures |
|
Now we turn to more complex methods of feed production, which are designed to produce better quality, well balanced feeds, which cannot be achieved by the simple techniques described earlier.
Figure 26 summarizes the major stages of compound feed manufacture. 1/
1/Binary-type diets are not shown in Figure 26. This type of compound feed, which represents a compromise between 'home-made' and manufactured products, is explained further in the glossary (Appendix IX).
As mentioned before, only those operations which are appropriate to the production of feed for small-scale aquaculture (those marked by hatching in Figure 26) are dealt with in this manual. References for those who wish to study steam pelleting techniques or others such as cooker/extrusion expansion, have been provided earlier.
This sub-section contains some comments on those stages of compound feed which are marked by hatching in Figure 26.
Intake
The most important matter at this stage is to check the quantity and quality of the raw materials being delivered or collected. Make sure that each ingredient is actually the one which you ordered and which is contained in the formula of the aquaculture feed to be made on your farm. The appearance and names of some of the feed ingredients are very similar but, as has been demonstrated in sections 3 and 4 and in Appendices IV and V, their analysis may be very different. Use of the wrong ingredient will greatly affect the quality of your compound feed and your costs of fish or shrimp production.
Make a visual inspection for quality, using appearance (signs of damp on dry materials, fungal growth), smell, texture, etc., as a means of assessing quality. Do not accept unsatisfactory batches of ingredients even if they are offered at a discounted price. You may, at the worst, kill some of your stock or, at the least, depress growth rate by the use of damaged ingredients.
Marking
You will notice that the word 'mark' is included at several points in Figure 26. This has been done to stress the importance of labelling ingredients and mixtures of them at each stage. Ingredients are commonly not labelled when they arrive, except vitamin premixes. You personally may be able to remember them all, and where they have been put, or be able to identify them later - but can your staff?? Proper, clear, indelible labelling should be used for all stacks of materials and on all containers, so that mistakes are less likely to occur. Mistakes caused by using the wrong ingredient are very common, especially in small-scale production where all material movement is by (often unskilled) manual labour. These mistakes can waste expensive ingredients and will destroy the whole point of your making compound feeds, which is to produce a feed designed and balanced specifically to promote optimum growth and survival on your farm. Mark the raw materials; mark each batch of mixed ingredients during production with its name and batch number, so that the operators know whether it is the batch they have added a specific ingredient to or not, for example. Don't neglect this simple but essential instruction: MARK IT and insist that your staff follow that rule too.
Grinding
The equipment used for the grinding or mincing of dry and moist ingredients has been dealt with in section 5.3.
As far as operation is concerned, the following points are important:
a) Do not overload the equipment by trying to force too much material through too quickly. You will cause blockages and equipment failure. Some grinders have an ammeter which will indicate when an overload occurs. Overloading can always be heard (i.e., the motor speed changes between normal loading and overloading).b) Follow the equipment manufacturer's instructions for use.
c) Grinders and mincers are very dangerous pieces of equipment. Pay special attention to safety (section 5.5).
d) Choose grinder sieves and mincer die plates carefully to produce the smallest particle size possible, consistent with speed and economy.
e) Clean the equipment immediately after use.
f) Only grind what dry ingredients you need within the near future; ground raw materials store less well than unground ones.
Figure 26: Major Stages in Compound Feed Manufacture and Use
g) When you mince wet ingredients, collect the liquid as well as the solid material that emerges from the mincer. Don't waste it; it contains valuable nutrients and attractants which are essential parts of the final feed.h) Don't allow foreign bodies to enter the grinding or mincing machinery. Large commercial scale grinders have devices such as screens and magnets to prevent the entry of articles other than the feed itself. Hand operated equipment does not. Knives, nails, string, stones, etc., harm your equipment and may cause other problems (section 5.5).
Weighing
Accurate weighing is an essential part of good feed production. This is why it was stressed in section 5.3. of this manual, when the dangers of economizing on weighing equipment were pointed out. Now that you have good scales you must make sure that they are used and looked after properly.
The manufacture of feeds on a small scale involves a large number of hand weighing operations. The accuracy of these is important. It is very easy to get distracted during weighing operations and to make a mistake. The operator who is doing the weighing must be provided with a check list specifying how much of each ingredient should be weighed and in which order they should be added. He must check off each ingredient immediately after it is weighed so that double addition of some ingredients and omissions of others do not occur. Materials should not all be weighed into the same container which rests permanently on the scale until the batch is finished. If this is done and a mistake is made (e.g., too much of one ingredient) it is very hard to rectify without removing some of another ingredient also. Weigh each ingredient separately, check it off the list and then add it to the other ingredients which are already waiting in another container (perhaps in the mixer itself, or the container which is going to be used to transport the ingredients to the mixer).
Keep the scales clean and don't forget to re-tare (adjust the zero point) after the weighing container has been placed on the scales and before each ingredient is weighed. Make sure the scales are level and that they are properly and regularly zeroed.
Scales are important and expensive pieces of equipment. Don't abuse them; follow the makers instructions and have them regularly maintained by a professional in that field.
Mixing
Efficient mixing is the next key to good feed production. The mixing time for a batch of dry or moist ingredients varies according to the design of the equipment - the advice of the manufacturer is usually available on this topic. Generally, dry materials mix adequately more quickly than moist ingredients or mixtures of the two. A general rule would be to allow a mixing time of at least 15 minutes after the last ingredient has been added to the mixer.
The order in which ingredients are added greatly affects mixing efficiency. It is not good just to put all the ingredients into the mixer and then switch it on. Materials such as vitamin mixes, which are added at low inclusion rates, should not be put into an empty mixer. Put one of the major ingredients (say the cereal component) in first, switch on the mixer and then add the minor ingredient so that it is already mixed into the major component before other ingredients are added. If you put the minor component into the mixer first, some will fall into crevices and will not be included in the final mixture. The loss of a small amount of a major ingredient in this way is much less important than the loss of a minor (but usually more costly) ingredient.
Minor inclusions of liquids such as lipids should be added after the dry components have been mixed. Ideally, such liquids should be sprayed on to the dry mixture to ensure they are evenly distributed. Where this is not possible, pouring them into a dry mix leads to balling or clumping, which may take a long time for the mixer to break down. The process can be speeded up considerably if the mixer is stopped and these balls of liquid and solid are broken up and distributed by hand. The mixer can then be restarted.
In moist feed mixing the moist ingredients should be added last, after all the dry and minor liquid ingredients are mixed. The mixer will then form the feed into a sticky dough-like consistency if the moisture level is correct.
After all the ingredients of a moist feed have been added and mixed it is (if the formulation is accurate) normally necessary to add some water to adjust the consistency to that which will extrude satisfactorily. The proper consistency is checked in the same way as was explained in section 5.4.2. Be careful not to add too much water at first; if the quantity added proves to be too little you can easily add more. If the same formula is always being made and the same batches of ingredients are being used, it becomes possible to quantify the amount of water to be added, speeding up the operation. However, it is not possible to do this when the ingredient source and the type of feed being made is frequently altered. As to Judging whether enough water has been added to provide the correct consistency for extrusion through the mincer, there is no good substitute for the test suggested in section 5.4.2. This consists of squeezing the material in your hand (much as you might hand-test damp soil to assess its clay content when selecting sites for ponds) to see whether a 'sausage' of dough can be extruded between the thumb and the first finger which is neither too runny nor too crumbly.
Extrusion (Mincing)
The same general rules apply to the extrusion of a mixed feed from a mincer as apply to the mincing of raw materials. Choose the die hole size for the feed which you are making. The rate of production will decrease as the die hole selected gets smaller. Don't overload the mincer (try to force too much feed through it at once). The material that is being fed into the top of the mincer is very sticky and sometimes it does not drop into the mincer screw very easily. Some mincers have an additional feeding screw which helps to overcome this problem. Most simply supply a special tamping rod (usually made of plastic) for pushing the material into the screw. This device, and the mincer, should be designed so that the tamping rod cannot actually come into contact with the screw itself. My experience is that, if such a device is provided, it quickly becomes used for other purposes and gets damaged or lost. The next stage is that the operators of the equipment look for other things with which to poke the feed into the mincer screw. Knives, screwdrivers, metal rods and hands seem to be the most common solutions. This practice is extremely dangerous for the operator and the equipment. It can lead to severe injury and/or the shearing of the screw and the failure of the equipment. If you must use something to help feed the mincer, make sure that it is a soft piece of wood and attach it to the frame with a piece of string.
The extruded product will emerge from the mincer in the form of long strands of spaghetti- or noodle-like consistency. These strands will break up into shorter pieces as they fall into the container placed below the mincer outlet. They will break up further during transport so there is no need to do this by hand.
After extrusion the feed should be placed into marked containers, before being weighed and distributed during animal feeding operations. Moist feed can be frozen for later use but, except for very small quantities which can be frozen in very shallow layers in a cold store., freezing moist feed requires proper freezing equipment. As this is unlikely to be available on a small farm this topic is not dealt with here. Moist feeds can however be dried (see below) and stored, instead of being used on the day of manufacture.
Drying
This topic has been dealt with in section 5.3.2. Moist feeds that have been dried can be stored (section 7) and are usually much more water stable than the original moist feed.
The general benefits of using feeds have been discussed in section 2.5.2 of this manual, including methods by which these can be quantified.
The economic viability of making compound feeds on the farm as opposed to purchasing them from a feed mill, being place and time specific, needs local study. It is therefore impossible to generalise on the economics of 'home-made' feed production. However, a specific model is provided below which utilizes cost data available in 1984. The substantial capital outlay involved in this model, which concerns an aquaculture unit of considerable size, should not deter the owner of a small farm from considering the manufacture of his own feeds.
The savings on unit feed costs achieved by small-scale on-farm feed production would also be considerable, without large capital expenditure. Additionally, the existing labour on a small farm may be able to absorb the extra work load of making feeds, keeping operational costs low. Farm-made compound feeds provide a potentially cheaper alternative to the purchase of commercially manufactured products, where these are locally available. Where commercial feeds for fish and shrimp are not available, an ability to produce compound feeds on the farm provides the farmer with an opportunity to increase productivity which might not otherwise exist.
At the other extreme, the owner of a very large aquaculture unit might prefer, as noted in the introduction to section 5, to buy in his compound feeds (even at higher unit costs) in order to be able to concentrate his managerial skills on farm, rather than feed mill, operation.
With these reservations, namely that:
(a) the relatively high capital costs of farm feed manufacture for a medium-sized farm should not deter the operator of a smaller farm from making his own feeds, and(b) the owner of the very large farm may prefer not to have the additional responsibility of feed manufacture, the following model is provided.
Costs and estimates used were those relevant in a developing country in 1984. The estimates given were for a moist shrimp feed for intensive aquaculture, achieving an AFCR of 4:1. The projected maximum hourly output of the plant was 5 t, while total annual production was 750 t using a labour intensive production system.
Estimated capital expenditure was US$ 50 000 for production and storage buildings and for services, and US$ 25 000 for equipment. Depreciating buildings over 15 years and equipment over 5 years, and assuming an annual interest of 20% to service the loan for capital expenditure, resulted in a production cost for these items of US$ 31/t of feed manufactured. Estimated expenditure on utilities and maintenance represented US$ 20/t of feed, while labour costs were US$ 12/t. Allowing for contingencies, total manufacturing costs were US$ 70/t of feed. Raw material (feed ingredient) costs for this moist, high protein, shrimp feed were typically US$ 250/t. Total feed cost was therefore US$ 320/t.
At an AFCR of 4:1, feeding costs were therefore US$ 1 280/t of heads-on shrimp produced. At that time a commercial dry pelleted grow-out feed was available at US$ 950/t. Using this feed and assuming a favourable AFCR of 1.8:1, feeding costs were US$ 1 710/t of shrimp. In this model therefore, savings of over US$ 400/t of shrimp in feeding costs were possible. In this farm, with a defined shrimp output of about 188 t/y, total potential savings were in the order of US$ 75 000 annually.
It is emphasized that the figures given above are for model purposes only. However, since the estimates used are based on an amalgam of experience in several developing countries, they do provide some idea of the potential value of 'home-made' feeds. As a rule-of-thumb I normally add 30% to local raw material costs in estimating the unit cost of farm-made compound moist feeds to cover production costs.
A hypothetical study of the economics of feeding a pelleted feed versus another strategy for increased production, the use of manure as a fertilizer, has been made by Tacon (1986a). This is repeated below, as an illustration of a method of assessing the economic viability of using compound feeds on your farm.
|
Assumptions and Calculations |
Major Feed Input | |
|
|
Pelleted Feed |
Manure |
|
Total fish yield (kg/ha/day) |
10 |
5 |
|
Total manure or feed used (kg DM/ha/day) |
20 |
25 |
|
Feed or fertilizer conversion efficiency |
2 |
5 |
|
Unit cost of feed or fertilizer (US$/kg) |
1 |
0.1 |
|
Input cost/kg of fish produced (US$/kg) |
2 |
0.5 |
|
Gross profit (or loss)/ha/day |
10 y - 20 |
5 y - 2.5 |
Testing various fish prices on the above example, it can be seen that, at a fish price of US$ 1.0/kg, there would be a daily loss of US$ 10 if pelleted feed were used and a profit of US$ 2.5 if manure were applied. If, however, the price of fish were US$ 4.0/kg then the use of pelleted feed would generate a greater profit (US$ 20) than manure (US$ 17.5). Equal profits (US$ 15) would be achieved from the use of pelleted feed or manure when the price of fish was US$ 3.5/kg. Thus, in this hypothetical example, it would be more profitable to use pelleted feeds whenever the fish price was more than US$ 3.5/kg. This sort of calculation, using locally applicable data, needs to be done when feeding is considered.
Most of the problems which are likely to occur in small scale feed manufacture can be avoided by good management.
The first important matter, ingredient quality, has already been stressed on several occasions in this manual. The completed compound diet can only be as good as the quality of its ingredients will allow. The important characteristics of feeds have been discussed in section 3 and Appendix IV, while sources and descriptions of ingredients are dealt with in section 4 and Appendix V.
Plant hygiene is also important. It is essential not only to take precautions to exclude pests and other forms of spoilage from raw material and dry compounded feed stores (section 7) but also to keep the machinery used for making feeds clean. Feed making equipment should be installed in a building which is easy to keep clean. Moist feed machinery must be cleaned immediately after use with freshwater, preferably warm. A high pressure hose is useful for cleaning mixers and mincers but care must be taken to protect the motor and switches from damage. All traces of feed must be removed from moist feed mixer blades and from the knives, screws and die plates of mincers. This will prevent old, rancid, mouldy feed from a previous batch being included in later ones and it will reduce the breeding places for fly and other insect larvae. Moist feed equipment should be housed in an area with floor drains of adequate size so that the latter do not easily become blocked by particles of feed. Areas where dry feed is made should also be kept as free from dust as possible and the floor swept at least on a daily basis.
The care that is necessary to prevent feed contamination has also been mentioned earlier. Proper separation of all feed storage and manufacturing areas from those where chemicals are kept is important.
Feed manufacturing, like any other activity involving machinery, can be dangerous to those employed in it, especially if it is their first experience of this type of work. Particular mechanical danger exists related to grinders, mincers and mixers. There is also the danger of electrocution, especially where moist feeds are being made, and of fire. Electrical supplies should be mounted high on the walls or hung from the ceiling, to take them above the normal level of water distribution during machinery washing etc. Switches should always be within arm's reach of the equipment they serve so that they can be switched off quickly in an emergency. No machine should be controlled by a switch several metres away on a wall. Another worker may switch the equipment on by mistake when it is being cleaned or maintained, for example. Equipment undergoing major repair should be disconnected from its power supply. Never supply more than one piece of equipment from one switch gear. Operators who switch on equipment must make sure that all other workers in the vicinity are clear of the equipment and are aware that it is about to be switched on before it is started up. Hands must not be put near the moving parts of equipment; long hair and flowing clothes are dangerous attributes for the machinery operator. Guards which are normally supplied to make driving gear safer are often removed for servicing operations; they must always be replaced before the equipment is put back into use.
Dry feed, especially when finely ground, is very flammable, sometimes explosively so. Dry grinding should therefore take place in well ventilated areas where naked flames are prohibited.
Obviously safety is a separate, specialized subject, of which only sufficient has been said here to alert you to the most obvious dangers. THINK ABOUT SAFETY, not just speed.
The next point in this sub-section concerns quality control. Quality control is desirable to ensure that the feeds being made meet the specifications being laid down for them. Usually there is no time for quality control analysis of the final feed (especially if it is a moist feed) before it is used. Process control, which is the careful control of all stages of manufacture by the person responsible, is therefore critically important. Regular samples of the final product should be taken and subjected to analysis as well if possible so that, at least in retrospect, efficiency and accuracy of mixing and formulation can be checked. Government and university laboratories will usually assist in this matter and, in many locations, private analytical laboratory facilities are also available. Care should be taken to ensure that any samples that are taken for any purpose are representative of the whole. It is misleading to sample one bag only from one hundred bags to be checked. Small samples should be taken from 10-20% of the containers and mixed to form a bulked sample. A full discussion of the topic of quality control is to be found in Cockerell et al., (1975) from which methods of analysis have been selected and reproduced in Appendix XVI. Alternative methods of analysis are given by Lovell (1975), CMFRI, (1982) and Ravindrananth (1981).
The final warning: you must look ahead and calculate your feed needs several months ahead. Keep proper records of your stocks of each raw material and do not let the quantity of any material fall below a pre-set minimum stock level. This level must be determined on the basis of how long it takes to get a new delivery once the material has been ordered. Stock control is essential if you are not going to run out of ingredients. If you do run out you will be unable to produce consistent feeds.
![]()
![]()
![]()


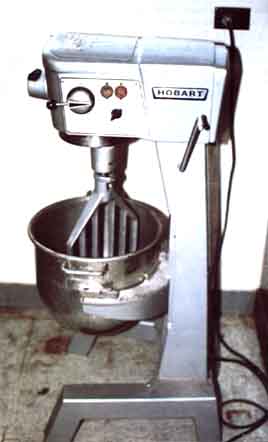
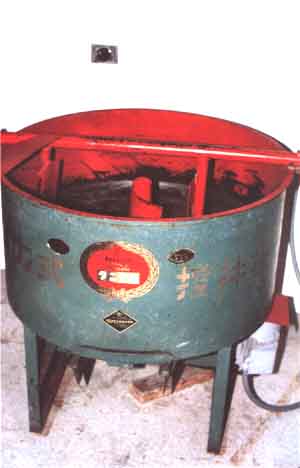
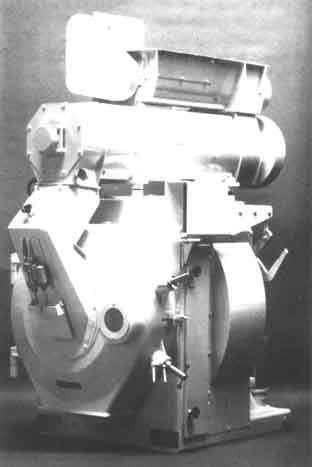
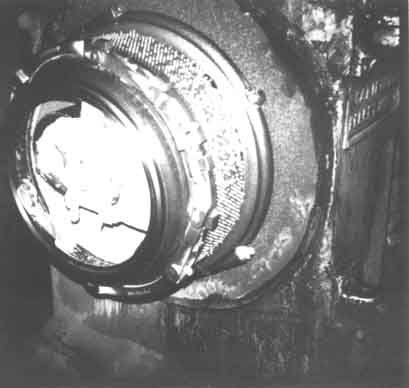
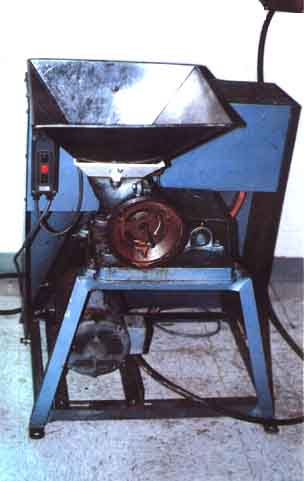
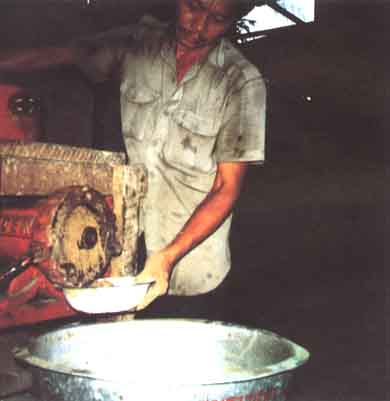
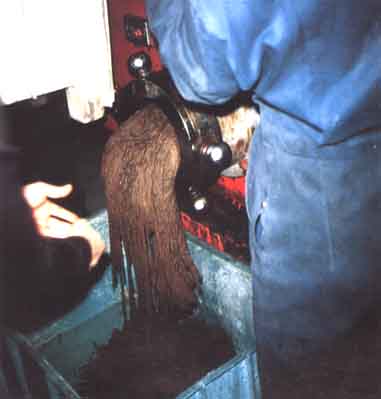
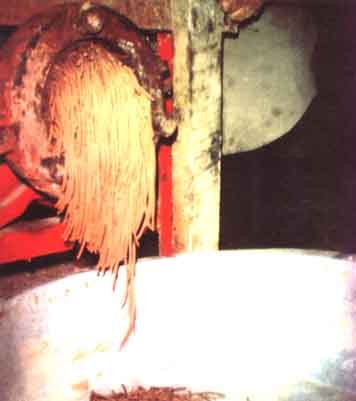
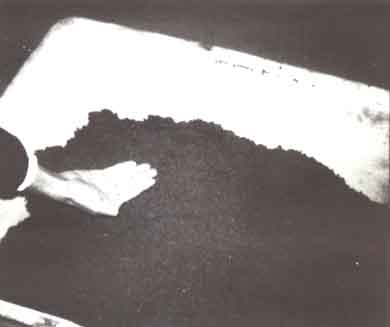
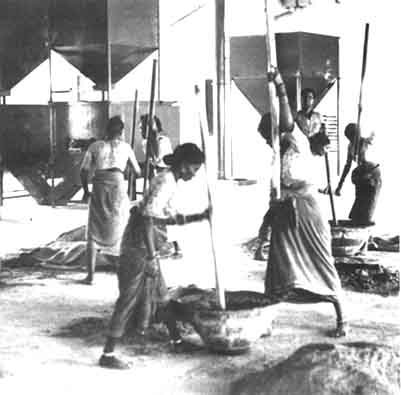