![]()
![]()
![]()
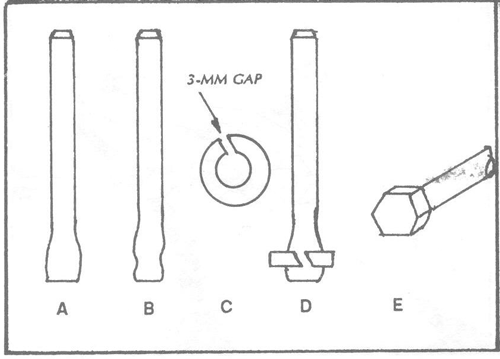
Material. Mild steel, 12 mm in diameter, 175 mm long; mild steel, 8-mm square section or 10-mm round section, more than 100 mm long.
Additional tools. 10-mm top and bottom fullers; sharp hot set or hot chisel; 12-mm bottom swage; bolster plate.
METHOD
For bolts larger than 16 mm in diameter, it is often quicker and easier to weld on a head rather than upset to the extent needed. This job will give additional welding practice as well as introduce the use of fullers. Heat one end of the 12-mm rod to a bright red heat and chamfer in the bottom swage as in Job 8. Heat the opposite end to near-welding heat, cool to restrict heat to within about 30 mm of the end and upset a little as in Job 8. Increase the diameter by only about 2 to 3 mm. One heat should suffice for this. Straighten any bending that occurs.
Reheat to a bright red heat, place on a bottom fuller of about 10 mm, position a top fuller as in Fig. 74. With light sledgehammer blows, make a shallow depression around the upset end as near to the end as possible. The depth of the fullering need only be about 1.5 mm. Take care to ensure that the fullers are exactly opposite each other during this operation. Do any straightening that is needed and place this part of the job near the fire to keep hot. Fig 73A and Fig 73B illustrates this stage of the job.
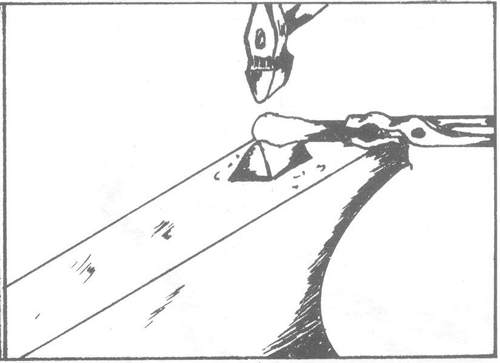
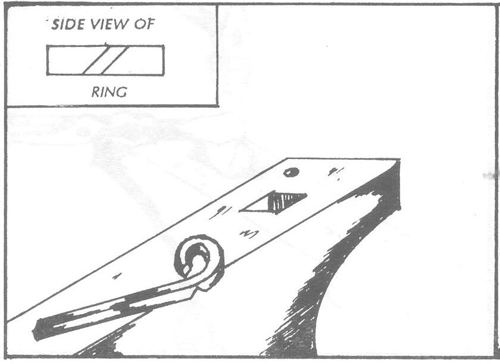
If 10-mm round section is to be used, this is now brought to near-welding heat over a length of about 60 mm and is carefully forged to as big a square section as can be obtained. Next, take the forged square section (or the 8-mm square section, if available), heat a length of 50 to 60 mm to a bright red heat and bend to form a ring as in Fig 73C and Fig 73D and Fig. 75. This ring should be slightly larger than the upset portion of the job. While it is still hot, trim the end with a hot chisel or set to the angle seen in Fig. 73C. Reverse the metal on the anvil face and cut just over halfway through from that side, leaving a gap of about 5 mm at this stage. Cutting is carried out from opposite sides so that the slope of the cuts will match up.
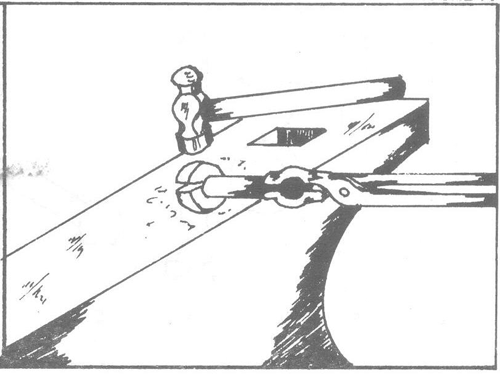
Both pieces of metal are now brought to a bright red heat, the ring is slipped over the larger piece, lightly tapped with the hammer to settle it into position and the excess broken off leaving only the ring in position. The ring is now gently hammered to settle it neatly and firmly into its correct place for welding. Make sure that the ends do not meet. There should be a gap of about 3 mm to allow for stretching when welding takes place.
A full welding heat is now taken on the ring end of the work. Heat slowly to allow the larger section to reach welding heat without overheating the smaller sectioned ring. If difficulty is experienced, the ring can be cooled carefully in water to control the heating. Both pieces must reach full welding temperature. When it is sufficiently hot, quickly place the work on the anvil face with the gap in such a position that it will form one corner of the bolt head. Quick light blows of the hammer will weld the two parts together. The job should be turned to form the head shape required, either hexagonal or square.
Next, make sure that the work will pass through the bolster plate. Take a second welding heat on the head, drop into the bolster as in Job 8 and flatten the head while welding any surplus material into the head. The second welding heat is easier to obtain than the first since the job is a solid piece at this stage. Finish the head and bolt shank in the same way as in Job 8.
![]()
![]()
![]()