 In this chapter we briefly explain what the term
participation means in the context of this book, and then give some
participatory tools that can be used to enhance participation. Most of these
techniques are useful and informative and are considered from the perspective of
an outside advisor, but they can also be used by a group to reflect on their own
situation and when deciding on how to improve.
|
|
participatory learning and action handbook |
If you are an outside advisor to a group, it is important to understand that when group members are empowered to make their own decisions, the group you are dealing with will be a more successful and effective group. You can assist a group not by telling them what to do, but by helping them to decide for themselves what they should do and giving guidance on the way. You can help the group to discuss their problems and find solutions together.
If you are one of the group members, it is very important to try and involve every member in the group activities and decision making. If you are doing this, group members will feel more ownership of the group and your group will be more effective and sustainable.
Participatory tools are used to increase participation of all group members, whether they are illiterate, young, old, men or women. The tools use mapping and other visualisation techniques that make everybody understand what the discussion is about. They are useful in gathering background information, in analysing the situation of the group and in improving ownership of the group.
When using the tools, ask open questions like “Which products would you like to produce?” rather than “You want to produce cheese, don’t you?” It is important that the members come up with the answers. Group members should analyse the problem and find the solutions themselves, only then will they really carry out the plan of activities. You can of course give guidance on the way, but the group members should decide for themselves what they are going to do.
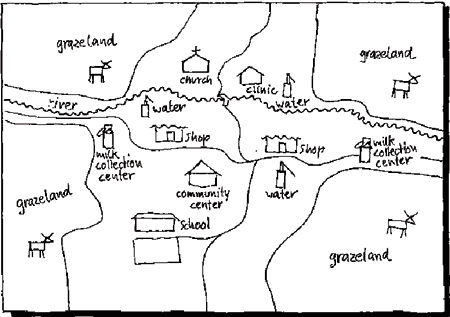
A milk production map is a map of the area, indicating all items of interest to the group. A milk production map can be used as a starting point for discussion on, for example where the milk collection centre should be. The map will provide an overview of all items to consider and will facilitate decision making.
|
Objective: |
to facilitate the drawing of a map by group members which shows items of interest to milk production in the area of the milk producer group, to identify opportunities for cooperation and facilitate discussion about these opportunities. |
|
When to use: |
when starting a new group or analysing an existing group. |
|
No. of members: |
groups of 3 - 10 members. |
|
Materials: |
naturally occurring materials, large sheets of paper and pens. |
|
Time needed: |
about 45 - 75 minutes. |
How to proceed
First, you have to decide what the object of the exercise is, e.g. finding a central place for the milk collection centre. The members then have to make a list of items to include. These might be roads, the homesteads of milk producers, markets, etc. You can include many things in a milk production map, depending on what you want to know and analyse, e.g.:
households of group members or all producers in the area;
milk collection points and collection routes;
milk processing units, factories, etc.;
possible marketing sites and points;
water points;
number of dairy animals owned by each milk producer;
amount of milk produced/delivered to the collection point;
home of veterinarians, traditional healers, etc.;
grazing land or animal grazing routes.
If necessary, divide the members into groups to produce a map-model of the area. You can make a map on the ground or on paper; the advantages of using the ground and natural materials (e.g. stones), is that it can easily be adjusted when necessary.
Once the map is finished, you can ask the group to transfer the map onto paper, copying what they see on the ground. You can then ask the group questions and initiate discussion, e.g. on where the collection centre should be.
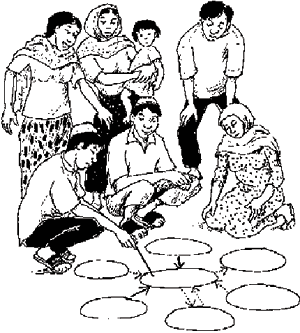
The area covered by each milk producer group contains other organizations with similar or complementary activities. These organizations might be willing to work together or they might compete because of conflicting interests. A dairy institutional diagram can help to get a clear picture of which other organizations are active in the same area. The diagram will assist in deciding the activities of the group and in choosing the organizations to approach for possible cooperation. Below are the steps needed to make a dairy institutional diagram. These give you an idea about how to proceed, but you can adjust the steps according to your needs.
|
Objective: |
to facilitate the drawing of a diagram by group members which represents the organizations working in the area of the milk producer group;, to identify the relationships between them, opportunities for cooperation and to facilitate discussion about these opportunities. |
|
When to use: |
when starting a new group or analysing an existing one. |
|
No. of members: |
maximum 8 members, if there are more, you have to split into groups. |
|
Materials: |
coloured paper (A1 size) or a flip chart, markers in different colours, tape. |
|
Time needed: |
approximately 60 minutes. |
How to proceed:
 STEP 1. DEFINE
THE BASIC QUESTION (10 MINUTES)
At the outset, and with all members present, it is important to define the basic question: what exactly do you want to analyse? The steps below all depend on this, so it is important to decide on your basic question in detail. You should decide on the type of organizations to be included, the geographical area of analysis and the sphere of activities. Once the basic question has been decided, you can write it on a big piece of paper.
Below are examples of possible objectives and related basic questions:
To find out which organization could help to provide livestock support services to the group: “What other organizations working in livestock development exist in the region that can provide livestock support services and what are the relationships between them and my group?”
To find out in general what the links are with other organizations: “What organizations exist in the region and what are the links between them and my milk producer group?”
To improve communication within the group: “Who are the members of my group, who is communicating with whom, and in what way are they communicating?”
To find out which milk producer groups could form a milk producer group association: “What other milk producer groups exist in the region, what are their activities and what are the relationships between them?”
 STEP 2. DEFINE
THE TYPE OF RELATIONSHIPS TO ANALYSE (10 MINUTES)
Decide on the type of relationships, these could be:
Financial, who finances who?
Cooperation, who cooperates with whom?
Hierarchical, for example who gives orders to whom?
Operational, who provides inputs/services to whom?
Communication, who is communicating with whom?
 STEP 3. DRAW THE
DIAGRAM (20 MINUTES)
Decide how to symbolize all the different types of organizations (e.g. circles for village groups, squares for government organizations).
Decide how to show the relationships between the organizations (e.g. blue lines for financial cooperation, red lines for operational relationships).
Decide how to represent the quality and/or intensity of the relationships (e.g. thick lines for very good communication, broken lines for poor communication).
Make a list of the organizations and type of relationships, keeping in mind the basic question.
Members can now draw the diagram.
 STEP 4. ANALYSE
THE DIAGRAM (20 MINUTES)
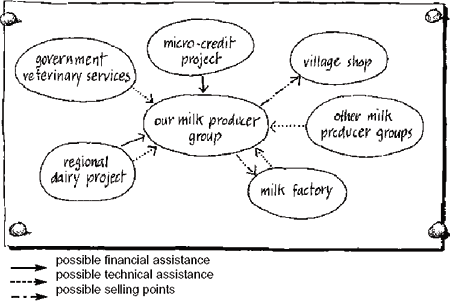
When the drawing is finished, it is important to take time with all group members present to analyse what has been drawn. You can ask the questions: “what do we see?” and “what can we learn from it?” It is important to let the members speak and let the members analyse the diagram. After a while you can go back to the basic question and see whether the group members can make suggestions about answering the basic question. Figure 5 gives an example of a dairy institutional diagram.
In the example below, the links between a milk producer group that has just started and possible future collaborative partners are analysed.
figure 5: example of dairy institutional diagram
A semi-structured interview is an informal guided dialogue to collect information with the assistance of a checklist. The checklist might be a short list of questions, but is not a questionnaire. The checklist is only used to initiate the interview and to keep the interview flowing.
|
Objective: |
to collect information in an informal way. |
|
When to use: |
when starting an activity; when wanting to find out information from others. |
|
No. of members: |
carry out interviews with a maximum of two members. |
|
Materials: |
paper and pen. |
|
Time needed: |
from 10 to 60 minutes. |
How to proceed:
 STEP 1: DEFINE
THE PURPOSE OF THE INTERVIEW
First you need to define the purpose of the interview in detail and how you are going to use the information: What exactly do you want to find out? For example: “what do consumers (minimum 20) think of the milk products available in the village shop and how will this help us to make better products ourselves in the future”.
 STEP 2: MAKE A
SHORT CHECKLIST
Make a short checklist, focused on the purpose of the interview. Ask open questions (“What products do you like?”) and try to avoid leading questions (“I suppose you do not like this yoghurt?”).
For example:
ask which products they prefer and why
ask how many of each product they buy
ask what they would like to buy, but is not there currently
Etc.
 STEP 3: CARRY OUT
THE INTERVIEW
Go to where you think is the best place to interview. Take into consideration the limitations of a certain place, e.g. if you go to a shop and only women buy milk products, then you are not taking into account the view of men. Do not carry out an interview with more than two members. If you interview people that are busy, don't take too long and ask only the main questions. Always thank the people for their time.
 STEP 4: ANALYSE
THE RESULTS
Look back and see what was the purpose of your interview. You have to ask yourself: Did I find out what I wanted? If not, then you have to go back and repeat or adjust the interview.
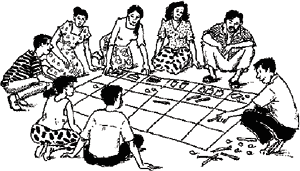
A brainstorming session is a means of getting a list of all the ideas of all the members. Ranking is a method of prioritising items in a participatory way. You can for example perform a ranking to decide which group activities to start or which training is needed most.
|
Objective: |
to prioritize items in a participatory manner. |
|
When to use: |
when deciding on a new activity; anytime you want to decide on priorities. |
|
No. of members: |
5 to 20 members, if there are more, you have to split into groups. |
|
Materials: |
large sheets of paper, markers and small stickers, or stones, beans or anything else appropriate. |
|
Time needed: |
30 to 60 minutes (depending on number of members, number of items to rank, etc). |
How to proceed:
 STEP 1:
BRAINSTORMING
First, you have to carry out a brainstorming session. A brainstorming session is a means of getting a list of all the ideas of all the members. This could be a list of all the milk products you could produce, a list of all the activities the group could start, a list of all the different training you could organize, etc. It is important to take enough time for this, at least 20 minutes if the group is large to make sure all the ideas are listed. You will have to encourage all members to contribute. If some members are illiterate, you can make use of symbols, but you have to make sure these symbols are understood by everybody. Some members could feel reluctant to speak out, for example women in a mixed group. In this case, you should consider dividing the group into subgroups, for example according to gender.
 STEP 2: DEFINE
CRITERIA
Once you have done this, it is time to rank the ideas in your list. Before ranking, you have to ask the right question of the members: e.g. “which activity would you like the group to start within the next month?” or “which training do you feel is most important for you in the upcoming training course?” The criteria for ranking will be based on this question, and it is important to have the question with all the criteria (time, for whom? etc). According to this question, the members should rank the list of items.
 STEP 3:
RANKING
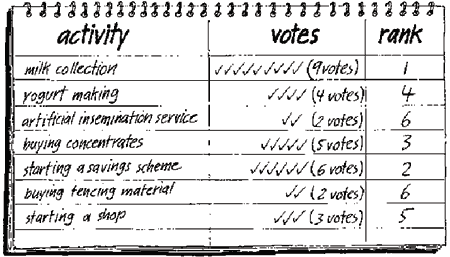
For the ranking, you could make three columns (see below), one for the votes and one to define the order after the ranking has finished. The ranking can be carried out in several ways. You can use whatever is available such as small stickers on a big piece of paper, stones or beans on a list of items on the ground, etc. You can give each member a fixed number of stones/stickers/beans (e.g. 1 for every item) and decide on a maximum number of stones per member per item (e.g. 3) in order not to have members choosing only one activity.
figure 6: example of a ranking matrix (possible activities):
Evaluation and monitoring is an important element for the success of the group. A participatory approach to evaluation will make sure all members feel ownership of the outcome of the evaluation, and will be more committed to the development of the group. The “group assessment checklist”, which is described below, can assist you in evaluating the group in a participatory manner. Outside advisors can fill in this list, but group members can also assess the group for themselves. You can use this list for monitoring purposes and, for example, fill in the list every three or six months to find out whether the group is making progress.
|
Objective: |
to assess the status of a group and find its strong and weak points, or to monitor/evaluate progress of the group. |
|
When to use: |
when you want to assess an existing group. |
|
No. of members: |
as many as possible. |
|
Materials: |
the checklist and pens. |
|
Time needed: |
about 10 - 20 minutes. |
How to proceed
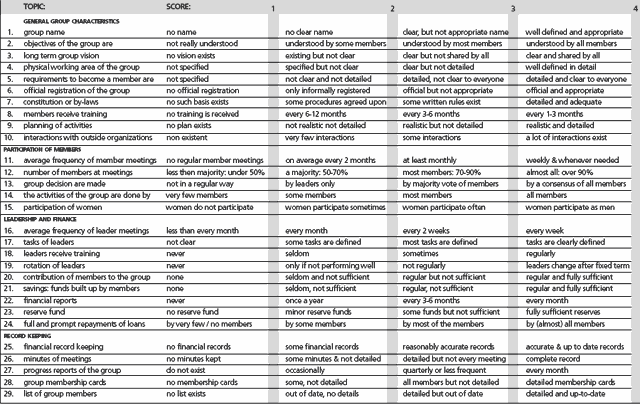
On the next page, you will find an example of a checklist. Please adjust this according to your own ideas, language and points of interest and add and delete items whenever you think it is necessary. If something is not clear, you should refer to other chapters in this book for an explanation. The list can be given to group members so they can analyse for themselves how their group is doing. The score can be recorded in the grey squares. You can add the scores for each topic. When the members have filled in the questions, you can have a group discussion on the outcomes of the exercise. The result will show the strong and weak points of the group.
Notes:
Please adjust this checklist according to your needs, adding or changing topics as you feel appropriate;
figure 7: example of a group assessment checklist:
(Score: 1 is lowest achievement and 4 is highest;
If items are not applicable donít fill in anything)
Click here to print the table (PDF format)
Introduction
’SWOT‘ stands for Strengths, Weaknesses, Opportunities and Threats. A SWOT analysis helps you to find out and analyse the strong and weak points within the group. At the same time, it looks at outside opportunities and threats. When the group has listed all strengths, weaknesses, opportunities and threats, you can discuss how you can use the strengths and opportunities to tackle the weaknesses and threats.
You can use this information to develop a strategy for the group. The steps for doing a SWOT analysis are given below. These steps give you an idea about how to proceed, but you can adjust the steps according to your needs. The information from the participatory group assessment checklist can be used to define strengths and weakness (see section 6.6).
|
Objective: |
to analyse the Strengths, Weaknesses, Opportunities and Threats of the group and develop a group strategy, using the strengths and opportunities to tackle the weaknesses and threats. |
|
When to use: |
when starting a new group or developing an existing one. |
|
No. of members: |
maximum 15 members, if there are more, you have to split the group. |
|
Materials: |
flip chart, markers in different colours, tape. |
|
Time needed: |
60 - 90 minutes. |
How to proceed
First you have to list all the strengths and weaknesses of the group, with as many group members present as possible. You can use the participatory group assessment checklist to do this, adding questions that you think are relevant for the group. Or you can use a brainstorming session, listing as many strengths and weaknesses as possible and then using the ranking exercise of section 6.5 to define which ones are more and which ones are less important. Do this for the strengths and weaknesses, as well as for the opportunities and threats. The strengths and weaknesses should focus on internal group factors. The opportunities and threats focus on external factors.
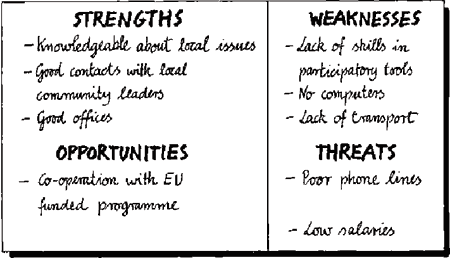
The list should be displayed on a whiteboard or flip chart in a table. Figure 8 gives an example of a SWOT analysisof a milk producer group.
figure 8: example of a SWOT analysis
A collaboration matrix can help to get a clear picture of the possible collaboration activities between organizations. The collaboration matrix exercise can be undertaken after completing a dairy institutional diagram (see section 6.3) or when you already have an idea which organizations you would like to cooperate with.
The steps for making a collaboration matrix are provided below. These give you an idea about how to proceed, but you can adjust the steps according to your needs.
|
Objective: |
for group members to design a collaboration matrix which will facilitate the analysis of collaborative opportunities, between the group and other organizations working in the region. |
|
When to use: |
when starting a new group or when developing contacts with someone from an existing group. |
|
No. of members: |
maximum 8 members, if there are more, you have to split into groups. |
|
Materials: |
Coloured paper (A1 size) or a flip chart, markers in different colours, tape. |
|
Time needed: |
about 1 hour. |
How to proceed:
 STEP 1. DEFINE
WHICH ORGANIZATIONS TO ANALYSE (5 MINUTES)
Decide which organizations you want to analyse in the dairy institutional diagram. You should then decide on making either a matrix between the group and one other organization or between a group of organizations. If you choose just two organizations, you can analyse the potential collaboration matrix in more depth.
 STEP 2. LIST THE
ACTIVITIES OF EACH ORGANIZATION (15 MINUTES)
Make the list of activities and choose only the activities relevant to the group. Group the activities according to the areas of interest, e.g.: milk related activities, financial services, livestock support services, etc. You can focus the list of activities on specific issues if you know what you want to analyse. For example, a more focused analysis could be if you are looking to collaborate with other organizations that might provide livestock support services to the group. Make sure you don't forget any activities. If you don't know exactly what another organization is doing, it is time to find out and talk to them.
 STEP 3. DRAW THE
MATRIX (20 MINUTES)
Decide on what you are going to complete in the cells of the matrix regarding the activities and cooperation possibilities. An example could be:
|
+++ |
organization has activities, and members see a lot of cooperation possibilities |
|
++ |
organization has activities, and members see some cooperation possibilities |
|
+ |
organization has activities, but members see no cooperation possibilities |
|
- |
organization has no activities in this field |
|
? |
members are not sure whether organization has activities in this field |
 STEP 4. ANALYSE
THE MATRIX (20 MINUTES OR MORE)
When the matrix is finished, it is important to take time with all group members present to analyse what has been drawn. You can ask the questions: “what do we see?” and “what can we learn from it?” It is important to let the members speak and let the members analyse the matrix.
When possibilities for collaboration have been defined, it is important to perform an in-depth analysis of the collaboration: what does the other organization think about collaboration with you? Will they have to spend more time, more money, is it also positive for them? A mutual benefit will form an important base for a possible cooperation. Figure 9 gives an example of a dairy institutional diagram.
figure 9: example of collaboration matrix
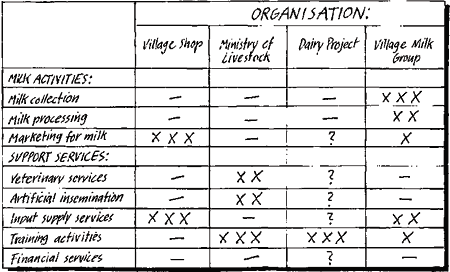
The above matrix shows that:
members do not have much information about what the dairy project is doing, other than training activities, and more information is needed.
The village shop can assist in input supply services and marketing.
The dairy project and the ministry could assist the group in providing training.
The group could look into more collaboration with the ministry regarding veterinary services and artificial insemination.
 adapted from
Management for Development Foundation
