![]()
![]()
![]()
Open the project you needed to open in paragraph 4.2, Opening an ArcView Project. A Theme can be turned on or off by checking the checkbox. By clicking on a Theme in the Table of Contents, this Theme can be made active and will appear raised in the Table of Contents.
|
Once the Theme is active and we click on the Theme Properties-button, the properties of this Theme are displayed (Figure 5.1). |
|
FIGURE 5.1
Theme Properties of the population density
Theme
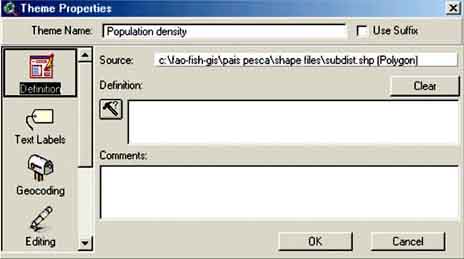
From the Theme Properties we see the name of the Theme and the original data source, which is a polygon shapefile found in the folder you designated, called ‘population density.shp’.
In this tool we can manipulate the original data displayed. In the first box, the name is given of how this theme is displayed in the View. Here this name can be changed without changing the name that is saved in the computer. In our case the Theme name visible in the View is ‘Population density.shp’.
Change the Theme name in this window to ‘Population density’(without the ‘.shp’), click OK and look at the displayed name in the View.
|
With the Zoom in and out-button in the toolbar we can make areas of interest larger by placing the cursor near the place of interest and dragging it till the area of interest is selected (Figure 5.2). |
|
FIGURE 5.2
Selecting an area for enlarging (zooming
in)

After releasing the mouse button, the view will be redrawn in the magnified scale (Figure 5.3). Before you do this, you might want to maximize the window, so that your whole screen displays the ArcView window.
FIGURE 5.3
The result of zooming in

|
Once you have zoomed in and you want to go to another location, you can move the map with the Pan icon. Try this out by zooming on the central part of Pais Pesca and then pan from north to south and from west to east. |
|
After zooming and panning, you probably will have lost track of where you are, and how to get back. You can go via the menu bar to View/Full Extent, which will show you the complete Theme again. Another option is to use one of the six View buttons in the button toolbar (Figure 5.4). Try these buttons, and see what they do.
FIGURE 5.4
View buttons

Identify is a tool to get more information on the separate items displayed in the map. Once the tool is activated by clicking on the button with your mouse pointer, your pointer symbol on the screen changes into a cross with an ‘i’ next to it. Try this, click on the identify button, and move the pointer over the View, you will see that it has changed. If you click now on an item/location in the map, detailed information of the table attached to the map for this location is automatically made visible (Figure 5.5).

By clicking with Identify on a sub-district, the data of this sub-district (attached to this Theme) automatically pop up. By doing this we can see for instance the name: HEROS, the number of the sub-district: 502, the name of the district: Dadon, etc.
We can use this tool to find a sub-district if we do not know exactly where it is, but this means that you have to click on a large number before you have found it. Try to find the sub-district named ‘Wolffi’ this way (northeast of Heros).
This can be done much more easily with Auto-label. You can add the name of the sub-district by selecting Auto-label in the Theme menu (Figure 5.6).
FIGURE 5.5
Getting details from the map with
‘Identify’
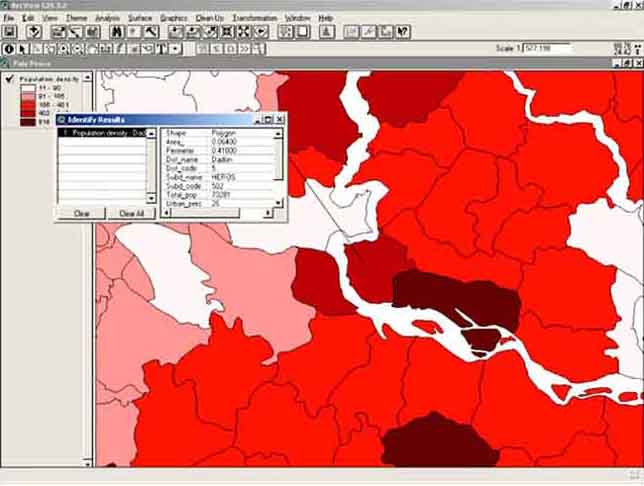
FIGURE 5.6
How to select Auto-label

FIGURE 5.7
The Auto-label window
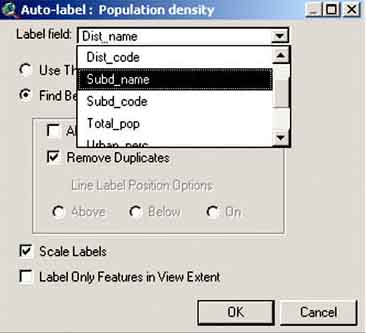
The Auto-label window (Figure 5.7) will popup, select ‘Subd_name’ in the Label field box and click OK.
Note: the first time you do it, you often see a large number of names overlapping and you hardly can distinguish anything. Zoom in further to provide enough space for each individual sub-district name.
Try to do this: Zoom in on the coast, Auto-Label the sub-district names and try to find the sub-district named ‘Gramma’. Using the ‘Pan’ tool now will make it easier.
The labels can be removed by clicking in the Theme menu on Remove Labels. Try this; remove the labels, and Auto-label again with ‘Dist_name’.
Note: The district names are best displayed if you zoom out before Auto labelling.
Note: In the Auto-label window you see two small Check-boxes: Allow Overlapping Labels and Remove Duplicates. The default setting of ArcView is Remove Duplicates, i.e. the same name is never displayed twice. Try this, remove the labels, and Auto-label again with ‘Dist_name’ with Allow Overlapping Labels ticked and Remove Duplicates not ticked.
![]()
![]()
![]()


