![]()
![]()
![]()
1.1 With the exception of the hapa net, netcages are usually of polyethylene (PE) material. Polyethylene is preferred for its high breaking strength, durability, high resistance to abrasion and cheaper cost when compared with other available materials eg polyamide, polyester, polypropylene etc.
1.2 Three types of netcages are used in fish farming. They are termed with reference to the mesh-size, namely:
Hapa netcage - of polyamide (nylon) 4-ply material of mesh-size 8mm (5/16") for fish fingerlings less than 10 cm (3" – 4");
Nursery netcage - of PE 15-ply material with mesh-size from 13 mm (1/2") to 25 mm (1") for fingerlings of 10 – 15 cm (4" – 6");
Production netcage - of 24-ply PE material, with mesh-size from 25 mm (1") to 50 mm (2") for fish of 15 cm (6") to 30 cm (12").
1.3 Netcage sizes are normally 2m × 2m, 3m × 3m or 5m × 5m, with depth varying from 2–3m. Mesh-size selection is dependent on the species and size to be stocked. For example, the seabass, having a more pointed snout would require a netcage of smaller mesh-size than would a grouper of the same size. The relationship between netcage type and fish species are summarised in Table IV/1 below:
| Selection of sesh-size for fish-holding in netcages Fish species and total length in ca | |||||||||||||||
| Type of netcage and ply | mesh-size | Grouper | Seabass | Solden sneoper | |||||||||||
| (Eoinechelus tauvins) | (Lates calcarifer) | (Lutjanus jotni) | |||||||||||||
| (cm) | 5–10 | 10–15 | 15–40 | 40–50 | 50–75 | 75 and > | 7.5–10 | 10–25 | 25–30 | >30 | 5–10 | 10–15 | 15–20 | 50 and > | |
| Broodstock | Broodstock | Broodstock | |||||||||||||
| Hapa (4 ply) | 8 | + | + | + | |||||||||||
| Nursery (15 ply) | 13 | + | + | + | |||||||||||
| 25 | + | + | + | ||||||||||||
| Production (24 ply) | 25 | + | + | + | |||||||||||
| 50 | + | + | + | ||||||||||||
| 75 | + | ||||||||||||||
| 100 | + | ||||||||||||||
2.1 The netcage
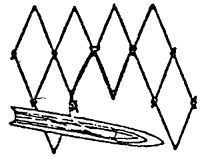
2.1.1 A netcage is assentially a box-shaped structure with a rope system which reinforces the netting material, gives shape and allows for tying to the raft unit. The netcage is formed by four panels which are the sides and one bottom panel. The rope system comprises a bolch or hanging line and main rope (Figure IV/1) which hold the netting material and secure the netcage to the raft unit respectively. Details of the netcage are covered in Chapter II on Netcage Structure and Construction.
2.2 Setting the netcazge into the raft frame
2.2.1 A netcage is set within the frame of the raft unit and should for ease of operation, be of the same dimensions as the frame. Smaller nets to be set within a larger frame require extra support and weights and possibly have to be rigged to poles at the bottom.
2.2.2 Netcages may be set singly for normal farming, but if valuable fish stocks are involved, the farmer may decide to set double netcages, one inside another, to ensure that the fish do not escape should one of the netcages be torn. This practice however, makes additional work in maintenance and would take the normal number of workers 1.5 the usual time for net changing and fish transfer.
2.2.3 The actual method of attachment of a netcage to the frame of the raft unit is similar for all netcages of the same basic design. The netcage, usually folded during storage, is checked for holes and tears before it is brought to the raft unit where it is unfolded and tied tightly to the corners at the top four corners of the netcage. The bottom corners of the netcage are secured to the raft frame by rigging to metal pipes as shown in Figure IV/2.
Table IV/2 is a summary of netcage setting in a vacant frame:
Table IV/2
Setting a netcage in a vacant frame
Untie and unfold the dry, cleaned netcage;
Push the netcage into the water within the frame space (Figure IV/3);
Drag each main rope from the top four corners of the netcage to each corner of the frame and secure it tightly to the wooden beam. This stretches the rope of the square netcage to open it completely;
Lift net panels and again check that it is free from holes, tears and weak connections (Figure IV/4);
Lift the bottom corners, one by one and locate the eye splice and secure one end of the rigging rope which connects the netcage to the corner bracket and pipe system of the raft unit to the eye splice. Pull the ring rope tight. This sets the netcage in position.
Changing netcages (replacing a netcage with another one)
This can be done manually or mechanically. Procedures are covered in Practical IV/1.
Setting double netcages in the raft frame (occupied by a netcage or unoccupied)
The procedure described in (a) and (b) are followed with the exception that the inner netcage is held to the inner corners of the outer netcage by another set of rigging rope (see Figure IV/7) while the outer netcage is rigged as usual to the corner bracket and pipe system.
Setting a smaller netcage in a larger frame
The same procedure applies if a single netcage is involved. However if more than one netcage is to occupy the frame, for example 4 (2m × 2m) netcages in a 5m × 5m frame, a cross bar (wooden beam) will have to be positioned centrally on the raft frame and provided with vertical metal pipes or wooden poles for rigging. Alternatively, the netcages can be tied at the top 4 corners while the bottom corners are simply weighted to ensure that the box shape is retained.
2.3 Cover nets
2.3.1 Cover nets are optional, and may be used to prevent fish from jumping out especially when sea conditions are rough. The cover net is essentially another net panel which is laced onto the top edges of a netcage. The lacking is kept simple to allow uncovering when required (Figure IV/8A-B). A small feeding hole is cut at one side for feed to be given to the fish.
3.1 Biofouling
A netcage immersed in the sea will eventually become encrustated with fouling organisms (Figure IV/9) like barnacles, tunicates, tube worms, mussels, bryozoans and algae. The net becomes clogged and grows heavier, and this increases drag. Water exchanged is poorer and fish growth may be retarded. A change of netcage is therefore necessary. The frequency of change depends on the mesh-size of the netcage and the season for fouling organisms which cause the netcage to alog. The smaller the mesh-size, the faster they are covered by these organisms.
Fouling organisms of the netcage can be controlled biologically to some extent by using grazer fish species within the culture fish. Alternatively, copper-nickel allov (which does not attract fouling organisms) could be used but these rigidify the netcages. Rotating netcages are used elsewhere allow regular cleaning of the netcages by painting with antifouling paints applied to netcages prolong the immersion of netcages by delaying fouling. Of these, anti-fouling paint has been tested under local conditions and are effective up to 3 months.
Practical IV/2 covers the use of antifouling paints in minimising biofouling.
3.2 Maintenance procedures
Maintenance of netcages involves net changing, cleaning and mending.
3.2.1 Netcage changing (manual/mechanical)
As netcage changing is time consuming and latorious, a mechanised net nauler may be considered for lifting out heavily fouled netcages. The net hauler is essentially a horizontal roller mounted on a pontoon. The hauler lifts to a heavily fouled netcage by its mechanical advantage. One sice of the fouled netcage is dragged over the roller which is turned manually or by a slow motor to which the netcage around it. The netcage is thus hauled out of the water and easily removed to a waiting boat or the attached portoon to be taken away for cleaning.
After the fish have been transferred to a clean netcage, the olc or fouled netcage is hauled out of the water to rest on the platform flanking the raft frame. It is then transferred to the washing area which is usually a floating platform at the farm.
The procedures for netcage changing is covered in Practical IV/1.
3.2.2 Netcage cleaning (Figure IV/10)
Fouling organisms are removed by a high pressure water jet (sea and freshwater “rocky” washers are available) from a washer run by a generator. The netcage is spread on a platform to bare the fouled surfaces for cleaning. In general, net washing is time consuming and the operator requires patience for the work. It takes about 40 minutes to 1 hour to wash clean a 5 m × 5 m netcage.
The procedure for netcage cleaning is covered in Practical IV/1.
3.2.3 Netcage drying (Figure IV/11)
The cleaned net is checked for holes and repaired before it is used again. It can also be hung up to dry and mended in this position.
The procedure for netcage drying is covered in Practical IV/1.
3.2.4 Netcage mending (Figure IV/12)
Net panels may be enlarged or torn meshes the netting material or ropes may have weakened from frequent use. The method of repair is similar to netcage construction as it usually involves panel replacement or partial replacement with rejoining.
The procedures for mending are covered in Practical IV/1.
1 Objectives
1.1 To replace used netcages (eg. double netcages of 5m × 5m) for broodstock with cleaned netcages in a 5m × 5m raft unit. The removal of netcages will be done by
manual means;
netcage hauler mounted on a wooden pontoon. All fish held in the used netcages will be transferred into cleaned netcages in the course of changing.
1.2 To wash a fouled netcage (5m × 5m) with a SHP (3.7 KW) “ROCKY - Te 5DX” washer fitted with a pressure hose working at 70 kg/cm2 (or 1000 p.s.i.) and water discharge rate of 22.6 litre/min.
1.3 To dry a cleaned netcage (from 1.2).
1.4 To inspect a netcage while drying, for tears and weak spots and to mend damaged or weakened areas before folding, tying and storing.
2 Procedure
2.1 Netcage changing by manual means
Release and hold on to the four main ropes of the netcage occupying the raft frame at the corners;
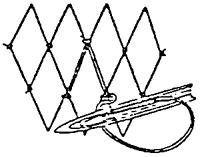
Drag the netcage by two main ropes from the corners farthest away from the work platform to the opposite side (ie tow towards the work platform) (Figure IV/5). Care is taken during dragging to prevent sagging of the moving side as this could result in fish escape;
Lift the netcage up by 0.5 m by pulling out the net along the static edge and resting the net on the work platform, stepping or weighting it down. This has to be done quickly because the fish at this time are held in between the folds of the netcage and are subject to stress;
Set the clean netcage in the space created by the dragging of the used netcage to one side according to the procedure described in (b, ii; Figure IV/3). At this time, the four main ropes are temporarily tied to the two corners farther from the work platform as adjustments will still have to be made after the fish are transferred and the used netcage removed;
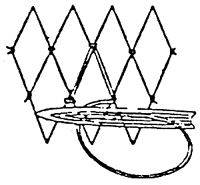
Partially haul out the used netcage weighting down the centre of the used net which will be billowing in the water. Drag open the netcage and pull one side to overlap with the nearest edge of the clean netcage. Lift up the old netcage to allow the fish to swim into the clean netcage, (Figure IV/6).
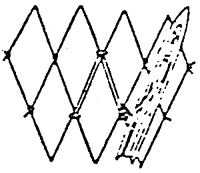
Completely haul out the used netcage and tie the clean netcazge by the main ropes at the four top corners to the corners of the raft frame.
2.2 Netcage changing by mechanical means
Position the net hauler pontoon alongside the work platform of the raft frame.
Remove the cover net by pulling off the interlacing twine;
Untie and release the rigging ropes;
Release and hold on to the four main ropes of the inner netcage;
Secure the side of the netcage closest to the work platform with small hooks (tied twine from the roller of net hauler). Drag the two main ropes of the opposite side toward the work platform;
Tie these two main ropes to the central wooden beam when the edge is about 0.5–1 m away from the work platform;
Release and hold on to the four main ropes of the outer netcages;
Drag the netcage from the farther end towards the work platform;
Set the two clean netcages within the space that is available through pulling of the used netcages to one side;
Add weights at the centre of the farther panel (in relation to the work platform) of the inner used netcage. Drag the panel to overlap with the newly set inner netcage;
Winch are roller of the net hauler by hand to haul out the inner used netcage. Note that the fish will swim into the clean inner netcage as the used inner netcage is being hauled out.
Unravel netcage from the roller to pontoon.
Haul up the outer netcage using the net hauler:
Rig the newly-set netcages and lace on the cover net.
2.3 Net cleaning (Figure IV/10)
Lay the used netcage on a sloping flat concrete surface by tying two main ropes to each of two posts set at 5 m apart:
Make sure the netcage lies flat on the surface;
Start up the washer and aim the water jet onto the netcage, moving from point to point, normally from right to left and then moving downward (top to bottom) to pick off the encrustating organisms.
2.4 Net drying (Figure IV/11)
Drag the cleaned netcage to the drying area;
Fix the four bottom corners of the netcage to the rocks at the corners of the wooden structure on which the netcage is to be hung (see Figure IV/11).
Pull at the main ropes to raise netcage by the pulley systems at the four corners of the wooden structure. This opens the netcage into its box shape in an inside-down position;
The netcage will normally take 1–2 days to dry decencing on weather conditions;
2.5 Netcage inspection, mending and storage
2.5.1 Check the netcage systematically for tears and weak connections, eg. from right and left and thereafter from top to bottom;
2.5.2 Mark the spots requiring repair with twine and come back to them for mending later;
2.5.3 Menzing (Figure IV/12).
Simple sending (eg. re-joining torn netting matarial of a netcage)
Make a starting knot (Figures IV/13–16) with twine of the same specifications as the netting material to the mended.
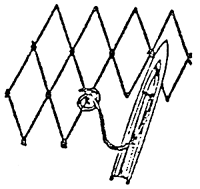
Working from the left to the right, make a right side knot (Figures IV/17–19), followed by a left side knot (Figures IV/20–22) to reconnect the meshes.
End with a finishing knot (Figures IV/23–26).
Patching (replacing damaged position of a netcage)
When damage to a net is extensive, and part of the netting is missing, putting a patch is easier than trying to mend the hole as described previously.
In the case of a square or rectangular hole, trim the hole (Figure IV/27) such that half a mesh smaller than the hole to allow the half mesh on either side to be joined.
Mend as previously, starting from the top right hand corner at 1 and 2 and work round the patch to finish at 1 and 2 at the bottom left hand corner.
Irregular sized holes can be trimmed and patched as above in positions, provided corners are right angled (Figure IV/28).
3 Exercises
3.1 Note how of rigging ropes to connect the netcage to the raft unit.
3.2 Compare the manual procedure of netcage setting with that involving the net hauler.
3.3 How may the net hauler be improved?
3.4 Note how the fish are transferred during netcage changing. In what way is this advantageous?
3.5 Note time required to clean a netcage in relation to its mesh size and dimensions.
3.6 Note the procedure of net mending eg. winding of twine onto the needle, knots used as well as mending time. Note also how a decision is taken to do simple or complex mending.
Practical IV/1
Questionnaire
Netcage maintenance and operation
Name :
Country :
Date :
| 1 | Are netcages used for fish culture in your country? | |
| [ ] Yes | [ ] No | |
| If “yes” from (1), please answer the following. | ||
| 2 | Is changing of netcages and their maintenance a major operational problem? | |
| [ ] Yes | [ ] No | |
| 3 | How often do you change your netcages? | |
| Once every | ||||||||
| Time | ||||||||
| 2 | 3 | 4 | 5 | 6 | 7 | 8 | ||
| Mesh size | weeks | weeks | weeks | weeks | weeks | weeks | weeks | Other |
| 1/2" | ||||||||
| 1" | ||||||||
| 2" | ||||||||
| 3" | ||||||||
1 Objectives
1.1 To coat a 2m × 2m × 2m netcage of mesh size 9.5 mm (3/8") with antifouling paint*1, a tributyl tin compound;
1.2 To observe antifouling effect in treated netcages at a fish farm.
2 Procedure
2.1 Treating a 2m × 2m × 2m netcage of mesh size 8.3 mm with antifouling paint.
Make sure the netcage is dry and free from tears.
Fold and tie the netcage into a loose bundle.
Put it in a square fiberglass tank (0.6m × 0.6m × 0.45m; 162-L capacity).
Pour the paint over the folded netcage in the tank and let stand for 1–2 minutes, taking the following precautions:
Table IV/3
Use of anti-fouling paint
The paint is packed in a 20-kg tin. It does not require the use of thinner. The following safety precautions must be observed when using it to treat the netcages:
Use it away from fire and refrain from smoking.
Do not inhale the vapour excessively, therefore use it in an open space.
Do not allow the paint to touch your skin, eyes etc.
Handle it with extrame care to avoid splashing and contact.
Hold on to the netcage in the tank and drain the peint at the tam bottom into a pail carefully.
Turn the retcage over so that the top portion now rests at the bottom. Pour the paint over the turned netcage and drain as before.
Repeat (c) to (f) several times that is, turning over the netcage and pouring and draining the paint until the entire netcage is coated.
Hang the coated netcage by its ropes under shade and away from direct sunlight for about 10–16 hours.
Immerse the netcage in water after drying.
The treated netcage is now ready for use.
2.2 Observations on the effectiveness of antifouling paint in preventing the adnesion of fouling organisms on netcages.
Check the two 2m × 2m × 2m (9.5 mm) 3/8" mesh-size) netcages immersed at the fish farm for 48 days (1.6 months).
One netcage has been treated with antifouling paint while the other is without treatment.
Scrape all fouling matter from both netcages from a quadrat of 50cm × 50cm (0.25m2) at the centre of the bottom panel and side panels*2. Weigh the fouling matter collected and record animal groups in Table IV/4.
2.3 Results
Record results in Table IV/4.
3 Exercises
3.1 Note the condition of treated and untreated netcages immersed for slightly more than one and a half months at the fish farms.
3.2 Based on the data collected, calculate the total weight of fouling matter found on each panel of the treated and untreated netcages. Compare the weights of corresponding panels. What was the effect of anti-fouling paint, given similarly positioned panels?
3.3 What is the total projected weight of fouling matter found on treated and untreated netcages? Note that the netcages were tied such that the top was 0.5 m above the water surface.
3.4 Based on results of (1)–(3), do you think antifouling paint is effective?
*2 Facing flood and ebb tides and the opposite direction.
| Netcages | Silt/ sediment (A) | Fouling Organisas | ||||||||||||||||||
| Total | ||||||||||||||||||||
| % | Molluscs | Barnacles | Tunicates | Sponges | Polychaetes | Bryozoan | Algae | Others | Total | fouling | ||||||||||
| Wt | of | wt of | matter | |||||||||||||||||
| (g) | sample | Wt | % of | Wt | % of | Wt | % of | Wt | % of | Wt | % of | Wt | % of | Wt | % of | Wt | % of | fouling | (A) + (B) | |
| (g) | sample | (g) | sample | (g) | sample | (g) | sample | (g) | sample | (g) | sample | (g) | sample | (g) | sample | organises | (g) | |||
| (B) (g) | ||||||||||||||||||||
| 1 With antifouling paint treatment | ||||||||||||||||||||
| 1.1 Side panels | ||||||||||||||||||||
| a Facing flood tide | ||||||||||||||||||||
| b Facing ebb tide | ||||||||||||||||||||
| c Opposite panel | ||||||||||||||||||||
| 2 Without anti-fouling paint treatment | ||||||||||||||||||||
| 2.1 Side panels | ||||||||||||||||||||
| a Facing flood tide | ||||||||||||||||||||
| b Facing ebb tide | ||||||||||||||||||||
| c Opposite panel | ||||||||||||||||||||
| 2.2 Bottom panel | ||||||||||||||||||||
| * 2m × 2m × 2m, 9.5 mm/3/8* mesh-size/ | ||||||||||||||||||||
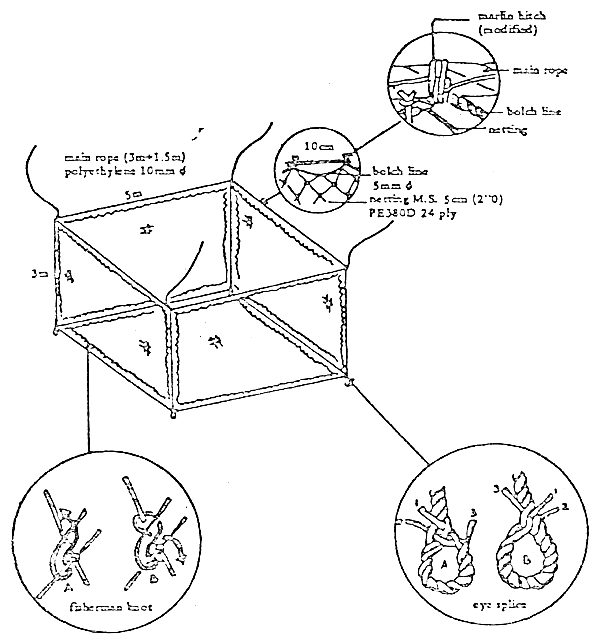
Figure IV/1.
A 5m × 5m × 3m netcage with details
(Taken from pg 6 of Manual on Floating Netcage Fish Farming
in Singapore's Coastal Waters, Feb 1986).
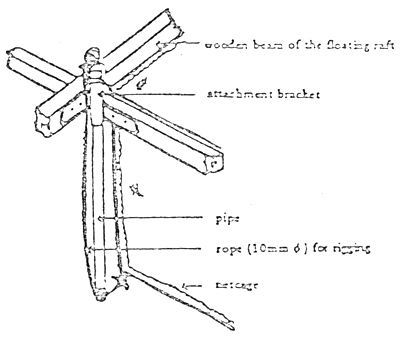
Figure IV/2.
Details of attachment between floating raft and netcage.
Note the rigging of netcage through a metal pipe.
(Taken from pg 10 of Manual on Floating Netcage Fish Ferring
in Singapore's Coestal Waters, Feb 1986).
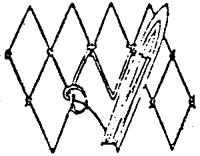
Figure IV/3.
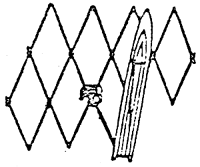
Setting up a clean netcage at a raft frame.

Figure IV/4.
Checking of the netcage for tears and weak connections.
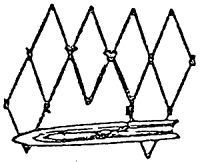
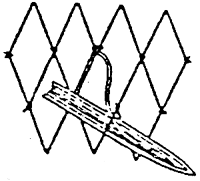
Figure IV/5.
Dragging the netcage by two main ropes at the farther
corners towards the work platform.
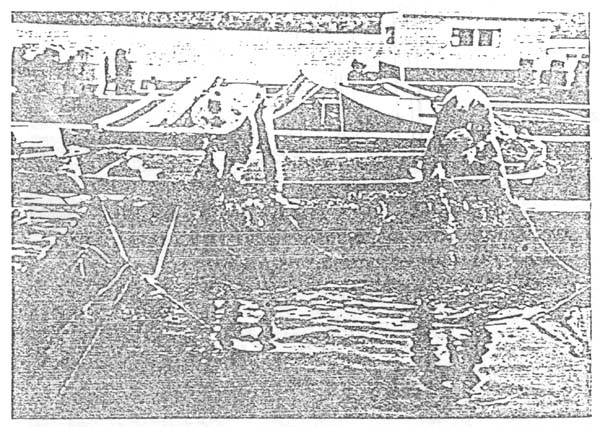
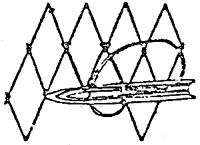
Figure IV/6.
Transfer of fish from the old netcage (back) to the
clean netcage (fore ground).
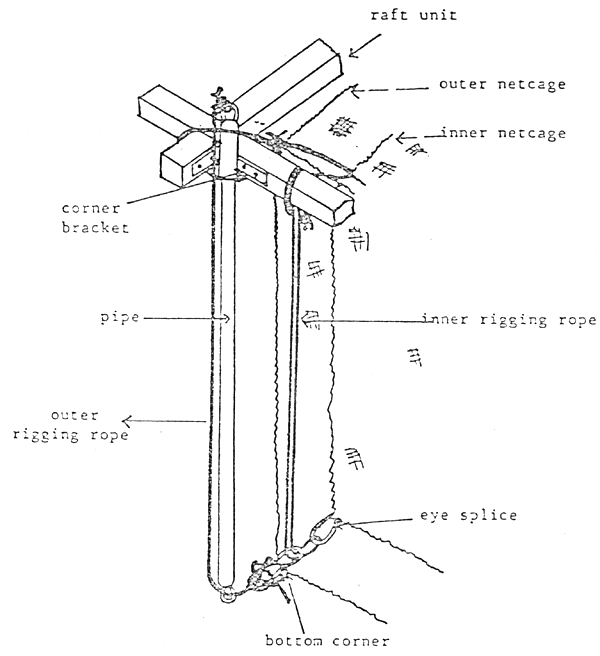
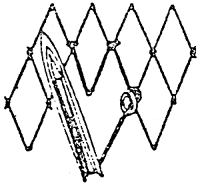
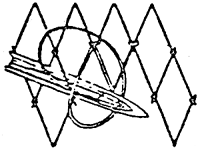
Figure IV/7.
Details of rigging ropes in a double netcages setting
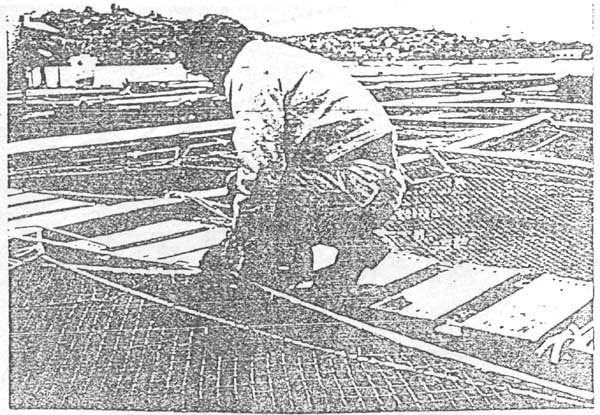
Figure IV/8A.
Lacing of cover net to the top of a netcage.
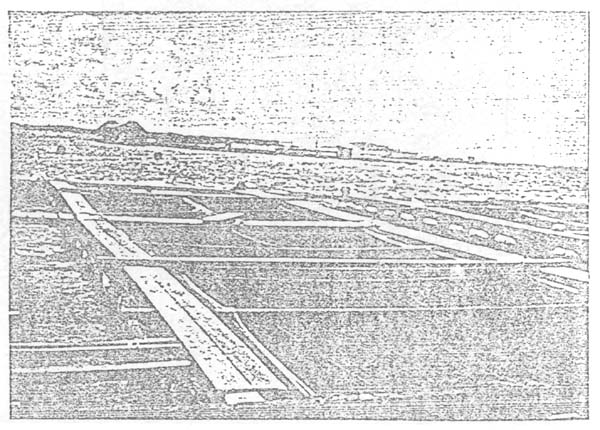
Figure IV/8B.
Cover nets for netcages.
Figure IV/9.
Netcage encrustated with fouling organisms
after 1.5 months in the sea.

Figure IV/10.
Netcage cleaning by using high pressure water jet
from a washer.
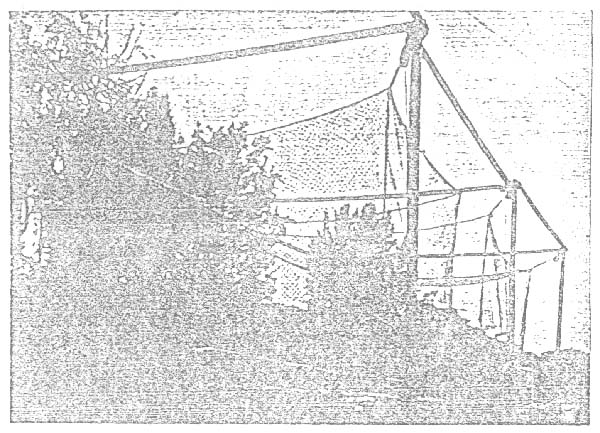
Figure IV/11.
Drying of netcages: the netcages are hung upside-down.

Figure IV/12.
Mending a netcage before re-using.
| Net Mending* | |
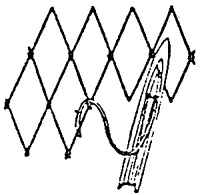 | The starting knot Figure IV/13. Pass the needle up through the mesh until a short tail of twine remains below the knot. |
 | Figure IV/14. Using the fingers, twist the tail of the twine around the two bars of the mesh above the twine leading to the needle. |
 | Figure IV/15. Throwing the loop of twine to the left, form a sheet bend. |
 | Figure IV/16. Pull tight. |
| The right hand knot | |
 | Figure IV/17. Lay the twine to the right of the knot of the side mesh, with the index finger behind the knot. Measure the length of the bar of the mesh being formed, by lining the two knots above the one being made. Clamp the twine with the index finger and thumb just below the knot in the side mesh. |
 | Figure IV/18. Throwing the loop in the twine to the left, cro an overhand knot around the knot in the side mesh. |
 | Figure IV/19. Pull tight by moving the needle to the left. |
| The left hand knot | |
 | Figure IV/20. Lay the twine to the left of the knot in the side mesh with the index finger behind the knot. Measure the length of the bar in the same manner as for the right hand knot, and clamp the twine in the same way. |
 | Figure IV/21. Throwing the loop of twine to the right, form an overhand knot around the knot in the side mesh. |
 | Figure IV/22. Pull tight by moving the needle to the right. |
| The finishing knot | |
 | Figure IV/23. To finger and a hand, a steet beno is formed. |
 | Figure IV/24. Sheet bend. |
 | Figure IV/25. A half catch is then tied around the bar opposite the lest bar formed. |
 | Figure IV/26. Full tight. |
Appendix 2
| Patching* | |
 | Figure IV/27 Fitting a square/ rectangular watch to a square/rectangular hole To put in a square or rectangular patch, cut out a hole as shown the patch is cut one mesh smaller in depth and width than the hole, to allow for the half mesh formed on each side to be joined. Starting from the top right hand corner at 1 and 2, work round the patch to finish at 1 and on the bottom left hand corner. |
 | Figure IV/28 Fitting a patch to an irregular sized hole When putting in a patch, it is not essential to cut out a square or rectangular hole all the time. Instead, cut out part of the hole and then use part of a patch to fit it. Join them. Cut out a further section of the hole and sew on the patch as before. Continue until patching is complete. The completed patch can be of any shape so long as each corner turned during cutting out the damaged portion is a right angle. |
D47 naca-4
![]()
![]()
![]()